How to Photograph Underwater Like a Pro: Exposure Settings, Composition Tips and More
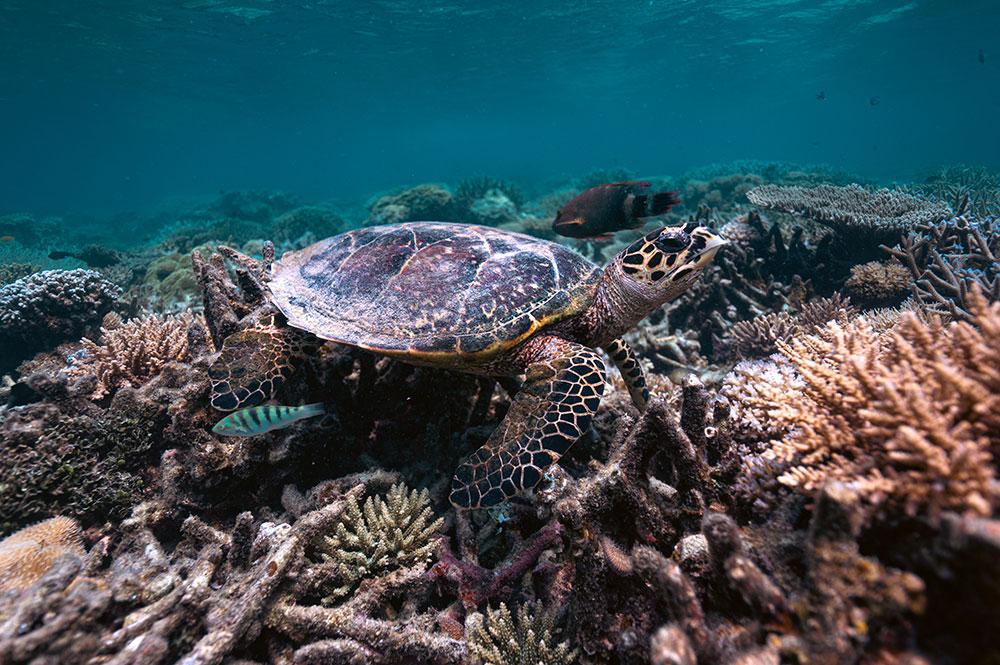
Nosy Be, Madagascar. Hawksbill turtle gliding over a shallow coral reef in the morning. They camouflage so well, I wanted to capture the different textures and life in the surrounds where the turtle was—a super healthy coral bed in a locally managed marine protected area. Z 6II, NIKKOR Z 14-24mm f/2.8 S at 18mm focal length, 1/250 sec., f/2.8, ISO 200.
I’ve always loved capturing moments—long before I ever took a camera underwater, my focus was already deeply in nature. So, when I started diving, the world beneath the surface felt overwhelming in the best possible way—the colors, the contrast, the stillness, the scale!
I didn’t want to rush to document it, the journey was first to be still—simply being present, getting comfortable in the gear, learning how it felt to move underwater, how light shifted, how marine life responded to a human presence. When I eventually took a camera underwater, it was a simple action camera—a great way to share this incredible world with my friends and family while documenting myself in a world I never thought would be mine. Over time, that evolved into a DSLR—I wanted more from my captures as my curiosity grew—I wanted more detail, more control, more quality in both video and stills. I’ve since made the move to the Z series mirrorless cameras.
What I wanted to capture ranged from the very small to the very large: the silence of a freedive as an octopus moves between boulders, and the power of encounters with whales or sharks. Always with the same intention—to capture a moment that creates connection.
That’s where underwater photography begins. Before we talk about settings, lenses, or techniques, it’s important to understand how photographing underwater differs fundamentally from photographing on land.
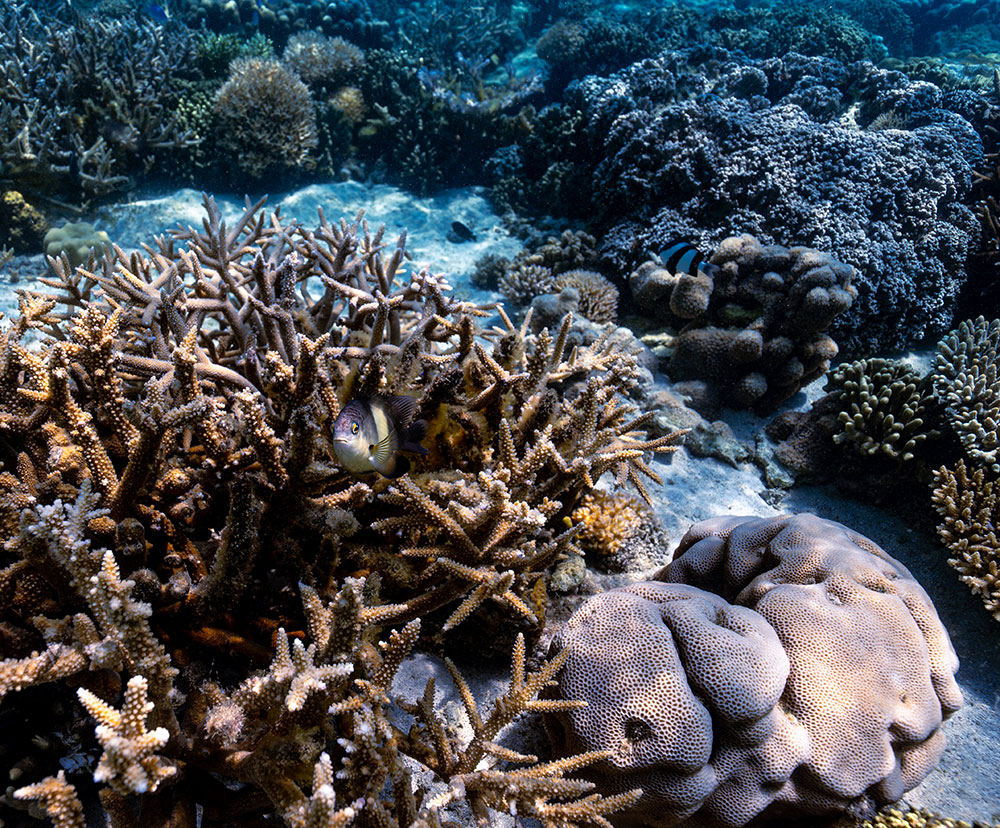
Nosy Be, Madagascar. As I came up over this staghorn coral, this Dusky gregory came to defend its territory—small but bravely holding fort! Z 6II, NIKKOR Z 14-24mm f/2.8 S at 18mm focal length, 1/250 sec., f/5.6, ISO 200.
Why Underwater Photography Requires a Different Approach
Underwater, light behaves differently. Color is absorbed quickly, contrast drops, and movement is often faster than it appears. At the same time, you are not stationary—you’re part of every encounter.
This changes everything.
Dolphins don’t do retakes. Sea lions don’t pause. Pelagic* encounters unfold on their own terms. Coral reef environments, on the other hand, offer a slower introduction where you can pause and observe before taking the photo—this is everything in the beginning!
The Most Important Rule: Comfort and Confidence Come First
Before anything else, comfort in the water is essential, how relaxed and confident you are directly affects your ability to create photographs.
The camera should never come before safety in the water, and carrying a camera does not remove your responsibility to be a good diver—this is a key part of caring for the environment that we are visitors in, not stepping on coral beds to get the picture etc.
Good buoyancy is power, even when you’re snorkeling and you dive down for a little to get the picture, your buoyancy allows you to rest at the depth you’re at and get ready for the picture.
Remember, when you’re comfortable, you can pause. When you pause, you can observe. And that’s when strong images begin to form.
Cabo Pulmo, Mexico. This burst of color while in beautiful blue water had me in awe! I wanted to capture the expanse, the colors, this huge ocean through my lens! Z 8, NIKKOR Z 14-24mm f/2.8 S at 14mm focal length, 1/400 sec., f/7.1, ISO 640.
The Three Core Decisions in Underwater Photography
Every underwater photograph is shaped by 3 fundamental decisions:
- Subject and Focus: Underwater environments are complex. The sun isn’t always where you need it to be, sometimes there another human in your shot and other times its nature—like surface or underwater currents you have to contend with. Stronger images usually focus on a single subject or interaction rather than trying to include everything at once. Granted we don’t make the rules when in the water, so capture what is in front of you!
- Distance and Proximity: Water reduces sharpness and color. Getting closer (slowly and respectfully) improves clarity. With larger wildlife this can be challenging, but with the right settings and positioning, it’s possible to capture strong still images.
- Light and Position: Light disappears quickly underwater. Your position relative to natural light often has more influence on image quality than your camera settings.
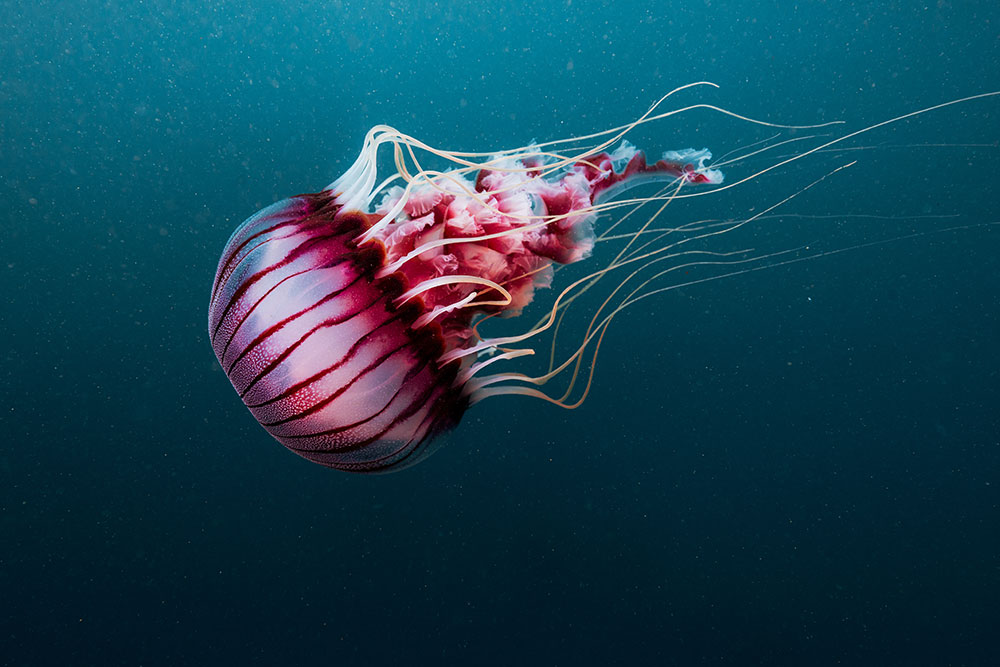
Cape Town, South Africa. These compass jellies were in bloom, but this one was alone and pulsing through the water, it seemed to attract light as it drifted, its patterns and colors so beautiful against the blue backdrop. Z 8, NIKKOR Z 14-24mm f/2.8 S at 24mm focal length, 1/400 sec., f/7.1, ISO 1000.
What’s Your Focus?
Underwater photography generally alternates between two approaches:
Macro photography, which focuses on small subjects and fine details
Environmental or wide-angle photography, which places subjects within their broader surroundings
Personally, I lean toward wide-angle captures—I love photographing larger wildlife and expansive scenes. Once you identify your focus, it immediately informs your lens choice and underwater housing setup.
Macro draws attention to details that are easily overlooked while wide frames provide context and scale. The strongest visual narratives often combine both, showing how small elements exist within much larger ecosystems.
Movement Underwater and Ethics
Body control is a critical component of underwater photography. Stable buoyancy allows you to compose calmly and accurately while minimizing your impact on the fragile marine environment.
Ethical practice is non-negotiable!
- Avoid touching or manipulating marine life.
- Do not chase or stress animals.
- Stay aware of fins, your camera housing, and surroundings.
No image is worth environmental damage or harming wildlife.
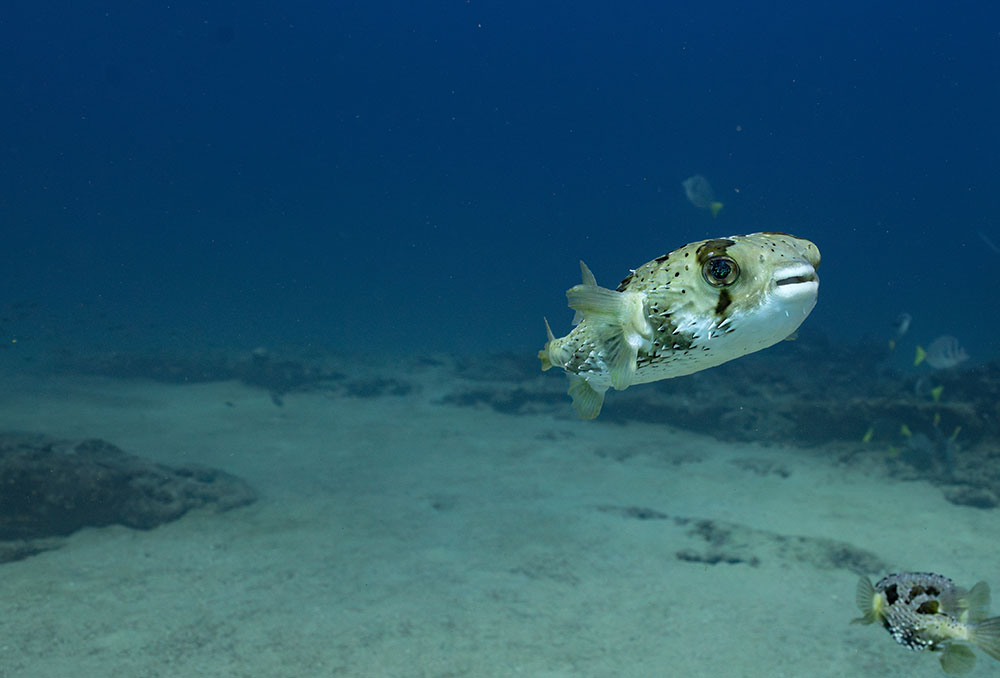
Cabo Pulmo, Mexico. This porcupine fish mid-water was in the perfect light for me to capture the green ‘freckles’ on its eye, an iridescent reflective pigment shielding the eye from intense sunlight. Z 8, NIKKOR Z 14-24mm f/2.8 S at 24mm focal length, 1/400 sec., f/8, ISO 640.
My 5 Practical Tips for Underwater Photography
1. Storytelling Beneath the Surface
Every image tells a story. The question is: what story are you telling?
Is it abundance—a reef full of life? Fragility—a species under pressure? Or simply beauty—a moment you want to share?
In the beginning, observation comes first but with time, you learn to anticipate behavior and compose with intention. Coral reefs allow for this slower process, while pelagic encounters require more readiness—settings dialed in and accepting that light and movement won’t always cooperate.
And sometimes, there’s luck: a pause, a glance, a moment that allows everything to align.
2. Understanding Light and Color
As you descend, color disappears—red first, followed by orange and yellow. At depth, the world becomes blue and green.
To manage this, you can:
- Use a red filter. Similar to other lens filters, this are placed on the front of your lens, reducing the strong blue/greencolor of underwater scenes. It allows the reds, oranges, and yellows to appear more naturally, improving color balance in both photos and videos. These are best used between 26ft - 65ft. The effect can however be limiting in shallower depths and have minimal benefit beyond 90ft.
- Set white balance manually or with a white card. This can be attached to your underwater housing and used in one of two ways. Go to your WB settings and selecting manual white balance where you’ll then place the white card in front of your lens and your camera will correct the white balance accordingly. It is important to note that the deeper you go, every 30ft of depth, you’ll need to readjust your white balance. The second option is to take a physical picture of the white card every 30ft and in post production, use this photo as the White Balance setting for the start of your edit.
- Shoot in RAW to allow flexibility in post-production. [Editor’s note: if your normal photographic workflow is to shoot RAW then do so. If you’ve only ever shot JPG, don’t switch now unless you first learn how to shoot and process your RAW image files.]
Sunlight is your best light source in shallow water, even if you’re using artificial lighting—natural light drops significantly below 40ft, so plan your compositions accordingly.
My base settings for shallow dives:
- ISO: 640 (up to 1000–2000 for very early mornings, I keep this setting till about 8am when the sun is higher up in the sky)
- Aperture: f/7.1
- Shutter speed: 1/640 (1/1000+ for fast pelagic encounters)
- White balance: Auto or natural light set according to the day’s conditions (cloudy, sunny etc.)
3. Aperture and Depth of Field
Aperture affects both exposure and subject separation.
In clear water, f/7.1 offers good depth while keeping the subject sharp. In water with sediment or plankton, increasing to f/8 or f/9 helps reduce backscatter and maintain focus.
My current underwater camera setup is a Nikon Z 8 paired with a NIKKOR Z 14-24mm f/2.8 S lens, which allows more light at depth. As I go deeper, I rely more on the camera’s low-light performance while increasing shutter speed to maintain clarity.
4. Shutter Speed and Motion
Shutter speed controls how movement is captured:
- Static subjects (coral, resting animals): A minimum of 1/320 works great, this setting in good light allows you to capture your subject without blur while also compensating for your movement in the water.
- Fast-moving subjects (sharks, dolphins): 1/1000 or faster—this is great for most wildlife, like turtles swimming or a pod of dolphins in ‘calm’ play, although light is always a huge factor.
- Complex scenes with layered movement: 1/2000—this can be higher if your conditions allow—for charging sharks, breaching whales or super sporadic movement. Here, yogur memory card determines how much you can capture. Using a continuous release setting that allows you to capture the rolling action and of course capturing NEFs (RAW) quality that assists in the post edit of sporadic environments—this means, lots of memory is used up, so ensure you have sufficient memory for what you want to capture. You can’t change your media card underwater, so you’ll want as large a card as you can get.
5. White Balance and Camera Assistance
A small white card is invaluable for setting accurate white balance underwater.
An important reminder is this—you don’t have to shoot fully manual in the beginning, allow your camera to assist you with the aperture and shutter priority settings until you have a better understanding of the conditions you regularly snorkel in. When using Auto ISO, you can set a limit to how high you want the ISO to go—for example, in my ISO sensitivity settings, I’ll allow the camera to go up a maximum sensitivity of 5000 on the Z 8, allowing my camera to help where needed to a point.
It’s important to say we can shoot at higher ISO’s as needed, our cameras can handle it but also, any challenges with noise can largely be fixed in the edit.
The Edit: Where Story Meets Emotion
Editing is where your story takes shape. As a friend once said to me: “Your edit is your flavor of storytelling.” Editing is emotional. I don’t think there’s a single correct approach—your edit is your signature, but always remember when color doesn’t work, Black-and-white is a stellar choice too!
When editing underwater footage there are a few things that you need to do:
- Correct the white balance to restore color accuracy in your images.
- Check that your reds, oranges, and yellows match up to your dive.
- Implement Dehaze to bring back structure into the scene.Use masking to manage highlights.
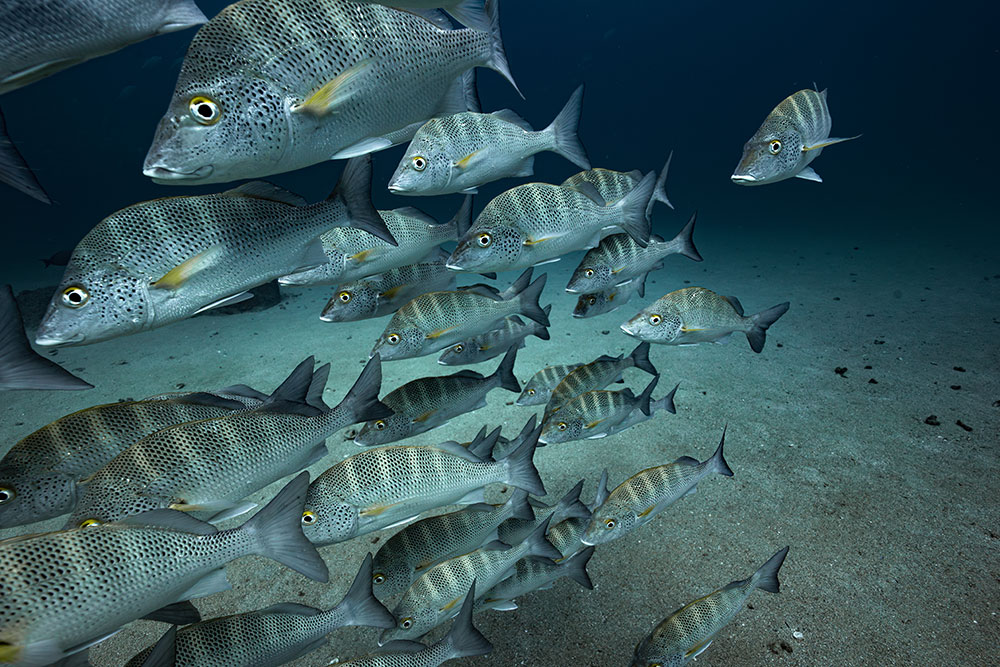
A school of Graybar grunts midwater, seemingly moving as one brain. Z 8, NIKKOR Z 14-24mm f/2.8 S at 17mm focal length, 1/400 sec., f/9, ISO 640.
Your Pre-Dive Checklist
Before every dive:
- Memory cards. Make sure previously shot images are backed up and the cards are formatted for use on the upcoming dive.
- Batteries. Fully charge your batteries! You don’t want to be in the water without power, making the camera useless on the dive.
- Lens cap. Remove it! Once you’re under water there’s no taking it off if you forgot to do it on land.
- Dome port. Clean it.
- O-rings. Make sure they are clean and lubricated.
- Camera housing. Make sure it is sealed and vacuum-checked.
- Underwater housing controls. Set to your shooting style.
- Camera settings. Pre-set camera settings before entry into the water so you’re ready to shoot right away.
- Camera housing. Your camera in it’s housing should be passed to you once you’re in the water whenever possible to minimize impact.
- SCUBA safety check complete. Make sure your air, mask, weights and group awareness is good. Your safety under water is more important than your image making.
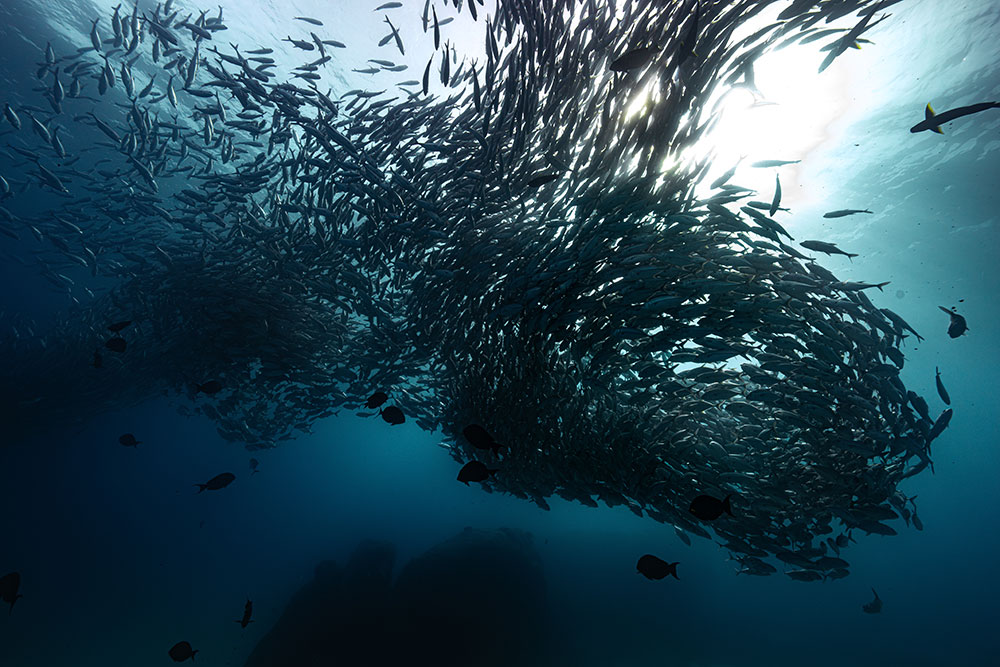
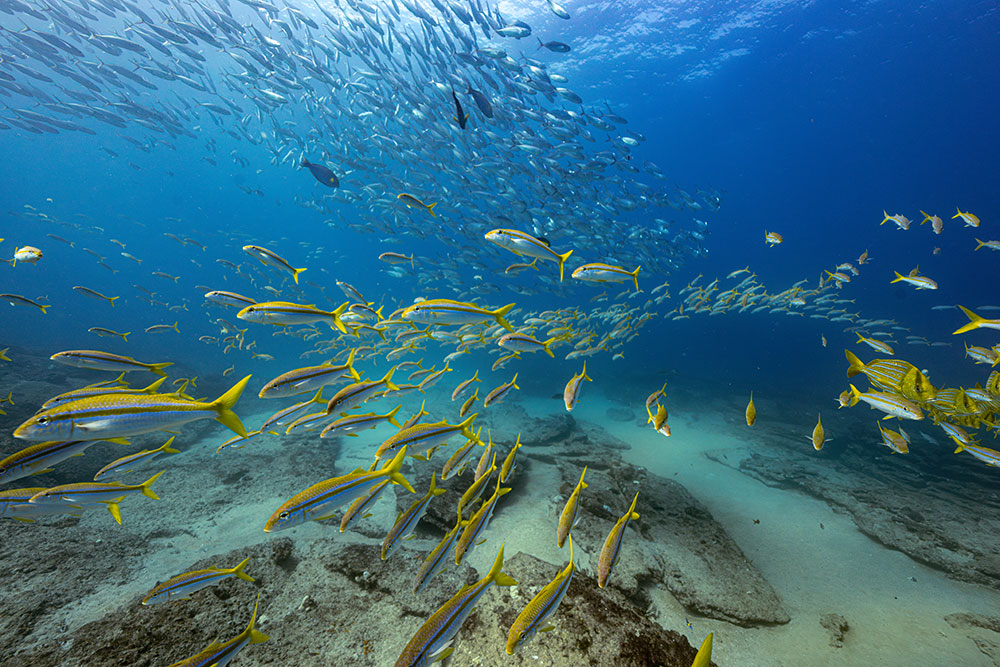
Cabo Pulmo, Mexico. This unfathomably huge school of Jacks kept making shapes just above us, the sun danced in the middle of the circle formed while the rest of the school was backlit, I love a wide angle to capture the immensity of the moment. Z 8, NIKKOR Z 14-24mm f/2.8 S at 14mm focal length, 1/400 sec., f/9, ISO 640.
Final Thoughts
Underwater photography is a balance of patience and presence. Equipment matters but it’s secondary. Meaningful images come from the camera you have, natural light, and time spent learning both the environment and your tools.
And last—Breathe. Stay present. And enjoy the process, happy exploring.
*Pelagic encounters refers to chance or intentional meetings with large marine animals that inhabit the pelagic zone (like sharks, dolphins, whales), which is the open water of an ocean (or lake) away from the shore and the bottom.

Zandile (Zandi) Ndhlovu is a photographer and an experienced SCUBA diver and free diver, and in 2020 she established the Black Mermaid Foundation, a nonprofit dedicated to transforming ocean conservation by fostering diversity, access and education.
Go to the Black Mermaid Foundation website to learn more.
See more of Zandi’s work on her Instagram and Linktr.ee
More articles by this contributor


