Digitizing Film Using the D850 and ES-2 Negative Digitizer
Digitizing film is the process of creating digital data from the image information found in photographic film. In the past, a film scanner was commonly used to scan in negatives and slides, however with the introduction of high-resolution digital cameras like the D850 DSLR, you can now produce a digitized copy of your 35mm negatives or slides using the D850 and the ES-2 Negative Digitizer.
The demand for digitizing film comes not only from hobbyists and photographers with large image collections that were captured on film, but also from young photographers enjoying the recent boom in taking photos using film cameras and having the results digitized at a photo lab.
The Negative Digitizer
While technically photographing film with a digital camera is all that needs to be done to digitize film, the image processing needed to create correctly-colored positives has proven difficult, particularly in the case of negative film, which has an orange base. The D850’s negative digitizer feature uses in-camera processing to generate correctly-colored positives by reversing the colors in the photos of film negatives.
Note that pictures taken using the negative digitizer will be recorded in JPEG Fine★ format regardless of the option selected for Image quality.
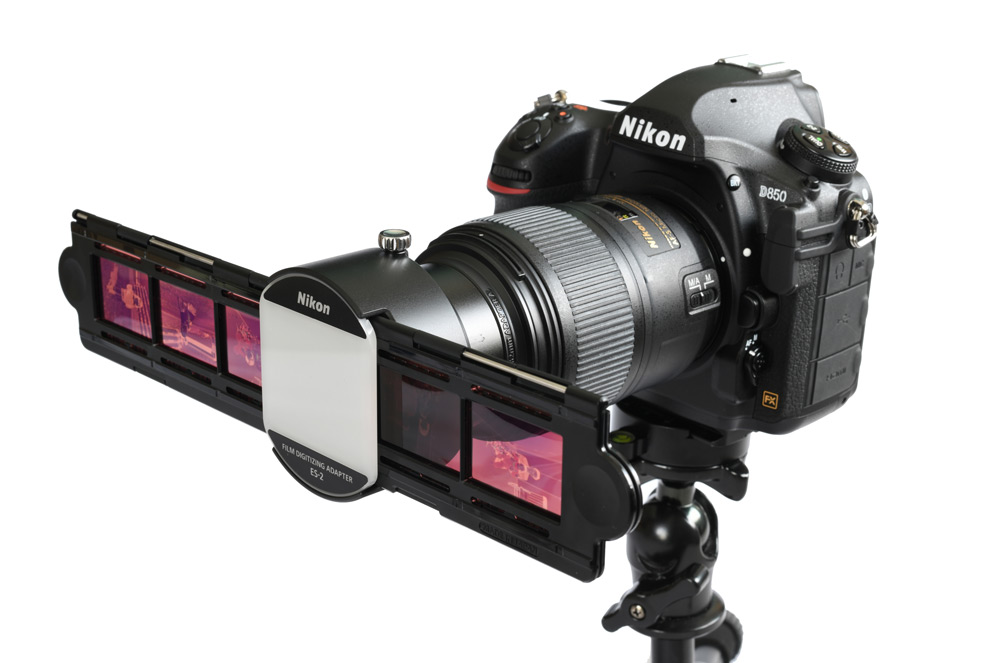
In addition to the D850, you’ll need a 60mm Micro NIKKOR lens or 40mm Micro NIKKOR lens for full-frame shots of 35mm film and an ES‑2 film digitizing adapter to hold the film in place in front of the lens.
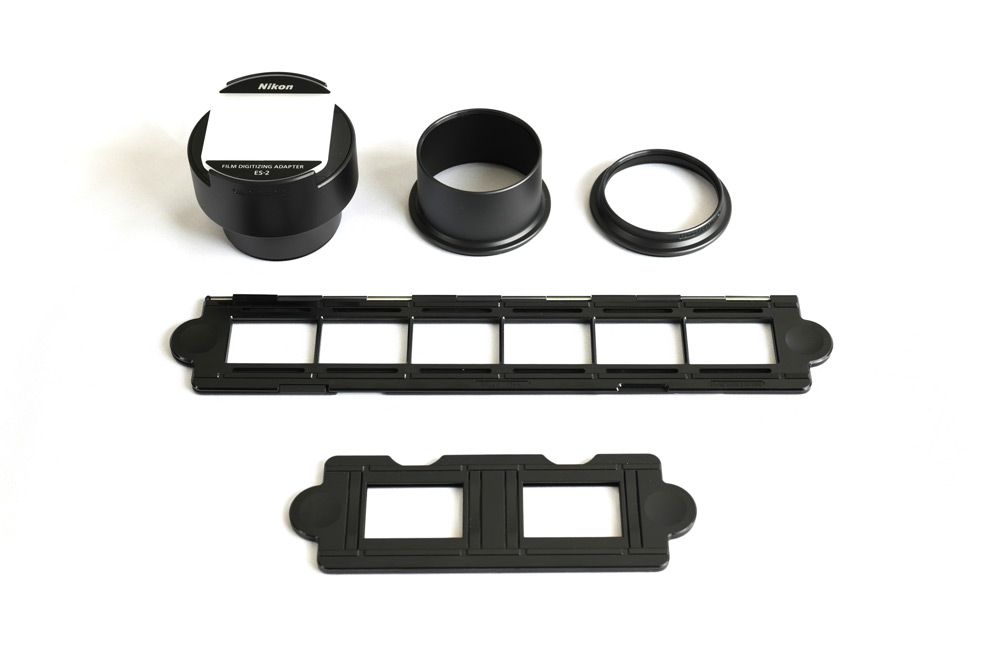
The ES‑2 can be used with both strip film and mounted slides.
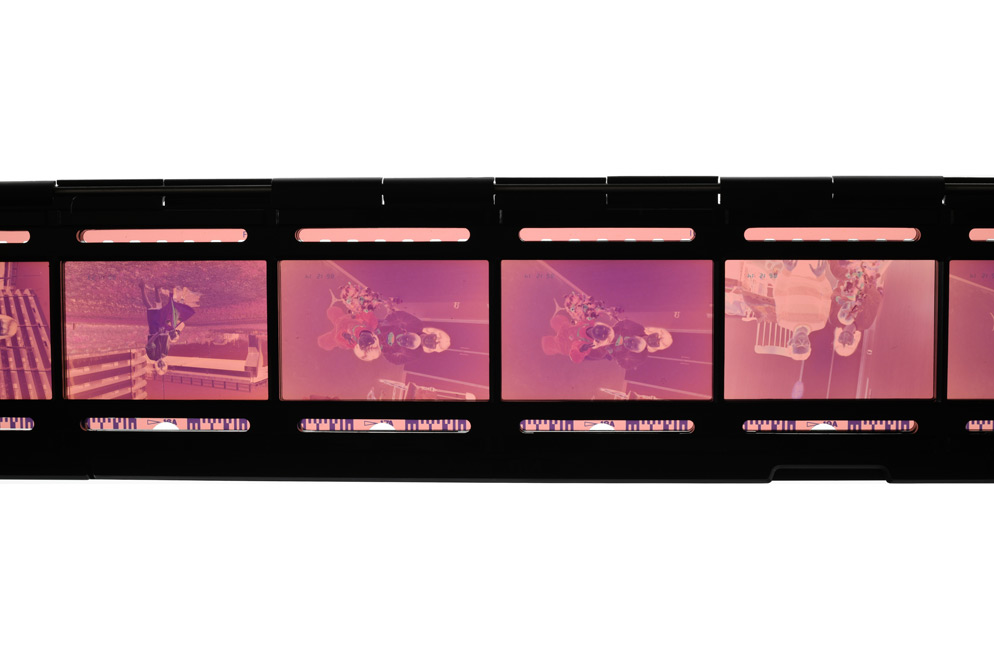
Digitizing negatives: A color negative loaded in an FH‑4 strip film holder.
Digitizing slides: A slide loaded in an FH‑5 slide mount holder.
Choosing a Light Source
A light source is required when digitizing film.
While you can use the light entering a window in daylight, to digitize large amounts of film or to digitize film at night, it’s probably best to have a small lightbox lit by a lamp with a high color-rendering index. Regular lighting from lamps or lightbulbs in your home may work as well. For black-and-white film, brightness is all that matters, so any type of lighting will work as long it’s bright enough.
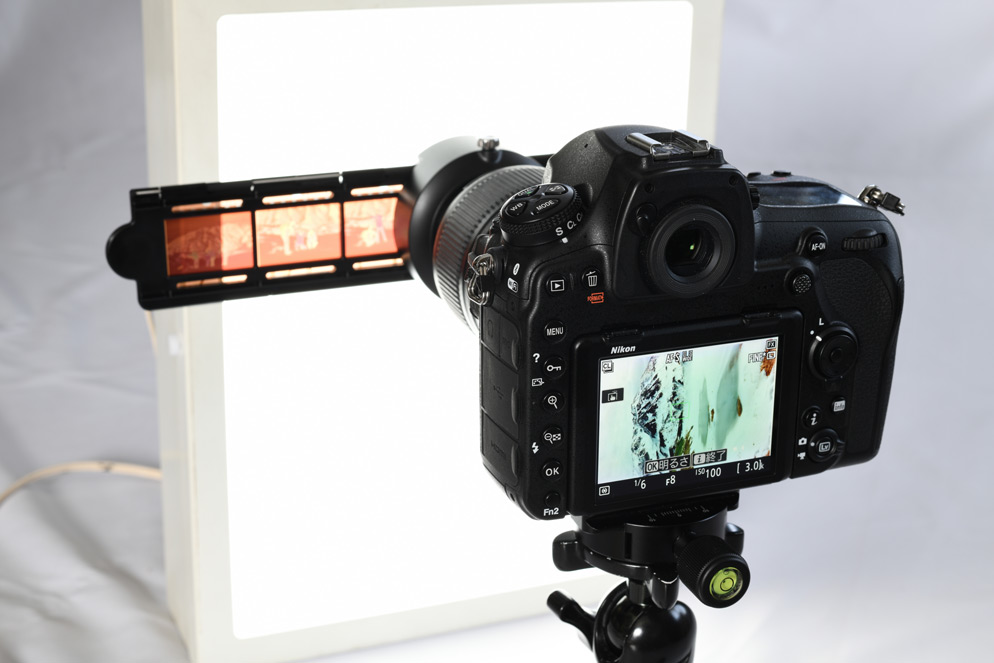
Digitizing negatives: A lightbox is used as the light source.
Basic Techniques: Digitizing 35mm Negatives
While the ability to create positives from negative film is one of the more notable features of the D850’s negative digitizer, not only can it record negatives in positive form, but it also reverses the colors in negative film during live view.
Inserting Film
Unmounted strip film in sections of six frames or less can be inserted into the FH‑4 strip film holder.
After removing dust and lint from the film with a blower, insert the holder into the ES‑2 holder insertion slot.
FH‑4 strip film holder.
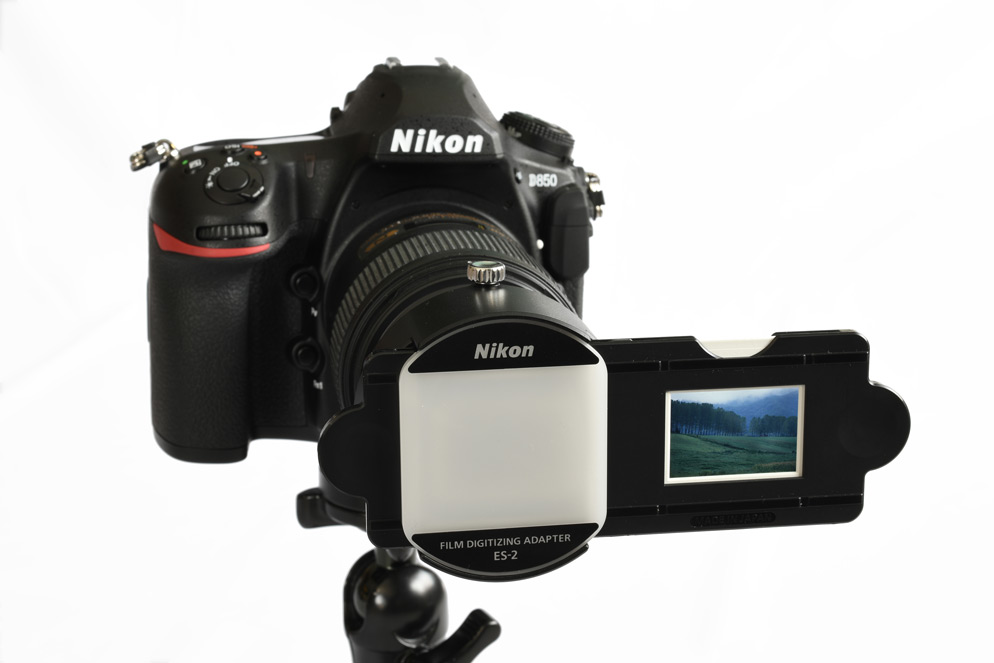
Starting the Negative Digitizer
-
Aim the ES‑2’s diffuser screen at the light source and
-
select live view still photography and start live view, then
-
press the i button and select Negative digitizer, and finally
-
select Color negatives or Monochrome negatives according to the type of film. The Monochrome negatives option can be used even with color film.
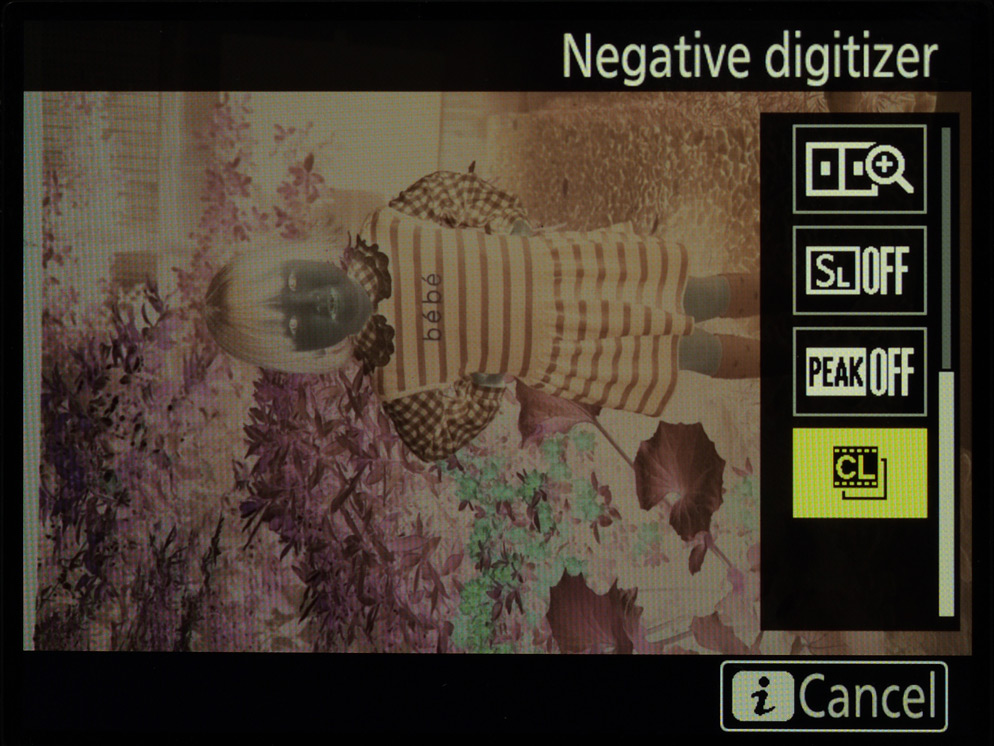
The Negative digitizer menu.
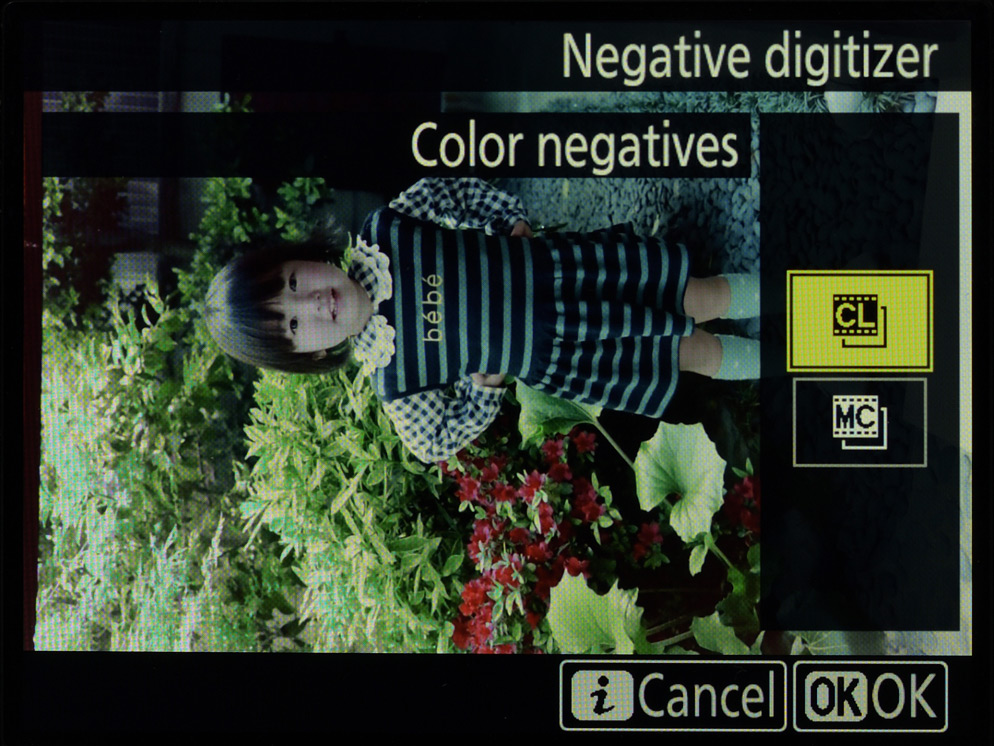
Select Color negatives
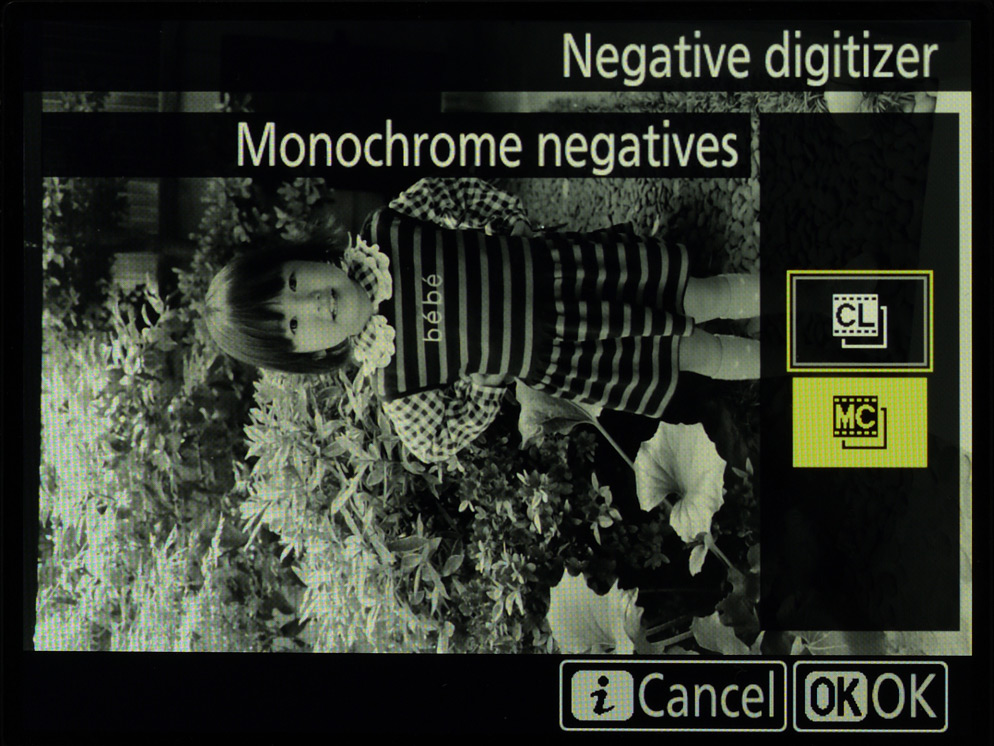
Select Monochrome negatives.
Taking Photographs
Framing
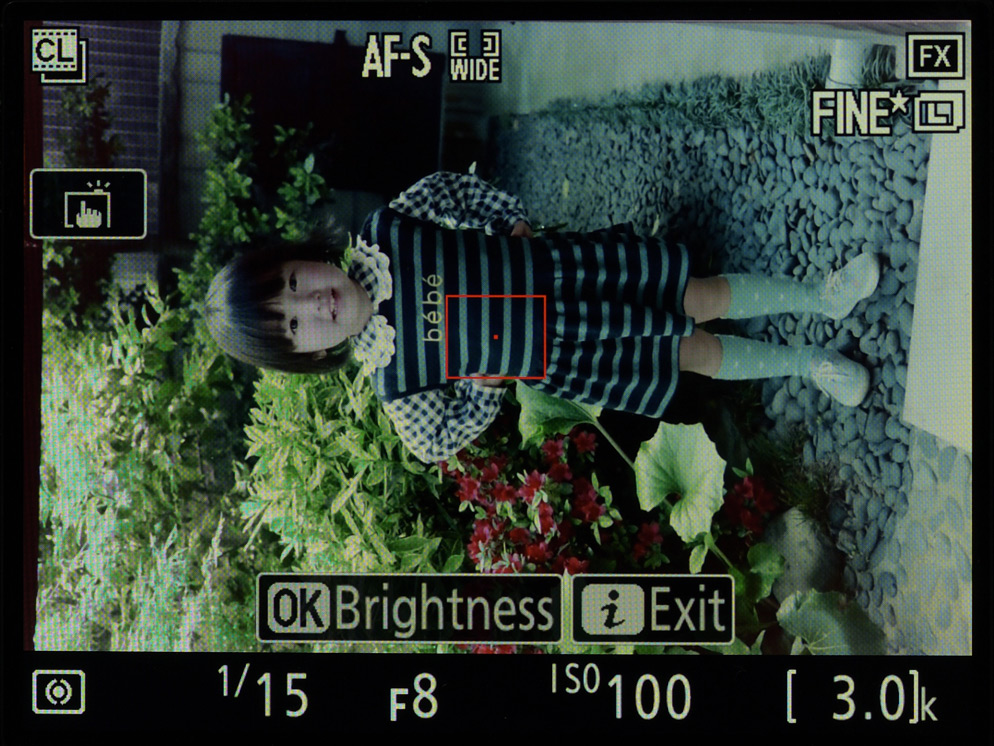
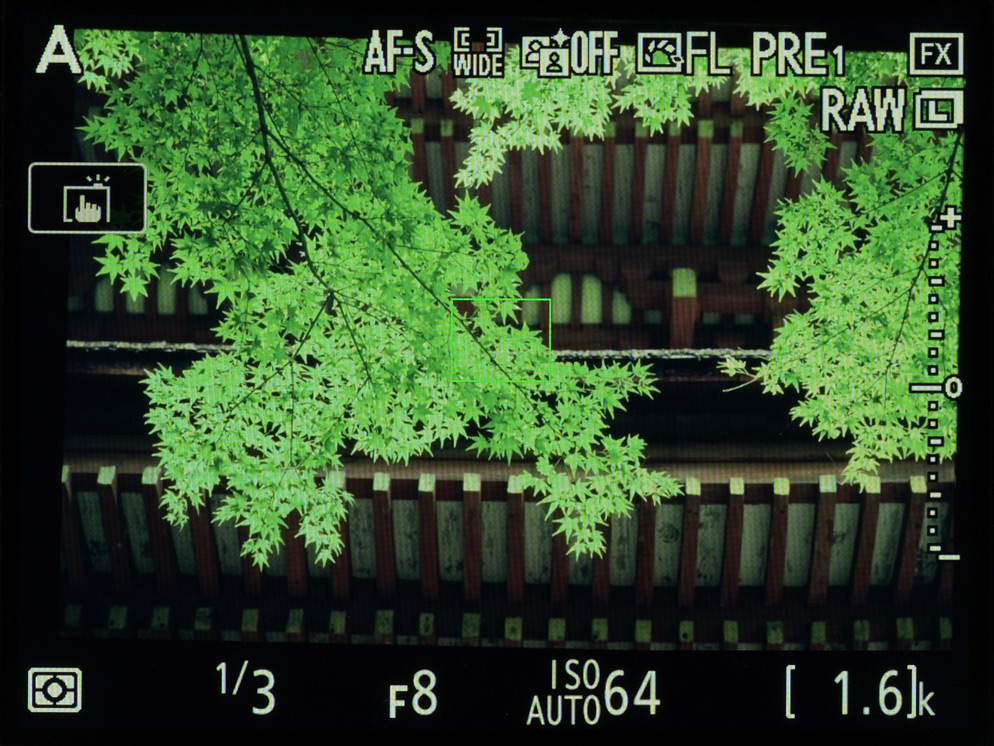
First, frame the area you want to digitize so that it fills the LCD screen. This way you won’t have to crop the image later.
Adjusting Brightness
Next, check the brightness of the positive image on the LCD and adjust brightness as necessary. The camera adjusts brightness automatically, but you can make the image brighter or darker by pressing OK and using the multi selector or touch controls to adjust brightness in the Brightness adjustment display. Exposure can be adjusted by ±5 EV.
Adjusting brightness: Press OK to adjust brightness.
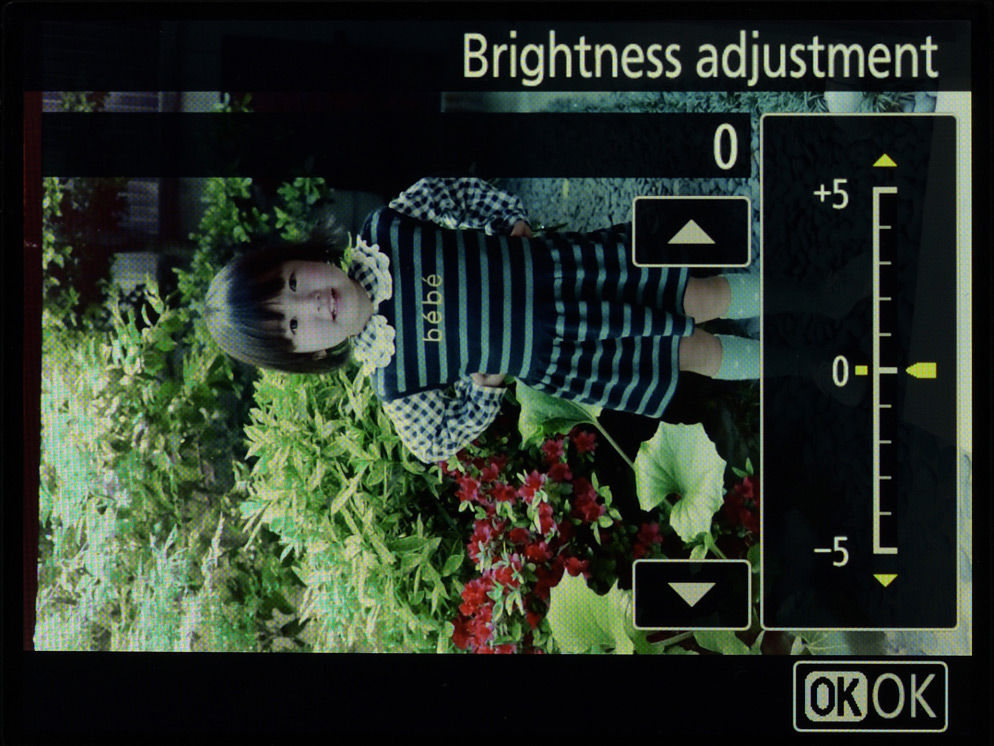
Adjusting brightness: Choose a value between +5 and −5 and press OK.
Focus
Now all that’s left to do is focus and take the photograph.
Autofocus works well in most cases. Although in some cases the camera may fail to focus if the portion of the subject (film) in the focus point is low in contrast, this can usually be solved by choosing wide-area AF as the AF-area mode, moving the focus point to a high-contrast area of the subject, or focusing manually.
Note: Shutter speeds may slow depending on the light source and the density of the film, but given that the film is held in place in the film digitizing adapter, subject blur will not be a problem. Slow shutter speeds may result in visible “noise” in the live view display, but the final photograph, having been properly exposed at a slow shutter speed, will be comparatively free of noise.
Basic Techniques (35mm Slide Film)
Photographing slide film is basically run-of-the-mill macro photography, differing only in that the subject is a frame of film, so you need only take the same care that you would in accurately photographing any other small object. The biggest difference between slide film and most other subjects is that the colors and tones have already been adjusted to create a finished work.
Inserting Slides
Mounted slides can be inserted into the FH‑5 slide mount holder. Unmounted slide film can be inserted into the FH‑4.
After removing dust and lint from the film with a blower, insert the holder into the ES‑2 holder insertion slot.
Adjusting Camera Settings
Given that your subject is a finished photograph, it is important that settings be adjusted so that its colors and tones can accurately be converted to digital. Colors and tones can be regulated using Picture Controls, and exposure modified appropriately by adjustments to metering mode and exposure compensation. Effective use can also be made of white balance in compensating for the light source. Choosing NEF (RAW) format lets you use NEF (RAW) processing for precise adjustments to white balance and Picture Controls after shooting. Exposure must however be tuned before shooting, regardless of the option selected for image quality. The description that follows provides settings for recording JPEG or TIFF pictures for immediate use.
Recommended settings:
White balance: Keep white (reduce warm colors)
Picture Control: Flat
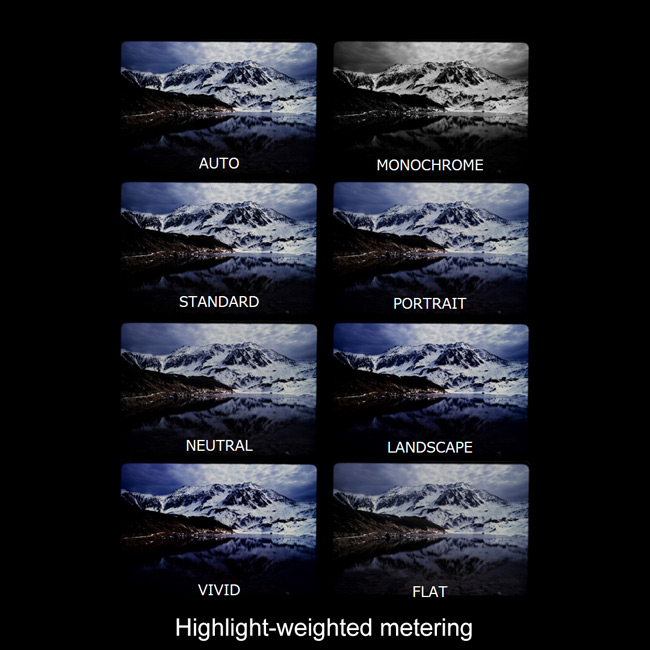
Metering: Matrix metering or Highlight-weighted metering
White Balance
Turning first to white balance, choose Keep white (reduce warm colors) for slides featuring subjects that vary widely in color and brightness. Keep white (reduce warm colors) may not however have the desired results if the slide is dominated by a single color (as when the subject is a blue sky or a green field); better results can often be achieved by selecting Preset manual and measuring white balance without the slide inserted. Try Keep white (reduce warm colors) first, switching to Preset manual if you aren’t satisfied with the result.
Picture Controls
When photographing slide film, experiment first with the Flat Picture Control. Slide film is processed to emphasize contrast and saturation, and it is therefore desirable to keep any further in-camera image enhancement to a minimum. Although there will of course be situations in which Standard or Vivid would better match your artistic intent, it seems more efficient to first view the image with Flat selected and then adjust Picture Control parameters or choose Standard or Vivid only if you feel that contrast and saturation require heightening.

FH‑5 slide mount holder.
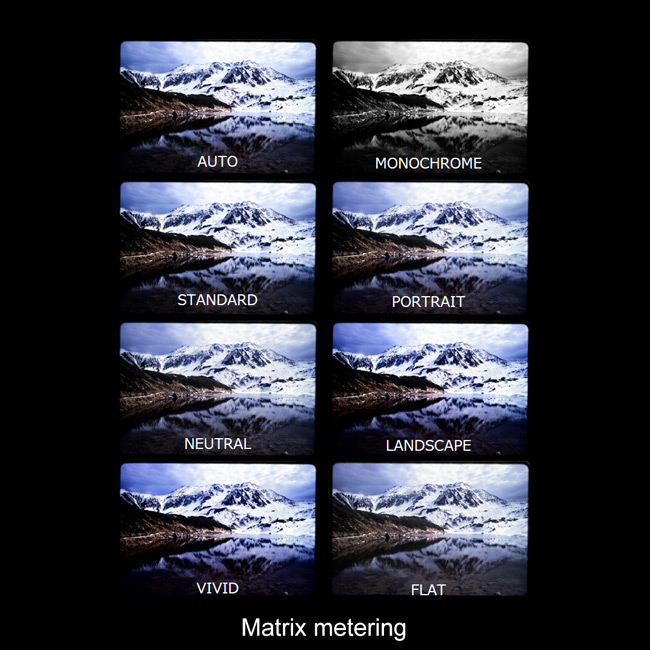
Choosing a Picture Control (matrix metering)
Choosing a Picture Control (highlight-weighted metering)
Metering and Exposure
One approach to metering is to choose matrix metering and adjust exposure compensation as necessary, but you can also select highlight-weighted metering if you want to make sure to preserve details in the highlights. Given that highlight-weighted metering adjusts exposure to preserve details in highlights, it may however not produce mid-tones with the desired brightness or dynamic range, in which case you can get the desired results by adjusting exposure compensation or the contrast and brightness Picture Control parameters.
When adjusting exposure, you can choose and adjust Picture Controls and hone exposure while viewing the histogram in live view to ensure that highlights are preserved. To enable the histogram display in live view, press OK to preview exposure and then press the info button a few times.
Live view.
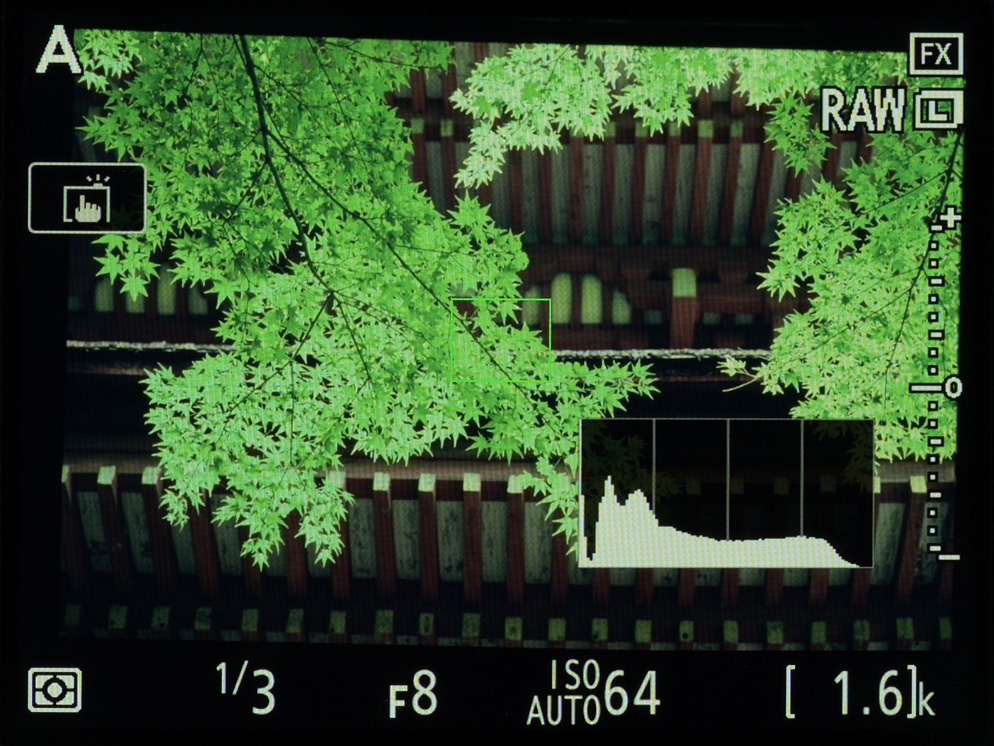
Exposure preview with histogram.
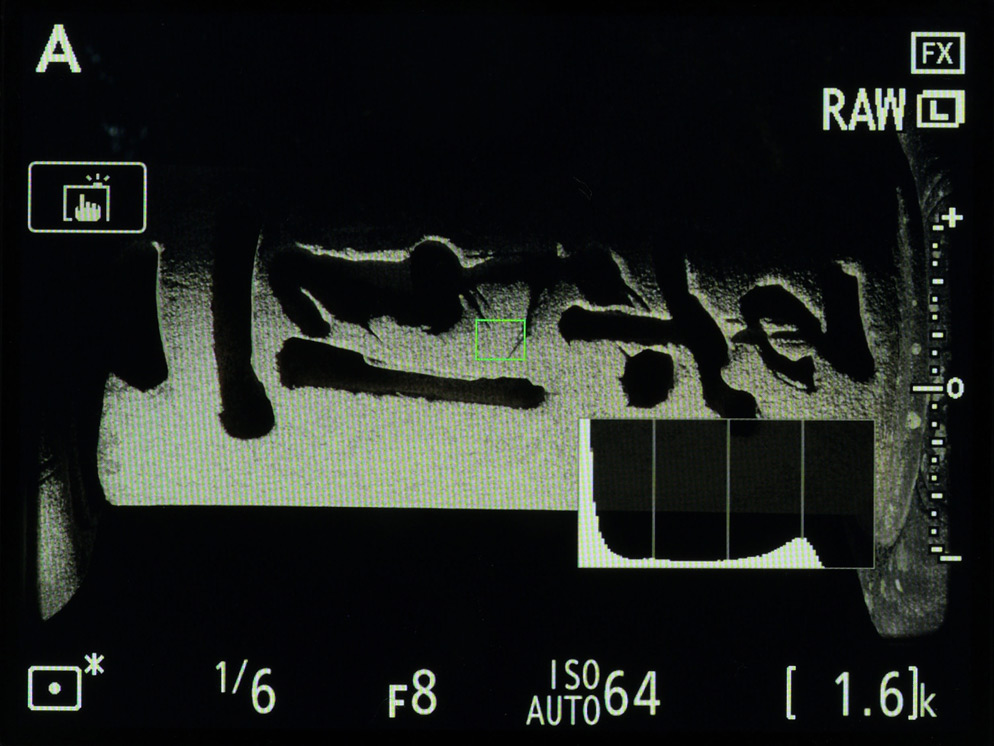
The histogram shows that highlights are preserved (highlight-weighted metering).
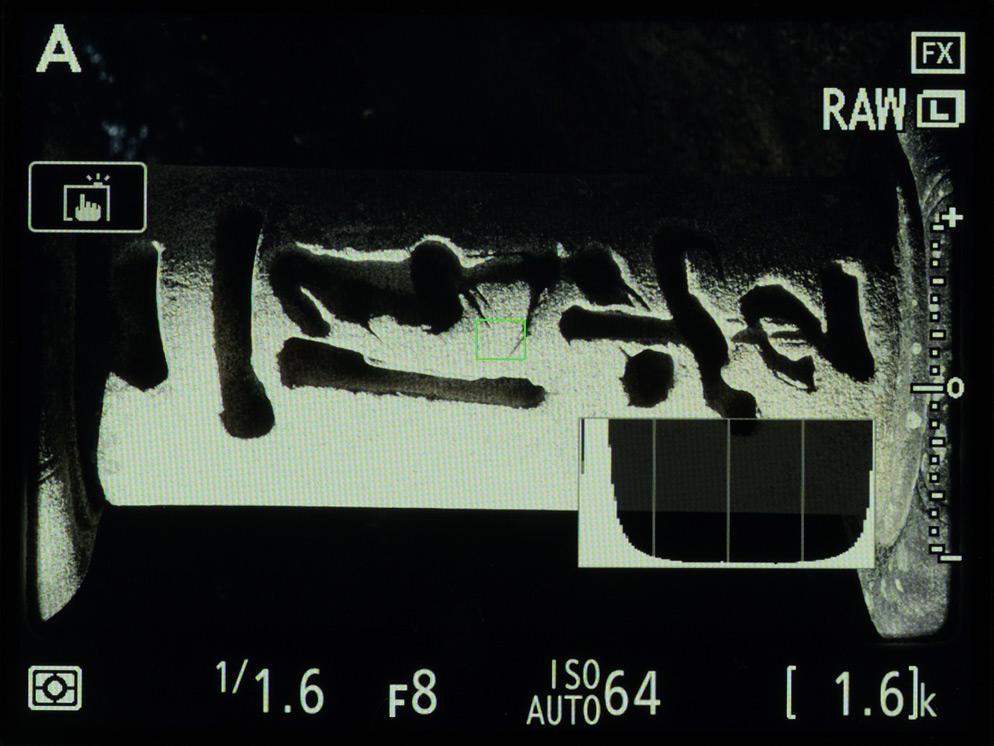
You can see here that highlights are washed out (matrix metering).
Taking Photographs
Insert the film in the ES‑2, point the diffuser screen at the light source, and frame the shot.
After that, you need only focus and shoot. Photographs are recorded in the format selected for Image quality and, when an NEF (RAW) option is selected, NEF (RAW) recording.
Features That Cannot Be Used with the Negative Digitizer
While the negative digitizer is very useful, there are a number of features with which it can’t be used. If you have any of the features that disable live view selected, and you press the i button to select Negative digitizer, you will see it grayed out.
These features are: Interval timer shooting, Multiple exposure, Focus shift shooting, Bracketing, HDR (High Dynamic Range) and Silent live view photography.
Handling Old Color Negatives
Film degradation of old color negatives is known to happen but there are some—although not necessarily perfect—ways of dealing with it when you digitize these images.
Cropping
Color changes caused by film degradation vary from one part of the image to another in both type and degree, resulting in uneven colors that produce a sense of dissonance. Color changes wouldn’t be a problem were they consistent over the entire image, as the camera would handle them as it would a base of a different color. It follows that if you can restrict the scanned area to a portion of the frame where the degradation is consistent, the dissonance caused by uneven colors would be lessened or eliminated entirely. While this method cannot be used if the degradation has produced inconsistent effects within the area you want to scan, try it where conditions permit.
Converting to Black-and-White
While admittedly it seems a waste not to use color information when digitizing color film, this is a solution that can be applied where age has caused colors to deteriorate and cropping cannot be used. In this case it may be better to convert an image to B&W rather than not digitizing the image at all.
Film with spotty colors caused by aging.
Spotty colors rendered almost undetectable by conversion to black-and-white.
With over 45 million pixels, the D850 has an input resolution of over 5000 dpi with respect to a frame of 35mm film, high enough to reliably capture the individual grains in most film. Resolution, then, is not an issue; the next concern is color reproduction and tone range. The reproduction of color negatives can be safely left to the D850’s negative digitizer, while slides can be adjusted using Nikon Picture Controls to accurately capture color and tone. The key to the latter is choosing the Flat or Neutral Picture Control and adjusting the individual parameters with reference to the histogram. The image data obtained can be printed up to 20 x 30 inches with an output resolution of about 250 dpi.


