Top 10 Photo Tips For Better Images
It doesn’t matter if you’re a beginner or a high-end DSLR photographer. These top 10 photo tips are timeless, tried and true—from framing to focus, from perspective to panning.
TIP 1: Get Closer
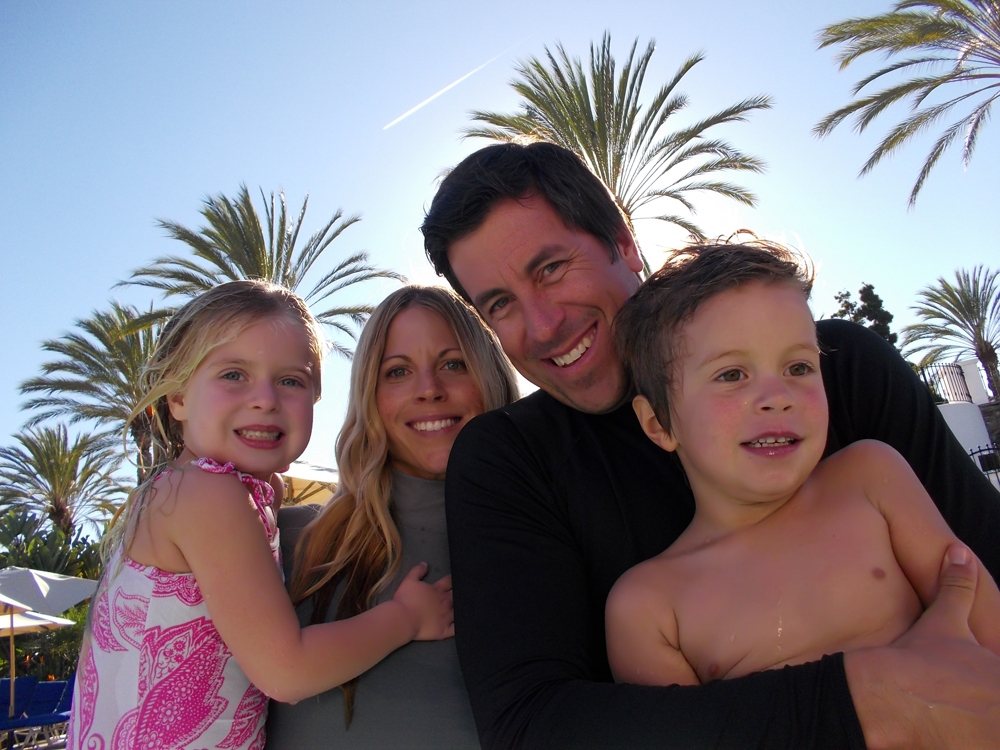
Get closer and fill the frame with your subject right off the bat.

As you can see in this example by getting closer to your subject (right) you can eliminate cluttered backgrounds and give more emphasis to the subject for a better portrait.
Is what’s in the background truly adding to your photo? In some instances what’s behind or aside your main subject may help tell the story—a travel location, hanging with a gang of friends—but when it’s not, cut it out! Take a step closer or use the zoom lens. Hone in on the details, expressions and textures that make your subject special.
TIP 2: What Lurks in the Back(ground)
Distracting lines, too much clutter, reflections, objects coming out of your subject’s head—any of these can turn a great photo into one that’s not so great, or one that may require retouching. Before you press the shutter, scan all areas of the frame. Spy something you do not want? Reposition yourself, or the subject, until you get an even better frame-up.
When capturing a photo, always be aware of the background to make sure you don’t have objects that detract from your subject, such as a tree sticking out from your subject’s head.
Ever tried this—if you normally frame your subject by looking through the viewfinder, consider making a quick check by dialing up Live View. A glance at this larger display shows exactly what your photo will look like once the shutter is pressed. Sometimes just moving your eye away from the camera to look at the LCD view gives a fresh and more objective glance.
TIP 3: Focus, Lock, Then Recompose
All Nikon cameras have the ability to lock focus on a subject. To use: frame your image, focus on your subject, then press the shutter release half way down and hold it there. Now you may reframe your shot (reposition your camera) to create a more interesting composition while preserving focus on your subject (provided that subject has not moved).
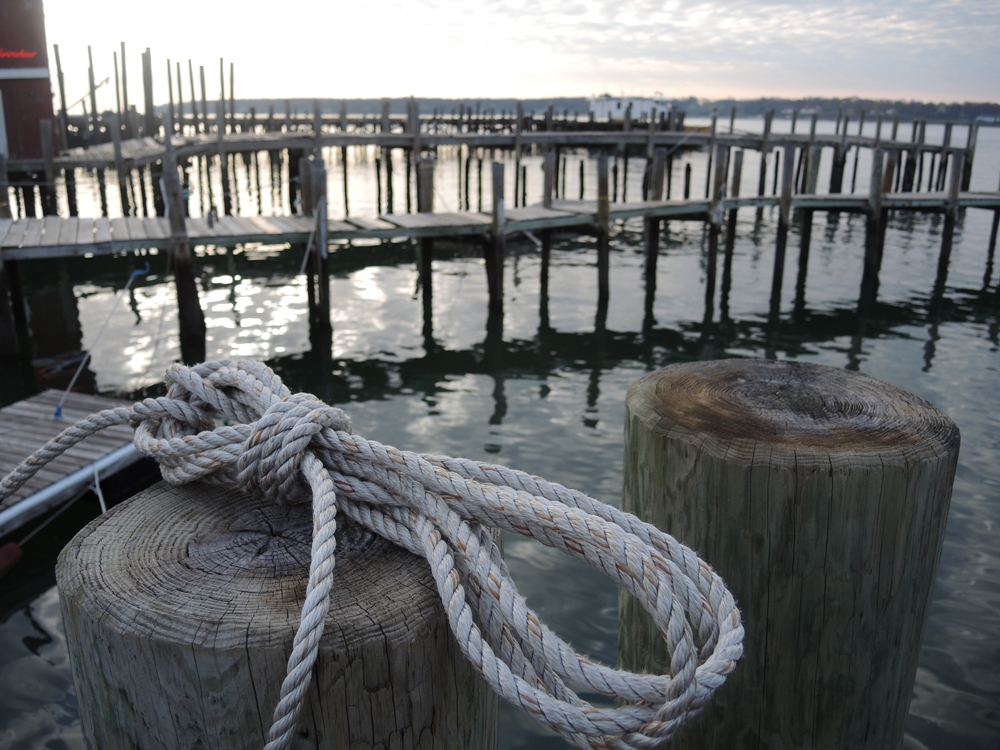
Focusing and recomposing can be a quick way to get the focus and composition that you want. In this example the focus is on the rope, through a quick recomposition after focus lock, the photographer was able to get a more pleasing photo.
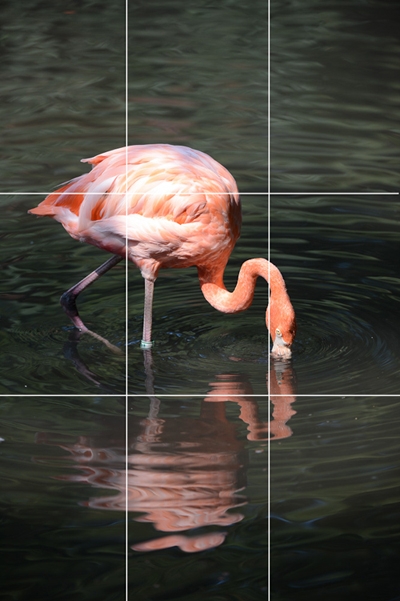
TIP 4: A One and a Two and a Rule of Thirds
Do a little test: pick a stationary subject that’s set against a clean background. While looking through the viewfinder, mentally divide your framed scene into thirds, or take advantage of the camera’s vertical and horizontal compositional gridlines. Take your first photo by placing your subject dead center.
Next, slightly move the camera to position your subject where the lines intersect at the upper left hand corner, then take a photo. For a third capture, move the camera to place your subject in the lower right hand section of the frame where the lines meet.
Now look at each shot on the LCD. What emotion does each image evoke? As a general rule, dividing your scene into thirds, then placing a subject where the points intersect, will make a more pleasing image. A photo where the subject lands dead center of the frame is seldom interesting.
Select your subject, use the camera’s Focus Lock, then reframe by moving the camera to reposition your subject to one of the intersection points.
TIP 5: Steady Girl
Seems obvious, but it’s worth a mention—holding a camera properly helps ensure sharper images because you can minimize camera shake. If your camera has a lens that sits out from the body, use your left hand to support that lens from underneath. Then firmly grip the camera body with the right hand, placing the index finger on the shutter. For point and shoot cameras, make sure you have a firm grip. Use the wrist strap as an added security against dropping the camera.
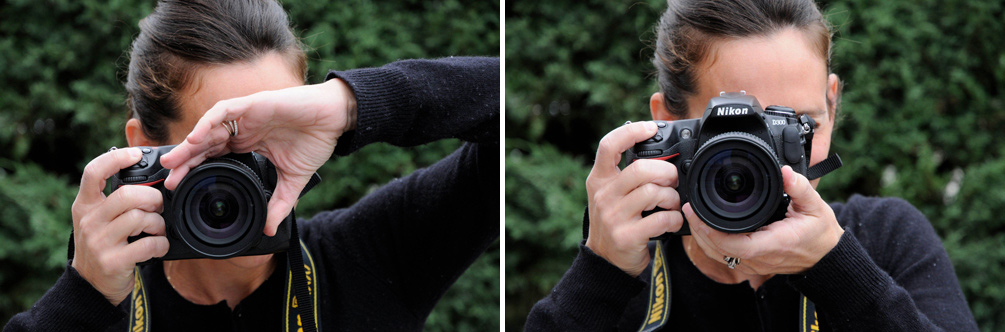
Left: A common mistake when holding a camera is to place the hand on top of the lens. This is not as comfortable and also blocks the light from the flash (if in use). Right: The proper way to hold your camera is by cradling the lens with your hand; this enables you to hold the camera comfortably and ensures you are not blocking the flash with your hand.
Use Nikon’s VR (Vibration Reduction) image stabilization system for sharper images. Be sure your gear has this switched to ON. Get your grounding, brace your elbow at your sides (if possible), take a calming breath and click.
TIP 6: Look Into My Eyes
Unless you’re going after the David and Goliath vibe with your photos, consider taking things down a level. Small subjects? Sight things up to their eye-level.
To photograph children at their level, use your camera’s vari-angle LCD, or position yourself so you’re at their height.
Not only will your image have a more pleasing and realistic head-to-toe balance, but the grins will look wider and you gain more control over what lands as a background.
To photograph children at their level, use your camera’s Vari-angle LCD, or position yourself so you’re at their height. Another benefit to dropping to a new level—noticing that poor lighting or shadows are falling into the frame may be easier to detect and correct.
TIP 7: Peter Knows About Panning
Never, never tried panning? This is a simple effect that adds drama and movement to a still image. It works best when photographing motion that will pass in front of the camera, for example a horse race or a merry-go-round.
Set the camera to Shutter Priority (S) mode, then choose a slow shutter speed such as 1/15 second. Then, while holding down the shutter release, follow your subject by moving your camera in the same direction. Experiment with different shutter speeds to alter the effect. It may take a few tries to dial-in a favorable look.

To photograph children at their level, use your camera’s Vari-angle LCD, or position yourself so you’re at their height.

To get beautiful linearly blurred backgrounds, hold down the shutter button and follow your subject by moving your camera in the same direction.
TIP 8: See the Light
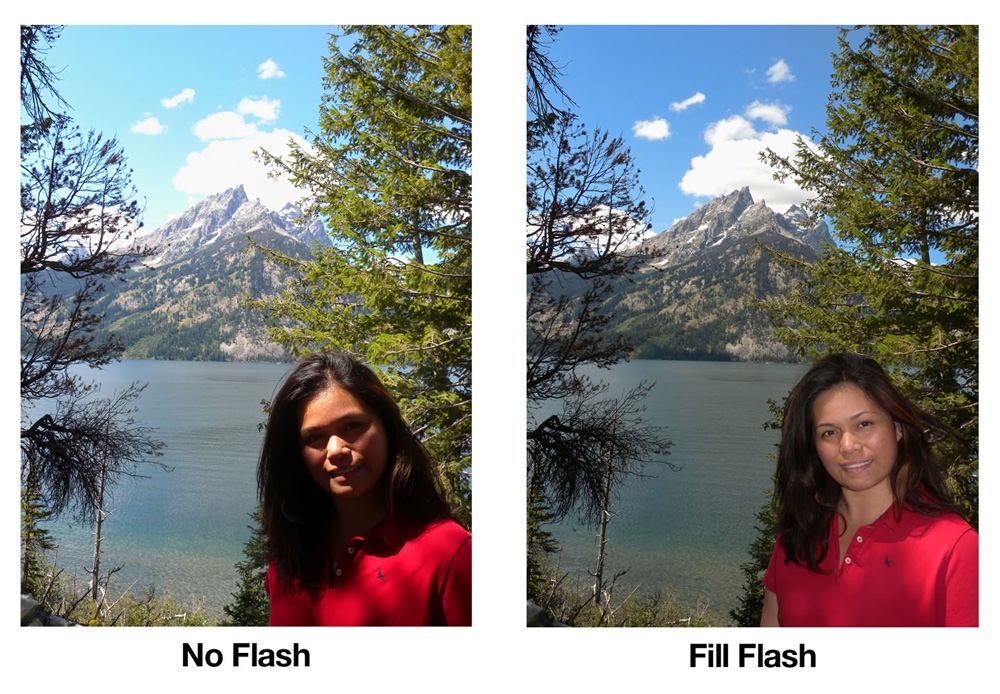
More light is a good thing. While it may seem contradictory, using a flash with your outdoor photography can often improve things. Why? Even though it’s usually bright outside, the source of most light, the sun, most often comes from high overhead; this often yields shadows on faces.
Set your camera to use the flash by either popping up the flash or enabling the flash feature in the menu. What this does is provide fill-flash; the light from your flash “fills” in the shadows. After you take a photo, view the resulting image. You may wish to take a few shots by repositioning the camera ever so slightly. You’ll notice subtle differences, and will have a few more photos from which to choose.
TIP 9: Be Ready
How many times have you said it? “I wish I had my camera.”
Just think of all the additional great images your portfolio, social media profile or art wall may have. Get into a routine whereby the camera is with you all the time–ready to capture those unexpected moments.
Don’t forget to keep the batteries charged and a memory card at the ready.
TIP 10: The Power of Practice
Shoot every day. Make a photo journal. Give yourself assignments. Invent your own themed Photo a Day challenge and make it a ritual to post to social media. Once your family and friends notice that you’re sharing an image each day they’ll become your biggest fans. Nothing like a thumbs up and a positive comment to keep you inspired.
Having your camera with you is the best way to never miss unexpected moments.
Another nice thing—after 365 days of shooting and posting, look back and see how your skills have improved. Heed these top 10 photo tips for taking better photos, and you’ll be well on your way to stardom and the admiration of family and friends. Be sure to post what you create; a social media upload every few days never hurts.
Be sure to check back again for more inspiration, tips and tricks.
Do you have a favorite Photo Tip?
Tell us below and we’ll pass it on!
Give yourself photo assignments and practice, practice, practice—you will find your skills growing with every picture you take.


