Tips and Tricks for Photographing Comets in the Night Sky
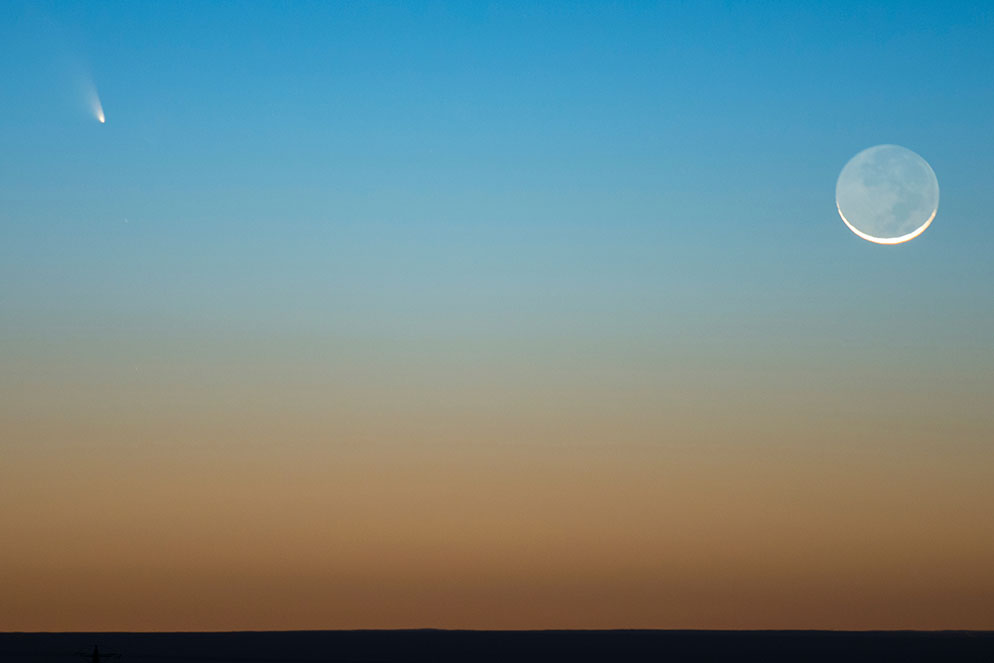
Comet PANSTARRS mirrors the moon as both set during twilight in far west Texas in early 2013. D800, AF-S NIKKOR 70-200mm f/2.8G ED VR II at 200mm focal length, 5 seconds, f/2.8, ISO 400, manual exposure, Center-weighted metering.
Without a doubt, our night sky is absolutely full of photographic gems. From the Milky Way to the Aurora Borealis to constellations and more, a bit of patience, dedication and sleep deprivation can yield some of the most jaw dropping imagery.
One of my favorite night sky subjects to photograph is a comet. Why, you may ask? Well, besides the fact that I’m getting to create an image of a cosmic piece of ice and gas that is moving at nearly 2,000 mph, I enjoy the challenge of shooting them.
Although a great comet image does not come easily, here are my recommendations for how to create an, “out of this world” image.
January 13, 2025, in the southern hemisphere, Comet ATLAS (C/2024 G3) will be reaching its closest point to the Sun. Mid-January through the end of the month, it will be visible, but not as bright. With its proximity to the sun take extra care when viewing or photographing it during the day.
Comet photography gear
You’re not going to need a huge telescope to create your image. The gear selection is going to be quite simple. For me, my go-to setup is my Nikon mirrorless bodies—the Z8 and Z6III and one of two lenses, the 70-200mm f/2.8 or 100-400mm f/4.5-5.6.
The key thing to keep in mind with lens choice is that you’re shooting the night sky, which involves low-light situations, so a wide aperture can be very helpful.
Also, although comets are huge masses, they are hundreds of miles above our atmosphere, so a long focal length can allow you to capture some great detail.
For the camera body, you can capture a comet image on anything from a Z50 mirrorless body up to a Z9, or a DSLR if you have one. In fact, a crop sensor can actually help you get a bit more “reach” if you’re looking for that close-up image of the comet. If you’re shooting with a full frame camera but want a little extra reach, put the camera in DX Crop mode to add 1.5x to the focal length you’re using, so a 500mm lens effectively gives you the reach of a 750mm lens.
You’ll also want to make sure that you have a sturdy tripod and a cable release or remote to trigger the camera.
Plan to shoot a comet
Comets are not necessarily a seasonal subject matter. In fact, they can show up pretty unexpectedly like the Comet NEOWISE which was only discovered in late March of 2020.
If you have the chance to photograph a comet, take advantage. With that said, not all comets are visible to the naked eye like Comet NEOWISE, so if you get the chance to view it, do so, because it is quite visible to the naked eye away from city lights. There are some famous comets that regularly visit our night sky and newer ones are discovered too.
It’s hard to predict when the next new comet will swing past Earth, so if this shot is on your bucket list, keep an eye on space weather for updates on what has been discovered or what may be returning to our skies!
How to find a comet
There are a few different sources that I use to find the comet in the night sky and plan out my shot. These are spaceweather.com, the Star Walk II app, and also the Photo Pills app.
These comet tracking resources can provide you with enough information on where in the sky to look, at what particular time, and how the comet will move across the sky.
You’re going to want to make sure that you first start by escaping any light pollution that may be around you. I recommend getting at least 30 miles or so away from city lights and putting them at your back if you are looking in the direction of the comet.
Once you’ve reached your dark sky location, give your eyes about 15 minutes or so to adjust to the darkness. Letting your eyes adjust to the night sky really helps you better identify constellations and therefore, find your comet. Constellations are going to be the map for you finding the comet, as they’re usually relatively small in comparison to the entire sky. If you aren’t familiar with recognizing constellations, I recommend downloading a star app that has augmented reality and can help direct you.
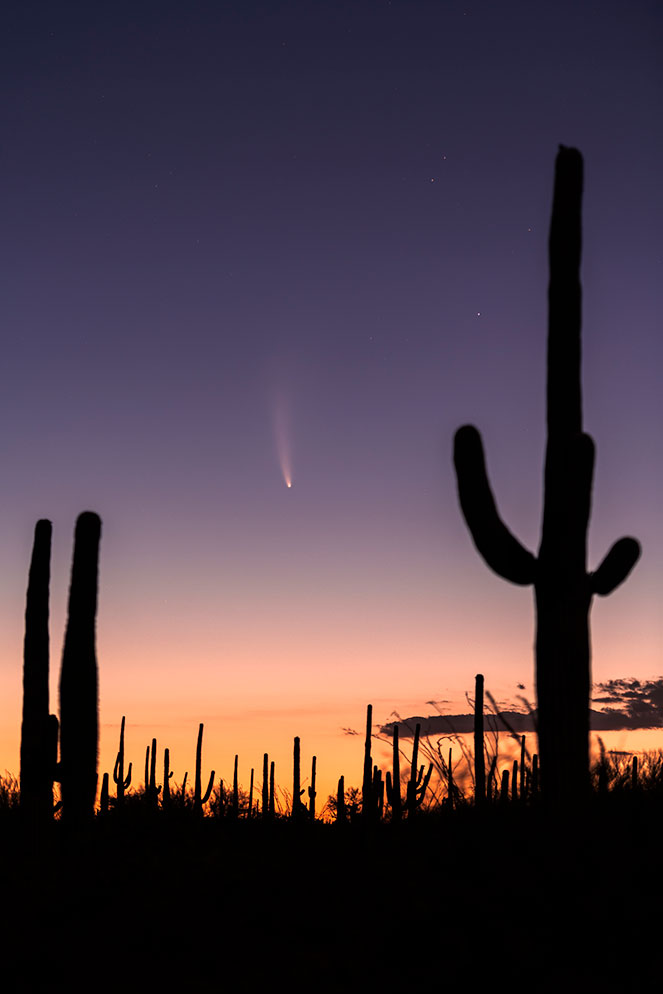
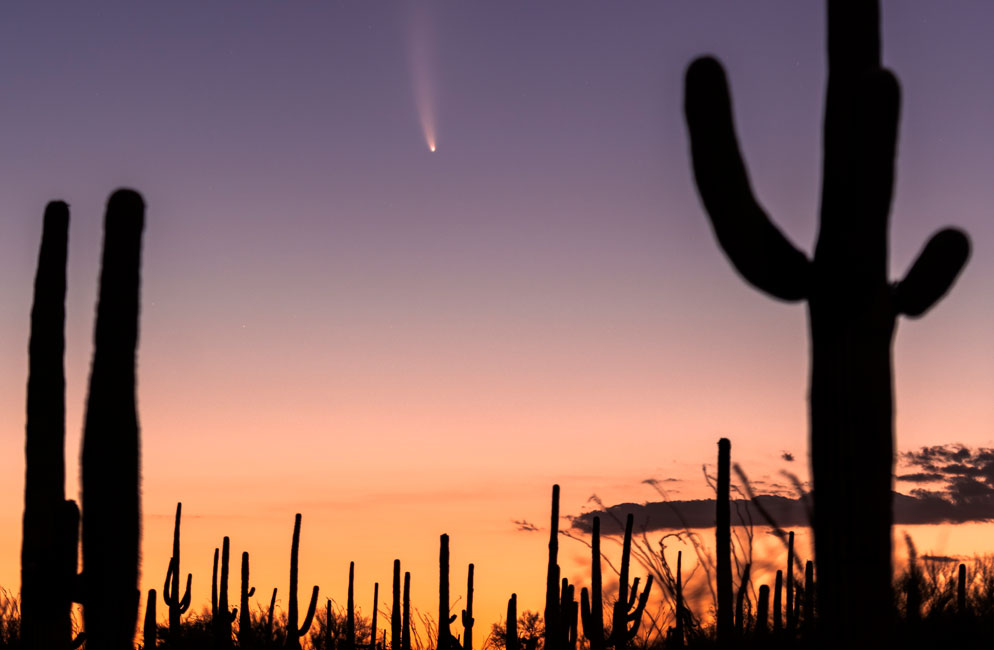
Framed between two Saguaro Cacti in Saguaro National Park, Comet NEOWISE and its tail rise into a colorful gradient sky during dawn in July 2020. D850, AF-S NIKKOR 70-200mm f/2.8G ED VR II at 116mm focal length, 4 seconds, f/2.8, ISO 160, manual exposure, Center-weighted metering.
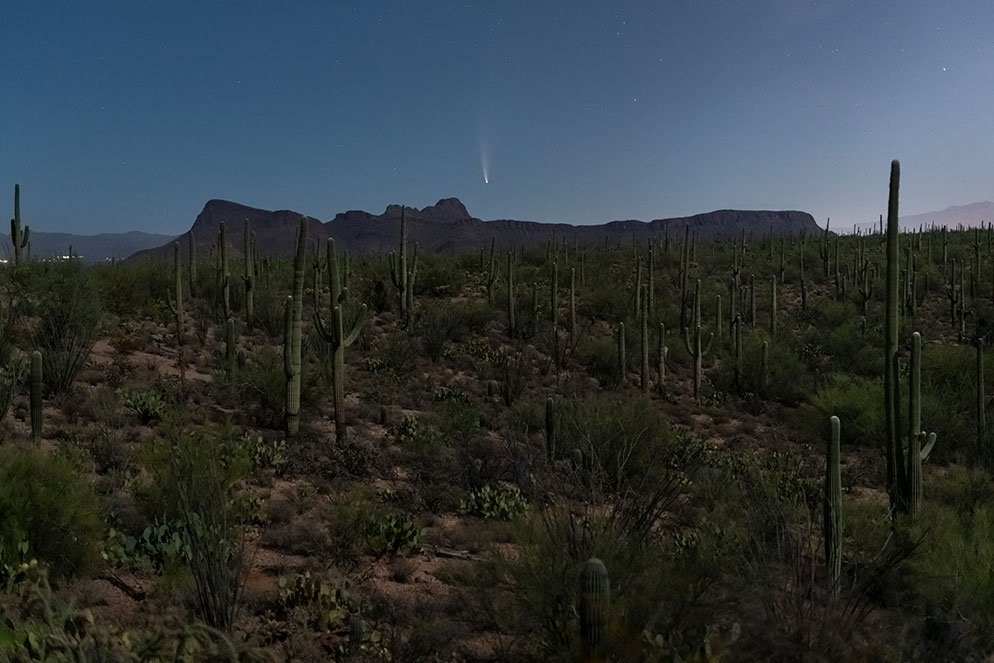
Comet NEOWISE rises above a moonlit Sombrero Peak in Saguaro National Park near Tucson, Arizona in July 2020. D850, AF-S NIKKOR 24-70mm f/2.8G ED at 50mm focal length, 4 seconds, f/2.8, ISO 2500, manual exposure.
Comet Foreground and composition
A comet is absolutely amazing to not only see, but photograph, however it can come across as a bit stagnant in an image just by itself. I recommend trying to incorporate a bit of foreground to your composition if possible. This can be beneficial to your composition in a variety of ways. It can add a sense of human element, give a sense of scale, help frame the comet and lead your audience’s eye, and more.
If you’re going to give a sense of scale, you may want to try a bit wider (think 24-70mm) focal length. If you’re going to frame or direct your audiences’ eye, a longer focal length may be a better choice. Although I have shot as wide as 70mm and as tight as 500mm for comets, I usually wind up using a 70-200mm lens. This allows me to get enough of a zoom on the comet, but yet still incorporate some sort of landscape element into the image. With the longer focal lengths, I can also compress the comet against a distant foreground to portray the comet in a larger manner.
Also make sure to shoot wide enough to capture the tail of the comet, which can sometimes be a bit harder to see with the naked eye. Your camera’s sensor is much more sensitive to light, so be sure to review your images and make sure you’re not cutting off the tail before calling it a night.
Camera settings
Settings are going to be a bit cut and dry but will still require some thought process.
Let’s start with your aperture. This is night photography, so light is pretty limited. This will warrant having your aperture set as wide as possible. I prefer f/2.8, but f/5.6 can work as well. Regardless, set your aperture as wide as your lens allows.
Next up, your ISO. ISO settings are going to be dependent upon three conditions, time of night, light pollution and comet brightness. With the Comet NEOWISE, it is visible right before sunrise in the twilight hours but will eventually work its way to being visible at night. It is also quite the bright comet, comparable to a 2nd magnitude star. This brightness, combined with twilight light, has allowed me to shoot at an ISO between 160 to 2500. If I’m shooting closer to sunrise, my ISO goes lower. If I still have an hour of twilight, I’ll raise my ISO up to somewhere between 1000-2500 in order to capture more of the comet tail. If this comet were visible during pure darkness, I would most likely stay around close to ISO 2000.
Finally, shutter speed. Although it sure doesn’t seem like it, we on the Earth are rotating and simultaneously the comet is moving as well, so you will want a “quicker” shutter speed. Now this doesn’t mean 1/1000 of a second, as there isn’t much “action” to freeze, but you will want to limit your shutter speed to be fast enought to make sure you don't blur the comet detail.
I recommend anywhere using a shutter speed between 1-5 seconds. Anything longer than that has a negative impact on the detail of the comet’s nucleus.
For your focus, you’ll want to use manual focus. Utilize your camera's Live View to help with this. Start by turning on Live View, then use the Zoom-In button to find a star or your comet. From there, carefully adjust your focus until the star or comet looks pinpoint sharp.
Make sure to turn OFF Vibration Reduction while shooting on a tripod. I suggest turning on Long Exposure Noise Reduction as well to help clean up any noise that may be present.
One last tip, if you have a cable release or remote, trigger your shutter that way to reduce any camera shake. If you don’t, utilize your camera’s Exposure Delay or Self Timer mode to help reduce camera shake.
Patience and weather
Like any other shoot that involves nature, you’re going to need some patience as the elements may not always cooperate. Be sure to check the weather forecast before you head out on your shoot. Partly cloudy skies can actually be quite dramatic as you can often frame the comet between the clouds. Rainy or mostly cloudy skies may require you try on another night.
The good thing about shooting a comet is that most of them give you multiple night opportunities for visibility! Also, if you find yourself out shooting on a night that the clouds cooperate, but it’s a bit windy, try using yourself or your vehicle to protect the camera from the wind. Even the smallest bit of wind can add shake to a long focal length image and muck up your shot.
Whether it’s Comet NEOWISE or another comet that will dance across our night sky in the future, make sure to get out and take in this spectacle with your camera, and your eyes. Be patient with nature, think your images through, and have fun with documenting a truly spectacular moment!

Mike Mezeul II is a photographer and photojournalist addicted to storytelling and adventure. He's photographed landscapes, professional sports, natural disasters, concerts, air-to-air aerial photography and more.
More articles by this contributor


