The Joy of Long Exposure Photography
One of the greatest things about photography is that it allows us to see things we can’t normally see with our own eyes. And one way this is more than true is when we use long exposures in our photographs.
Long exposures are created by using a very slow shutter speed to capture a single image that reflects an extended period of time. Depending on how short or long you decide to make the shutter speed, you can create a variety of different effects for some unique and creative images.
You’ll want to keep the following things in mind with long exposures, since you'll be dealing with an extended shutter speed.
Tripod. You should have a sturdy tripod that’s capable of handling the weight of your camera and lens so that it will help reduce the movement of your camera for the duration of your exposure. If you need to buy a new tripod, consider any future equipment you might purchase in addition to the weight of your current needs.
Remote. Whether you use an external remote, an app that allows you to take photos, or a cable release, remotely triggering the camera without having to physically press the shutter button will help reduce blur due to camera movement. Even a gentle push of the shutter button could move the camera during the exposure.
Self-Timer. If you don’t have any of the above-mentioned remotes, you can use the self-timer mode on your camera. You can set the timer to three, five, or even 10 seconds, depending on how long it takes to stabilize the camera and lens. Note that with the self-timer mode, you won’t have the ability to press the shutter button at the exact moment you want to take the photo, so keep this in mind when you’re out in the field.
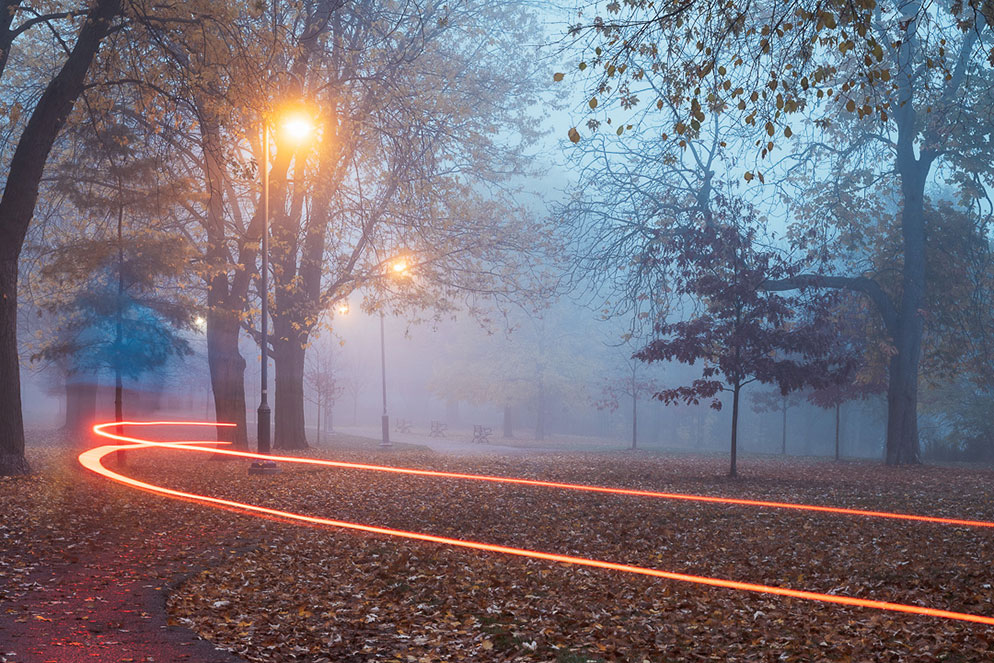
Z 7II, NIKKOR Z 24-120mm f/4 S, 67mm focal length, f/14, 3 sec.
You may also want to familiarize yourself with the Bulb and Time modes on your camera and look into adding optional Neutral Density filters to your gear.
Bulb mode refers to a camera mode where the exposure is created for the duration the shutter button is held down. Once the shutter button is released, the exposure ends. Use this mode with a remote or cable release. Access Bulb mode by selecting manual exposure mode and then rotating the main command dial that changes shutter speeds, and select Bulb.
Time mode is a mode where the exposure starts when you first press the shutter button (and release it) and continues until you press and release the shutter button a second time. This is useful for longer exposures where you don’t want to manually keep the shutter button pressed down for an extended period of time. Access Time mode by selecting manual exposure mode and then rotating the main command dial that changes shutter speeds, and select Time.
Neutral Density Filters, (ND filters) are filters that can be placed on the front of the lens or inside a filter slot on the back of certain super-telephoto lenses to reduce the amount of light hitting the sensor. ND filters are used to allow for a longer shutter speed during bright daylight hours or when you want to use larger apertures during the day when you might over-expose your images with your settings.
Z 7, NIKKOR Z 35mm f/1.8 S, f/11, 25 sec., with 6-stop ND filter.
There are several different strengths of Neutral Density filters—and depending on how long of an exposure you want to make, you'll decide which one to use. They are noted by the amount of reduction in stops of light, or in optical densities.
There are also Variable Neutral Density filters that allow you to set between two to eight stops of light reduction simply by rotating the filter.
Refer to the chart below to see how many stops of light are reduced with some of the more common strengths of ND filters.
f-stop Reduction ND Factor How much light hits the camera sensor
1 stop ND2 50%
3 stop ND8 12.5%
6 stop ND64 1.56%
10 stop ND1000 0.1%
Comparing the difference in the image below you can tell that without the use of an ND filter, the image is completely blown out. By adding a 6-stop ND filter, I was able to create an image with a proper exposure, smoothening out the water and clouds, given that all of the camera settings remained the same as in the previous shot.
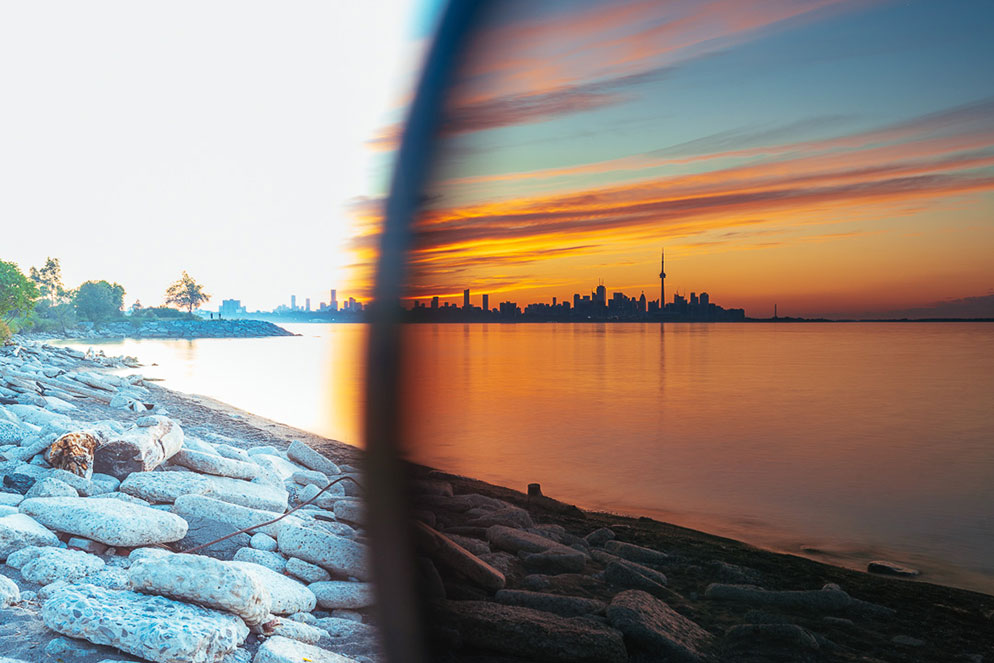
Z 7, NIKKOR Z 35mm f/1.8 S, f/11, 6 sec., half covered with a 6-stop ND filter
Long Exposures
A long exposure photograph can completely change the mood of your image. With extra long exposures such as 30, 60, or even 90 seconds, details of clouds are blended together, and waves or ripples in water are all a blur as well.
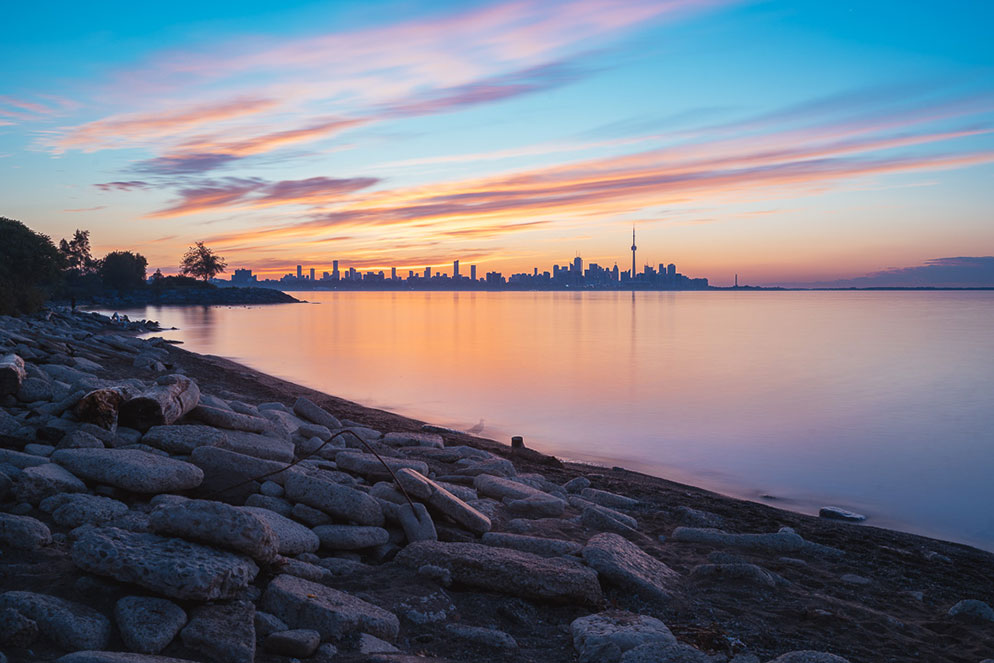
In this image the 90-second exposure completely blurred any details of the clouds and washed away the ripples in the lake in the foreground, further enhancing the reflection of the city lights on the water. Z 9, NIKKOR Z 24-120mm f/4 S at 120mm focal length, f/13, 90 sec.
Most cameras will allow you to set an exposure length of up to 30 seconds without the use of a remote or app. On the Nikon Z 6II, Z 7II, and Z 9 mirrorless cameras, you can enable long exposures of up to 900 seconds just by moving the shutter speed dial to the desired time. This is very useful if you don’t have a remote with you.
Another convenient feature of these cameras is the countdown timer on the display screen that counts down the remaining time left in a long exposure. This is enabled for any exposure longer than 30 seconds.
Long Exposure Panning
Panning your camera in the middle of a long exposure is a great way to create unique and creative effects. Often at golden hour when we have the beautiful colours of the sunrise or sunset, we can create abstract images that form unique imagery.
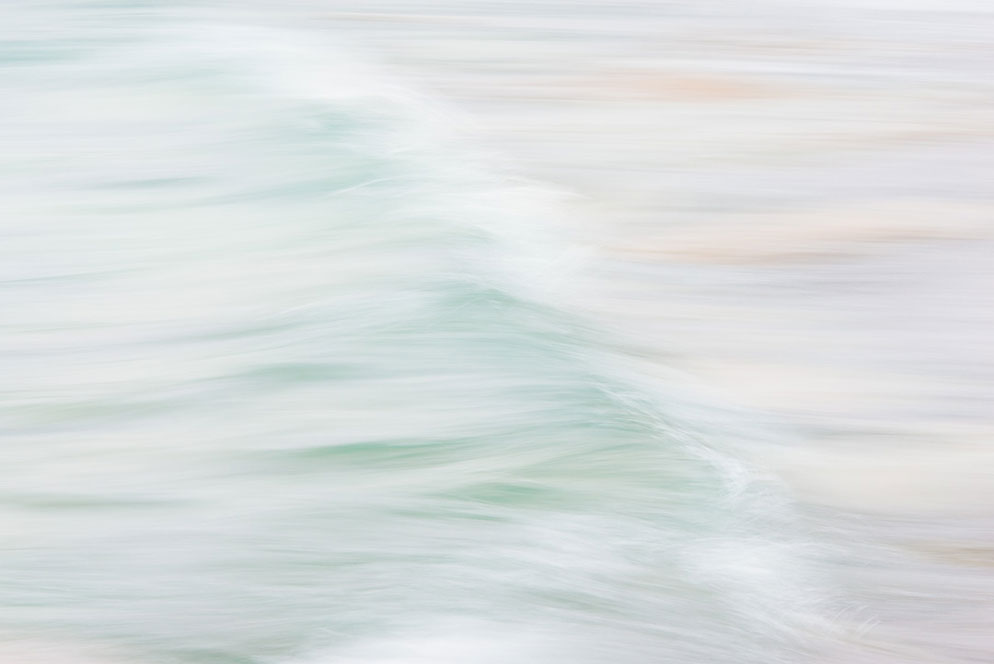
This photo was captured by slightly moving the camera as I followed a wave crashing on the beach. The 1/8 sec. shutter speed and movement of my camera allowed me to capture the fine texture of the wave and subtle colours of the sandy beach beneath the water. D800, AF-S NIKKOR 70-200mm f/2.8G ED VR II lens at 122mm focal length, f/16, 1/8 sec.
I used a telephoto lens to focus on just the clouds above the horizon. With an exposure of 1/8 sec. Quickly panning the camera from left to right (or vice versa), produces some ethereal images that blend the colours in the clouds.
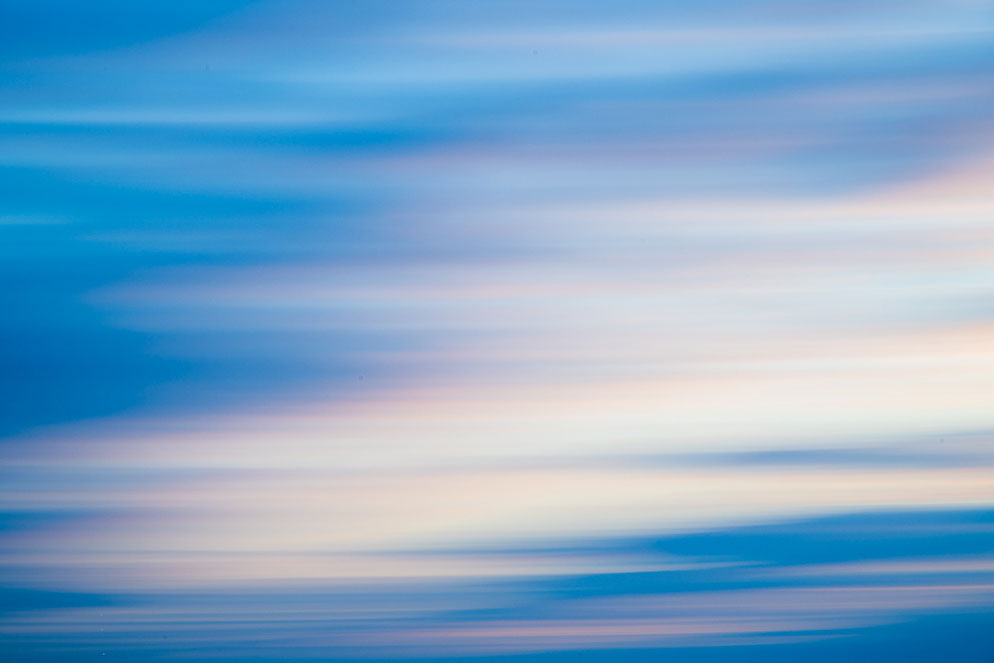
Focusing on the clouds just above the horizon. Z 9, NIKKOR Z 24-120mm f/4 S at 120mm focal length, f/16, 1/8 sec.
If I do the same thing with the horizon in the frame, I can create an image with blurred clouds on top and the blurred water on the bottom to further create dramatic images with the horizon acting as a defining line.
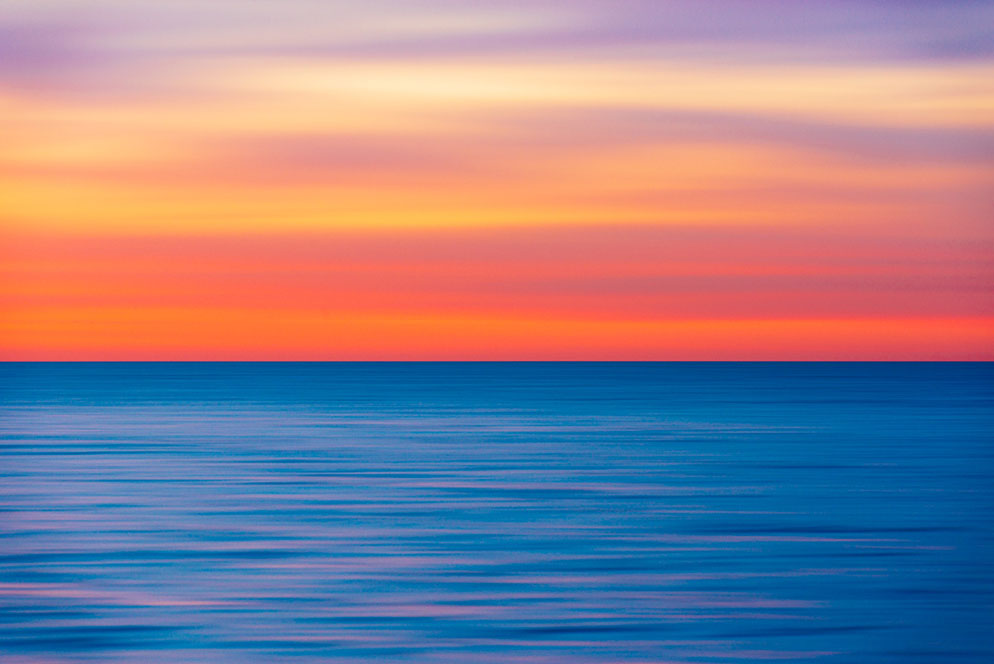
Sky and water blur, with a visible horizon. Nikon D800, AF-S NIKKOR 70-200mm f/2.8G ED VR II lens at 200mm focal length, f/10, 1/10 sec.
Panning with a subject is equally enjoyable. Here I panned with an exposure of 1/25 sec., as I followed a cormorant flying in front of me at sunrise. There is a blur of the cormorant but you can still identify that it is a bird flying. Couple that with the blurred lines of the water below it and you have yourself a unique image that you can’t see without a camera.
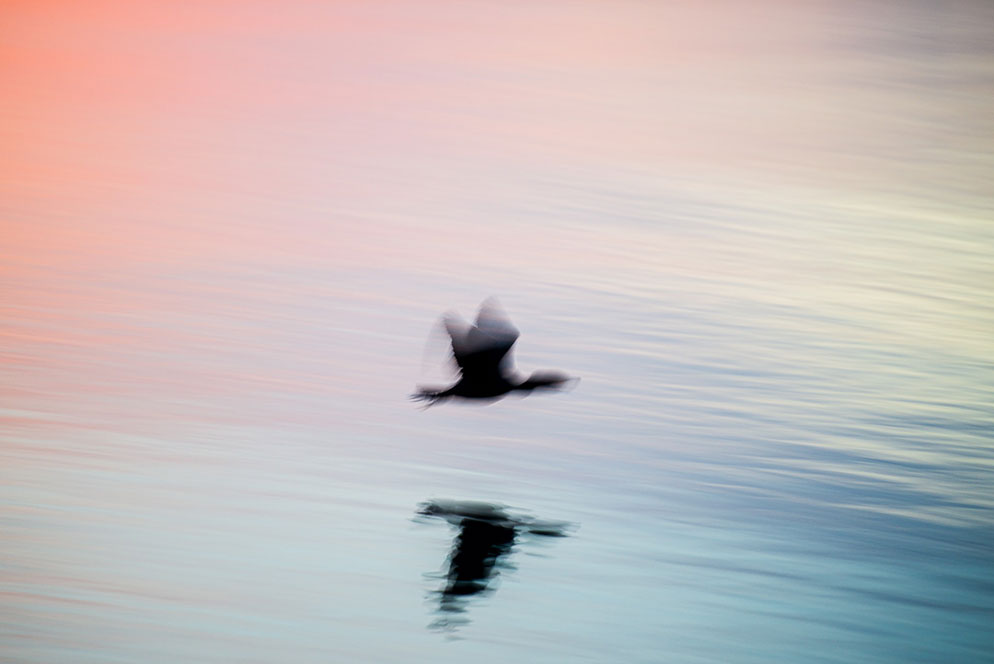
Pan shot of a Cormorant flying over the water. Nikon D800, AF-S NIKKOR 70-200mm f/2.8G ED VR II lens at 200mm focal length, f/2.8, 1/25 sec.
Waterfalls
Creating a long exposure of a waterfall can be very rewarding. Instead of illustrating the powerful nature of the falls, we can transform an image into one with silky smooth water falling down to create a more elegant waterfall image. The roughness and splashing of the water immediately transforms to create textures that we don’t see with the naked eye.
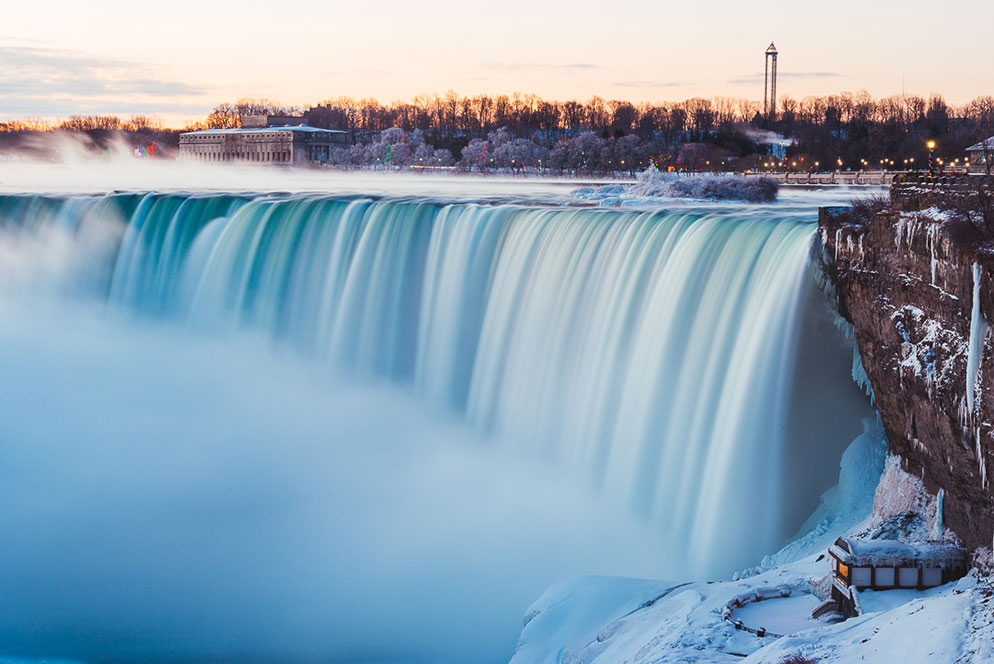
This photo of Horseshoe Falls was taken with a shutter speed of 5 seconds to smoothen out the waterfall and make a dreamier photo of the waterfall at sunrise. D800, AF-S NIKKOR 70-200mm f/2.8G ED VR II lens at 70mm focal length, f/18, 5 sec.
Compare the difference between these two images of a stream, the photo on the left was taken with a shutter speed of 1/60 sec. The photo on the right with a shutter speed of 1/6 sec. Blurring the movement of water over the rocks.
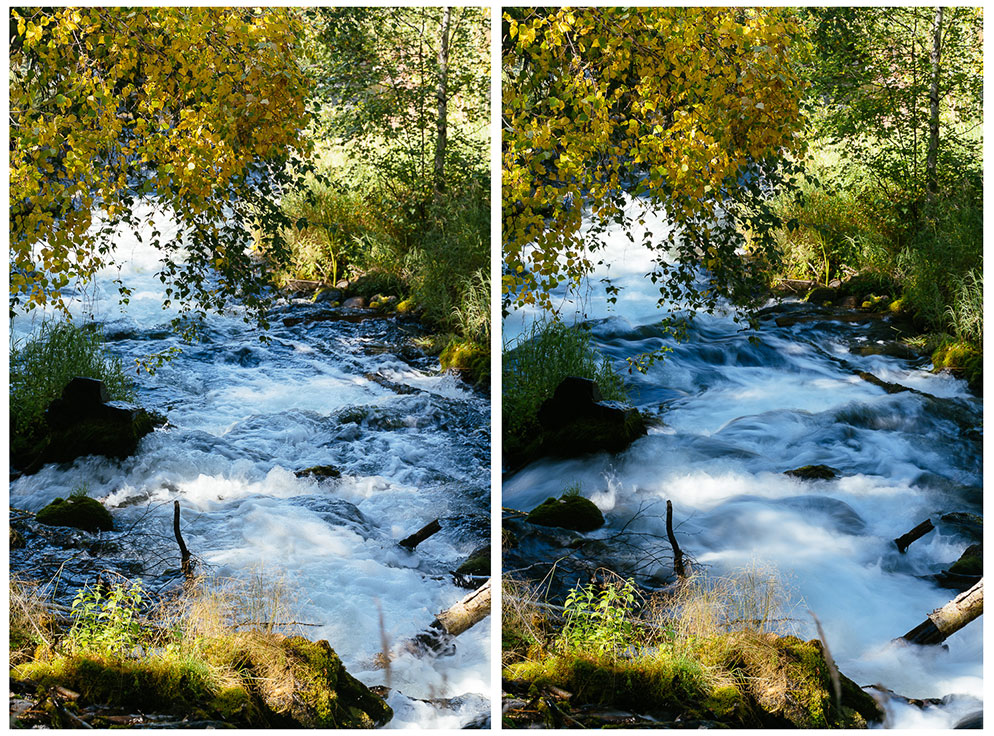
(Left) Z 7II with NIKKOR Z MC 105mm f/2.8 S, f/11, 1/60 sec. (Right) Z 7II with NIKKOR Z MC 105mm f/2.8 S at f/11, 1/6 sec.
Long exposure photography has long been a favourite of mine as it allows for so much creativity, yielding images that we can’t see with the unaided eye. There’s a variety of ways to use long exposures, whether it be for extra-long exposures, combined with panning of the camera to yield ethereal imagery, or simply just to smooth out the water in a waterfall.
The creativity is endless, and I hope these examples ignite your interest in this form of photography.

Taku Kumabe is a self-taught graphic designer and photographer who understands all facets of a creative workflow, capturing moments that his clients can seamlessly use in their own workflow. His work covers a broad range of genres including events and festivals, editorial and environmental portraits, travel, nature, landscape, and art direction in the print industry. He is a Nikon Canada Ambassador. See more of his work on his website at www.smaku.com.
More articles by this contributor


