Photographing Meteors, Fireballs and Meteor Showers
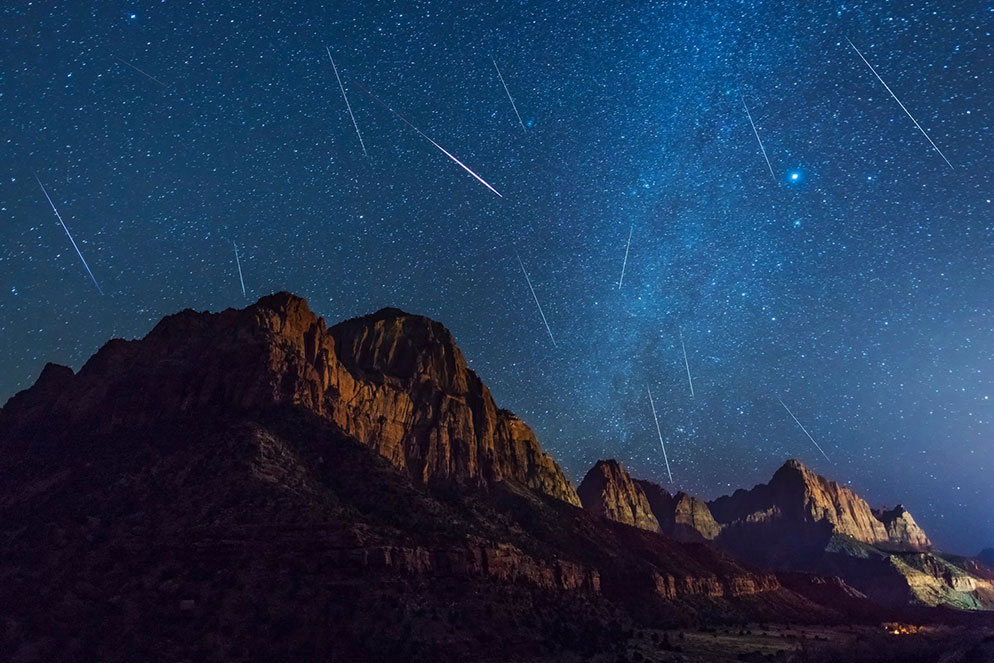
Meteor shower over Zion National Park. D850, AF-S NIKKOR 14-24mm f/2.8G ED at 19mm focal length. Base shot (landscape) 55 seconds, f/2.8, ISO 4000; Meteor shots 30 seconds, f/2.8, ISO 400.
Astrophotography has become more popular than ever and stars and the moon aren't the only celestial objects in the night sky that can be photographed. Taking pictures during a meteor shower can be just as exciting as seeing a shooting star or fireball blaze across the sky for the first time.
What causes meteor showers?
Meteor showers happen when Earth passes through or near a comet. They’re named for the constellation in which they’re visible radiating from.
Meteor showers are great subjects for the beginning astrophotographer because they don’t require special gear or telescopes—they’re easily seen by the naked eye.
Where to photograph meteor showers?
Meteor showers happen throughout the year and can be seen in both the northern and southern hemispheres. Searching the internet will get you lots of information on the more common, and, not so well known meteor showers to occur during the year.
Meteors can be captured in a “normal” image of the night sky as well as star trail photos. They vary in brightness and color, with some of them so bright they’re given the moniker “Fireballs”.
In addition to going out to take photographs during a meteor shower that occurs with regularity, there are sporadic meteors—random meteors not associated with a particular shower.
For observers, those located in the northern hemisphere, you have a distinct advantage as shower activity is stronger there than that seen by observers located south of the equator. The reason for this is that most of the major showers have meteors that strike the Earth in areas located far above the equator. As seen from the northern hemisphere, these meteors appear to rain down from high in the sky in all directions.

Meteor, Joshua Tree National Park. D5, AF-S FISHEYE NIKKOR 8-15mm f/3.5-4.5E ED, 15mm focal length, 30 seconds, f/3.5, ISO 6400, manual exposure, Matrix metering.
When to Photograph Major Meteor Showers
There are a number of meteor showers that regularly occur each year in the northern hemisphere. They include:
-
The Quadrantid meteor shower in January.
-
The Lyrids in mid-April.
-
During February, March, and April you can also expect fireballs to stream through the sky.
-
The Eta Aquariids during the first half of May
-
The Delta Aquariids in the second half of July
-
Alpha Capricornids in late July
-
The Perseid meteor shower begins in August and can last through December. The best time to see them however is mid-August, September and the beginning of December.
-
Orionids during the second half of October.
-
The Taurids (October for the S. Taurids, November for N. Taurids), are active for two months, are most numerous in November’s first half, including fireballs.
-
The Leonids in mid-November are quite unpredictable, with rich displays occurring roughly every 33 years.
-
Geminids in mid-December with the strongest dependable and observable display.
-
The Ursids occur in December.
There are a few meteor showers best seen from the southern hemisphere. These showers include the Alpha Centaurids, Gamma Normids, Pi Puppids, Piscis Austrinids, Delta Aquarids, Alpha Capricornids, Dec Phoenicids, and the Puppid/Velids.
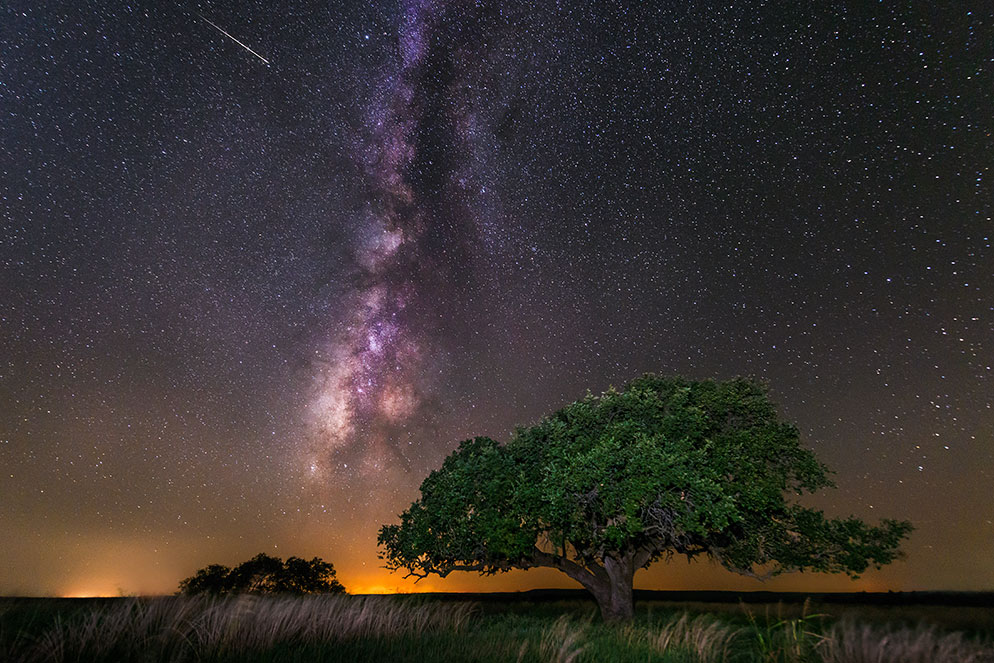
The Milky Way and meteor over a tree at the Texas State Historic Park of Fort Griffin in Albany, Texas. D800, AF-S NIKKOR 14-24mm f/2.8G ED at 14mm focal length, 30 sec., f/2.8, ISO 3200, manual exposure, center-weighted metering.
Camera settings for Meteor Showers
We spoke with professional photographer Diana Robinson who does a lot of night sky photography including photographing meteors, the milky way, stars and star trails; and Nikon's own Paul Van Allen who also often photographs the night sky including star trails, meteors and the Milky Way.
Diana suggested its best to begin each shoot with a basic starting exposure and experiment from there to dial in the ideal exposure. She explains, “I use manual mode, f/2.8, 20 seconds, ISO 4000, white balance 4000° Kelvin.” Depending upon the darkness, she will vary the ISO and shutter speed. “Because I am using the NIKKOR 14-24mm lens, I never go above 25 seconds so that the stars and meteors stay sharp.” The blurring of stars in a longer exposure happens due to the earth spinning on its axis.
If you're looking to photograph meteor showers and the Milky Way in the same image, you’d start off with this exposure and work from there as well.
How to photograph Meteor Showers
Diana says a tripod is a must, along with a wireless shutter remote.
Focusing can be a little tricky at night. “I use live view zoomed in on a bright star or Jupiter. I turn the focus back and forth until the star [or planet] pops. It takes a little practice but once you get it you have it. I always lock down the focus with gaffer tape and make sure that I’ve turned off the autofocus,” she explains.
You could also focus on infinity, “At f/2.8 at infinity or focused on the stars almost everything else is in focus unless things are closer than about 10 feet,” she adds.
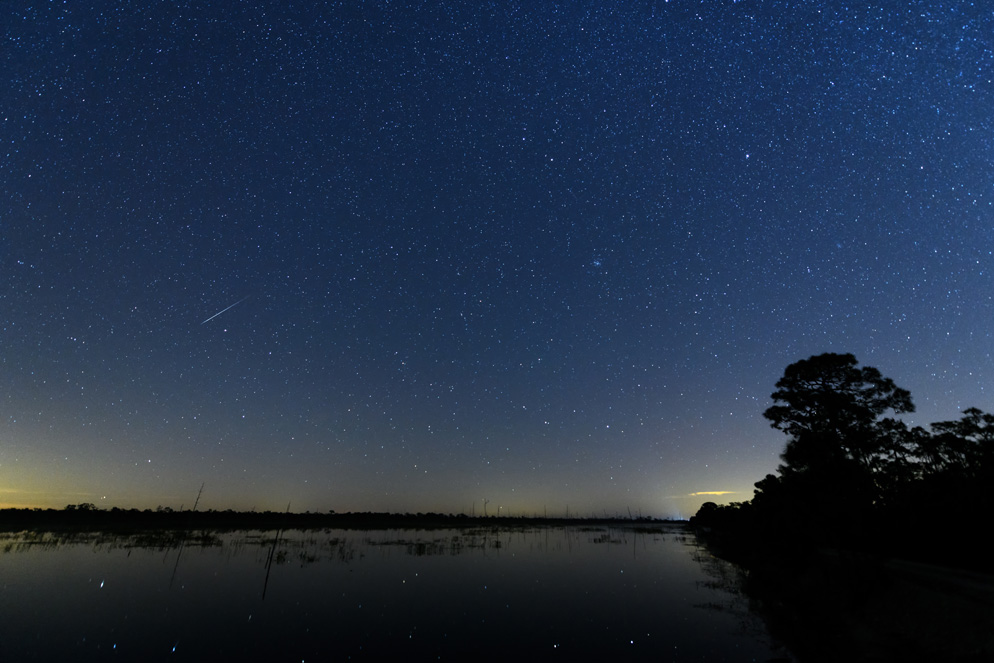
Geminid Meteor Shower, Babcock Wildlife Management Area, Punta Gorda, Florida. D850, AF-S NIKKOR 14-24mm f/2.8G ED, 15 seconds, f/2.8, ISO 1600, manual exposure, Matrix metering.
Diana suggests shooting RAW (Nikon NEF) so any post-processing will be done on a file that has the most digital data from the camera. And, while she often does a lot of post-processing for artistic reasons, she says, “I most always try to get the white balance correct in camera.”
For added creativity, you may want to make a separate exposure of the foreground landscape. Diana explains, “I usually take a long exposure of about 5 minutes at ISO 2000, f/2.8, 4000°K with long exposure noise reduction turned on so that I can include a nicely exposed foreground blended in with my Milky Way or night sky.”
Diana says that it is relatively easy to learn how to distinguish between meteors and other objects in the night sky like airplanes, the International Space Station or satellites. “I check for meteor shower events and try to shoot in the recommended time frames,” she notes. “Airplanes have a distinctive look with dashed red lights that show up in your shots. You get used to seeing these,” she says, adding, “Tracking the Space Station and satellites with smartphone apps will help also.
Paul explains that an object captured in a photograph is a meteor if it has tapered ends. Otherwise you may have photographed an airplane or satellite. Planes and satellites also will often span more than one frame, whereas a meteor rarely shows up in more than one consecutive frame. And, meteors can be more colorful than the man-made objects you may capture in your images.
Use a red headlamp so you can see your camera’s controls if you need to change anything but the red light keeps your eyes adjusted for night vision.
Lastly, Diana noted how addictive astrophotography can be once you get hooked, “I spend hours out shooting. Sometimes the dawn is breaking and I can't believe the night went so fast.”
Get out there, try it and have fun!
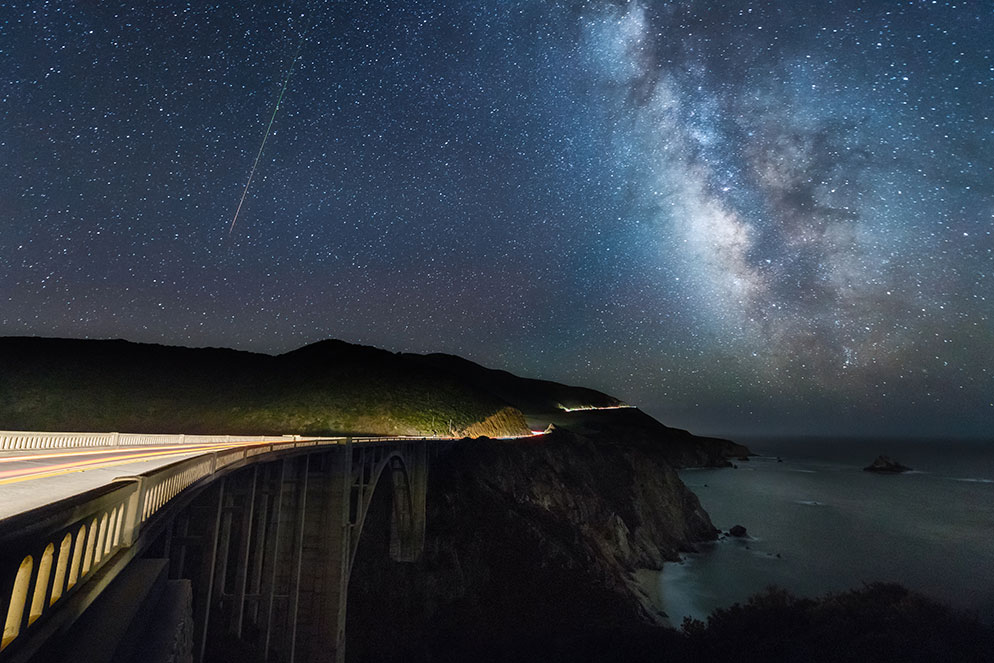
The Milky Way and a Perseid Meteor shine above the Bixby Bridge in Big Sur, California. D810, AF-S NIKKOR 14-24mm f/2.8G ED at 14mm focal length, 30 seconds, f/2.8, ISO 5000, manual exposure, center-weighted metering.
Meteor Shower Photography Tips
-
Research the optimum date for the meteor shower you want to photograph
-
Start with an aperture of f/2.8
-
Use a shutter speed of 20 seconds
-
ISO 4000 as a beginning point
- White balance 4000° Kelvin
-
Use a wide-angle lens
-
Make a separate exposure of the foreground landscape with a long exposure
-
Turn off the Autofocus
-
Shoot RAW files (NEF)
-
Use a tripod
-
Use a red headlamp to see camera controls
- Use a piece of gaffer tape on the lens barrel so the focus doesn’t move
-
Track the space station and satellites with smartphone apps


