Macro Water Drop Photography
How to create photos of water drops and splashes
I travel a lot during the year shooting assignments and teaching workshops around the globe. I love to travel, but you know the saying, there’s nothing like home sweet home. After a few days in the office my creative energy starts to stir. I begin looking for a photo project I can do without even walking out the front door. Macro photography offers endless creative options, and one of my favorites is water drop splash photography.
Water drop splash photography involves capturing droplets as they fall into a small bowl of water. At its simplest, you can set up on a small table using items found in your kitchen and photograph drops and ripples. Take it one step further, add a few Speedlights, and you can create beautiful photographs of droplets colliding with each other. Let’s look at two different ways to photograph water drops at home.
Equipment for photographing water droplets
To get started you need a camera, macro lens and tripod. Mirrorless cameras make macro photography easier than ever before. Using your EVF and LCD screen you can focus, compose and evaluate depth of field in real time. My favorite macro systems are the Z 9 or Z 7II along with the NIKKOR Z 105mm f/2.8 VR S lens, but you can use any macro lens. The 105mm gives a narrow angle of view, which is helpful to isolate the drops. You’ll also need a sturdy tripod and a continuous light source. I use a video light mounted inside a softbox on a light stand. And lastly, have some colored gels available to put on your light source to give your water droplets vibrant coloration.
Setting up to photograph water droplets
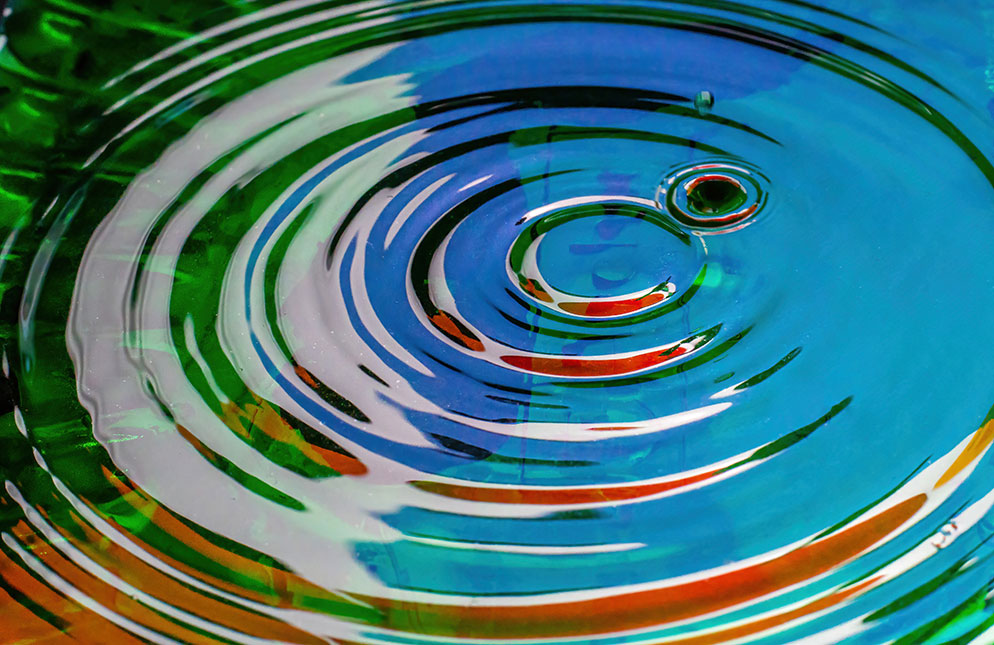
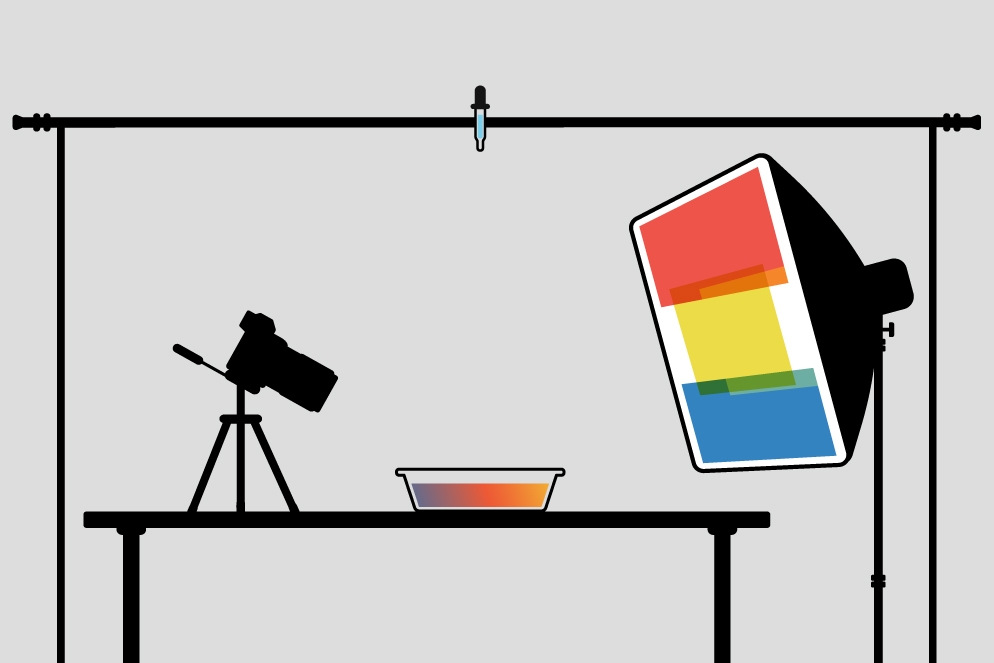
Start by filling a small bowl or casserole dish with plain tap water right to the top of the container and place it on a table at a comfortable shooting height.
Next, you need to suspend a small eye dropper over the water source. There are many DIY solutions for this, but I just tape an eye dropper to a crossbar attached to light stands. Height matters. You need the dropper at least two feet above your source to create a nice splash when it hits the water.
Now place your light source behind the water. I place my small light about a foot away from the water. I tape a few colored gels over the light to add some interesting reflections in the water.
Finally, position your camera so you are about one to two feet from the water source. Adjust your angle until you like the reflections created by the light behind the water.
Water droplets shooting technique #1
Now the fun starts. One challenge is determining focus. Take a pencil and press the tip into an eraser so the pencil stands straight up on its own. Squeeze a drop of water into your dish and place the pencil/eraser in the water right where the drop hit. Now you can focus on the pencil at the waterline to get perfect focus. Remove the pencil from the water.
You’ll want to photograph in a fairly dark room so your light is the only light reflecting in the water. Settings will vary depending on how bright your light is, but my normal exposure is f/11, 1/1000 at ISO 3200. Set the frame rate to CH (fastest frame rate) to capture more images per drop. With your finger on the shutter of the camera, slowly squeeze the dropper. As a drop starts to fall, hold the shutter down to capture all the ripple/drop effects in the water. Colored ripples can be just as interesting as actual drops emerging from the water.
Experiment using different colors of gels on your light. Also, try adding food coloring to the water for different effects. Expect to shoot a lot of frames for just a few keepers. Try changing your camera angle for different perspectives on the dish of water…everything from eye level to straight down works. Have fun!
For this technique, the camera is set up to photograph water drops and the ripples created. The dropper is suspended above the container of water and color gels added to the light source.
Water droplets shooting technique #2
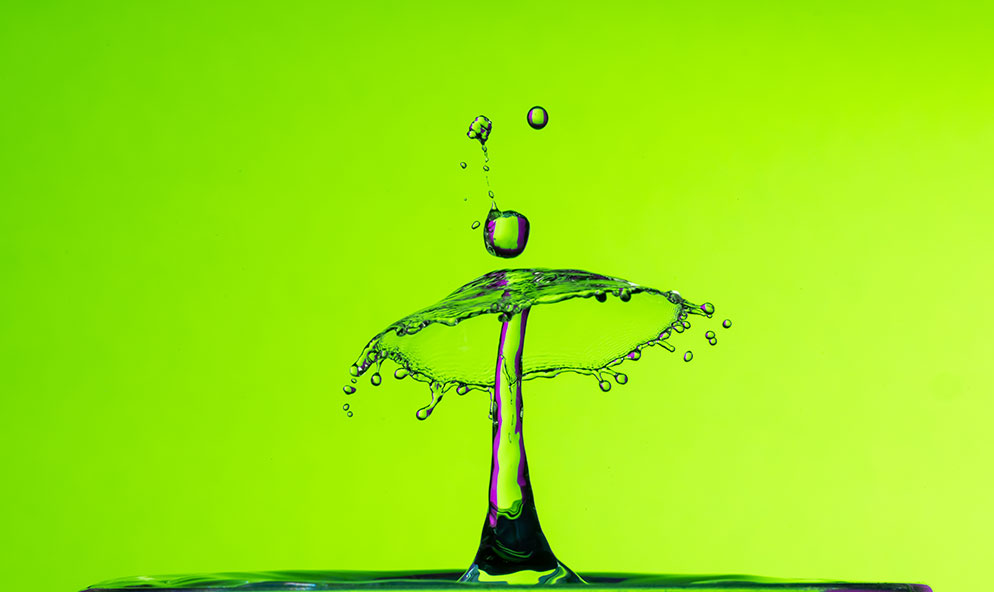
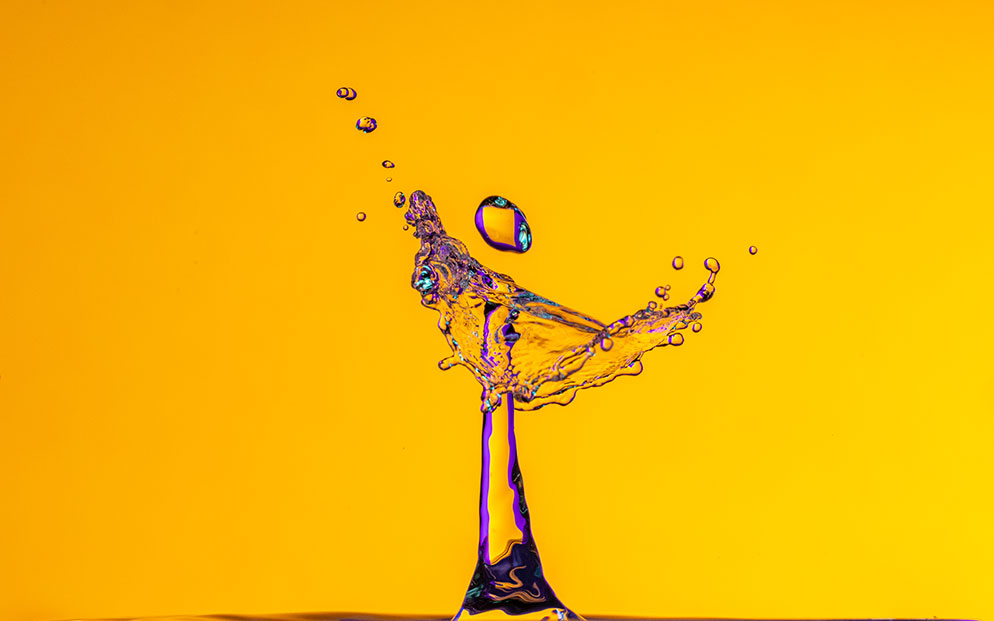
The second set up to photograph water droplets is a little more complicated and requires a few other pieces of gear. But the results are stunning, and you have much more control over the shapes the drops create splashing into the water. If you want to create those beautiful umbrella splash shots, this is the technique for you.
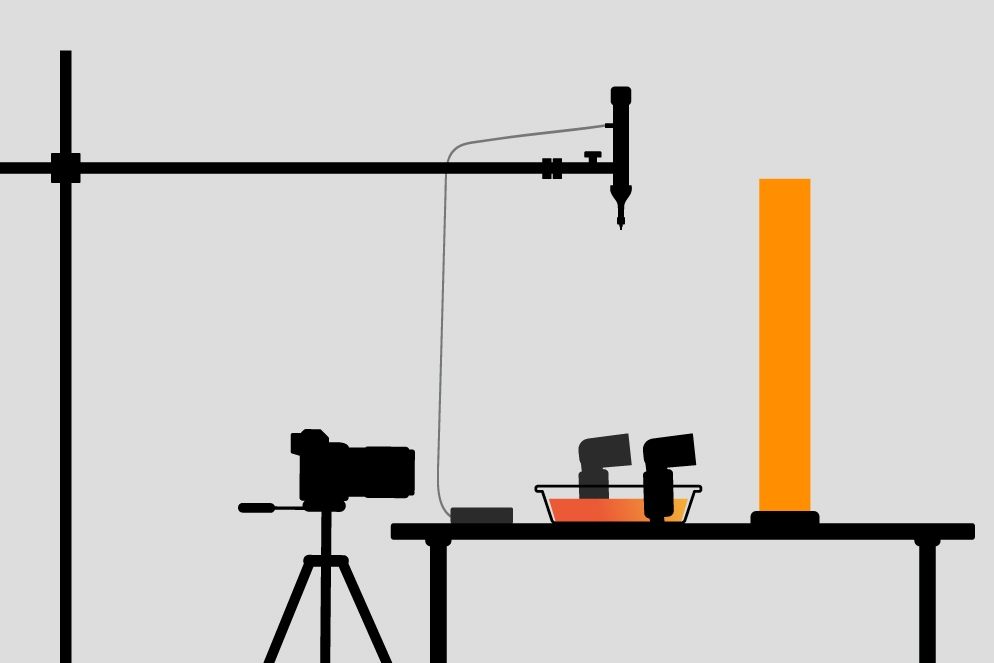
You will need three additional pieces of gear. Two Speedlights, and a splash water drop kit. For Speedlights I use two SB-5000 flashes, but any Nikon flash will work. The other item you need is a splash water drop kit. These devices allow precise control over water dropping into your container. I use a Miops Splash Water Drop Kit, a simple device that you can control using an app on your smart phone. There are other varieties of drop splash kits that work well, choose one that fits your budget.
Fill a small bowl with tap water, place it on a table, and set up a white background behind the water. The background can be a white poster board or reflector. Next, attach the water droplet device over your water bowl. I use a small boom arm to position the Miops water device over my water bowl. Fill the water in the bowl right to the very top…gravity should be holding the water right at the rim.
Now position the Speedlights. I place one on the table aimed at the white background. The second Speedlight is positioned to the side of the water bowl. This light will illuminate the drop from a perpendicular angle. I shoot this light through a small softbox to diffuse the light.
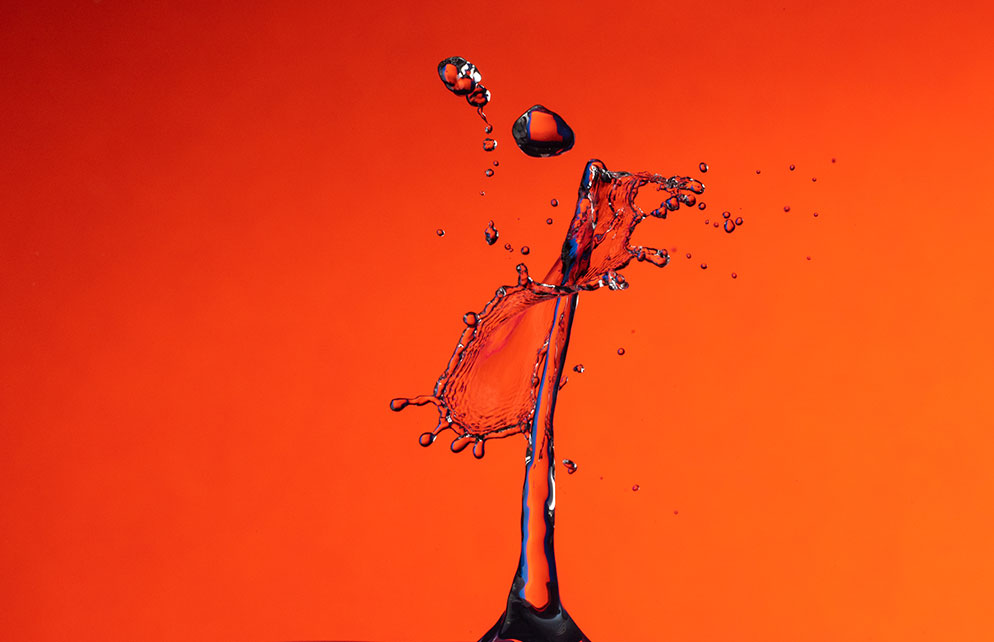
There are three variables that will create the color in your photograph.
First is the background. The flash illuminating the white background will create white as a backdrop. To change the background color simply add a gel over this flash or put a colored piece of paper behind your bowl.
The second color variable is the color of the water droplet falling out of the droplet device. You can drop clear tap water for a clean look. Or you can add food coloring to change the color of the drops. You can also add Xanthum Gum (find it at your local grocery store) to this mixture for more gel and consistency in the droplets.
Finally, you can use plain tap water in your water source bowl, or a variety of other liquids. Add food coloring to change the color or use another liquid like milk for different effects. Experimentation is the name of the game. See what you like the most.
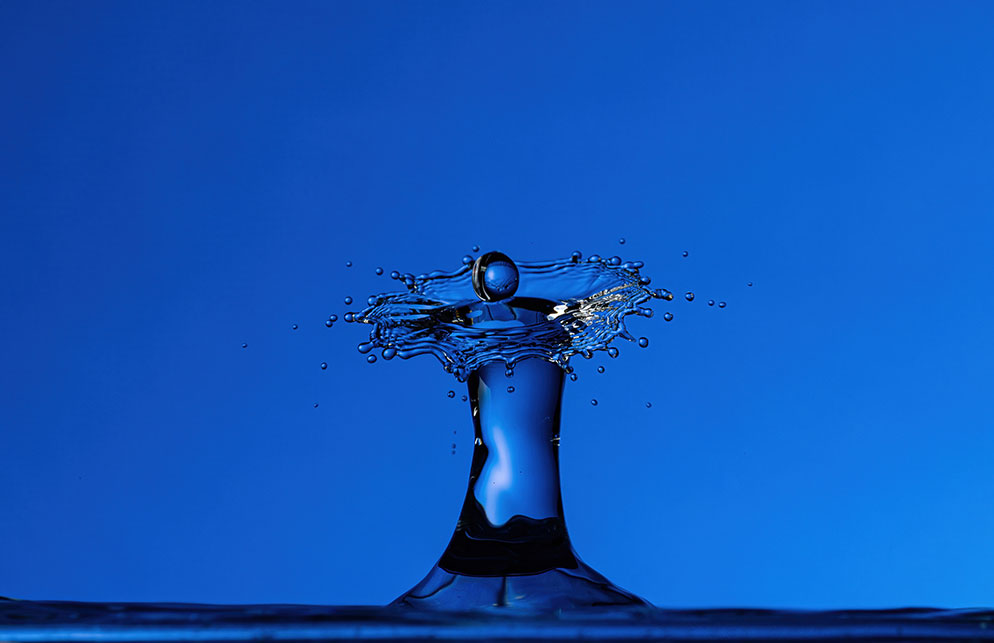
In this technique, the dropper system is set up above the camera and Speedlights are set up to illuminate the background.
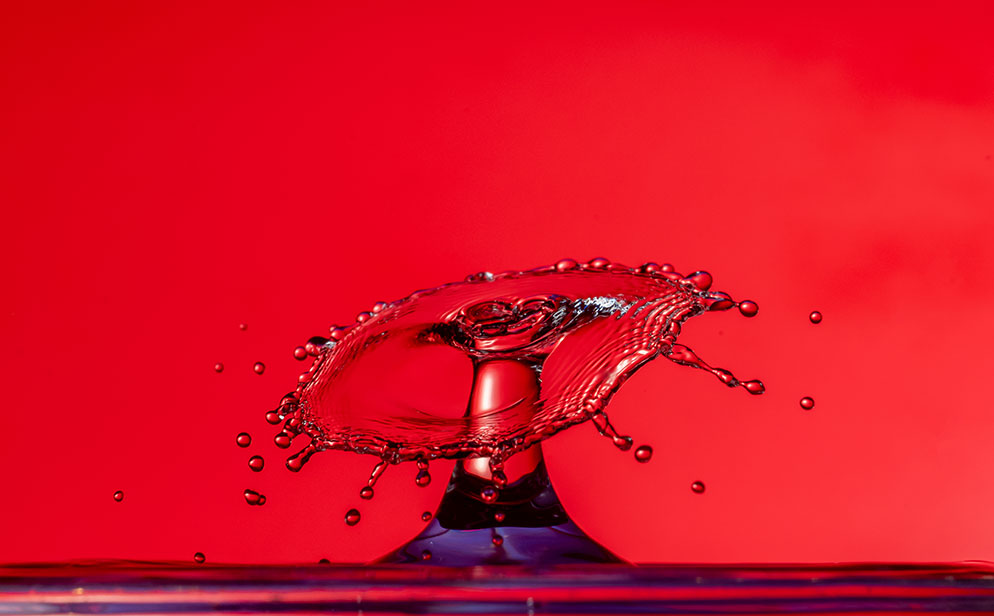
Umbrella effect shooting technique
The real trick here is getting the timing of your droplets just right. To create an umbrella effect, you need two drops falling at slightly different intervals. The first drop hits the water, splashes upward and the second drop hits this creating the beautiful umbrella effect. The Miops app allows you to control size and timing of the drops. Expect to experiment a little to get it right. The app will fire your flashes at just the right time when the drops create the splash.
It can take some time to get the perfect drop timing. I set up a Z 6II and took slow motion video of the drops and flash burst. This really helped me fine tune the timing of droplets. If you don’t have a second camera, try using the video on your smart phone.
What actually freezes the water droplet motion is the flash duration, not the shutter speed. I will set my Speedlights to manual mode to 1/32, which creates a very fast flash duration. The lights are triggered by the splash kit device. Since you’re shooting at a slow shutter speed, you need a dark room for this technique to work. I set my camera for three seconds, f/29 at ISO 400. The long exposure gives you time to hit the drop/flash trigger on the smart phone app and sync perfectly. You want as much depth of field as you can get, so choose an aperture of f/22 or higher.
When you get your first perfect umbrella you will gasp in excitement. The delicate shapes are stunning, and each drop will create something a little different. One word of caution. Macro droplet splash photography is addictive, you may not be able put your camera down!