Time Lapse Tips and Tricks Using Nikon Mirrorless Cameras
Z 9, Z 14-24mm f/2.8 S lens at 17mm focal length, 13 sec, f/8, ISO 100, manual exposure.
Time lapsing is one of the most creative ways to convey the emotion, action, and life within a scene without relying on shooting in a strictly video format. From capturing the fleeting light of a sunset to a starry night dancing across the horizon or showing the chaos that ensues during rush hour traffic, time lapses take your audience out of a still image, and into a world of storytelling motion. On one of my most recent adventures, I had the opportunity to put the Nikon Z 9 into some of the harshest environmental conditions to tell a story of the beauty within Iceland. In this article, we will dive into the specifics of how I managed to utilize the Z 9 and its features to create these time lapses and discuss a few key components that you should keep in mind while creating a time lapse on any Nikon camera.
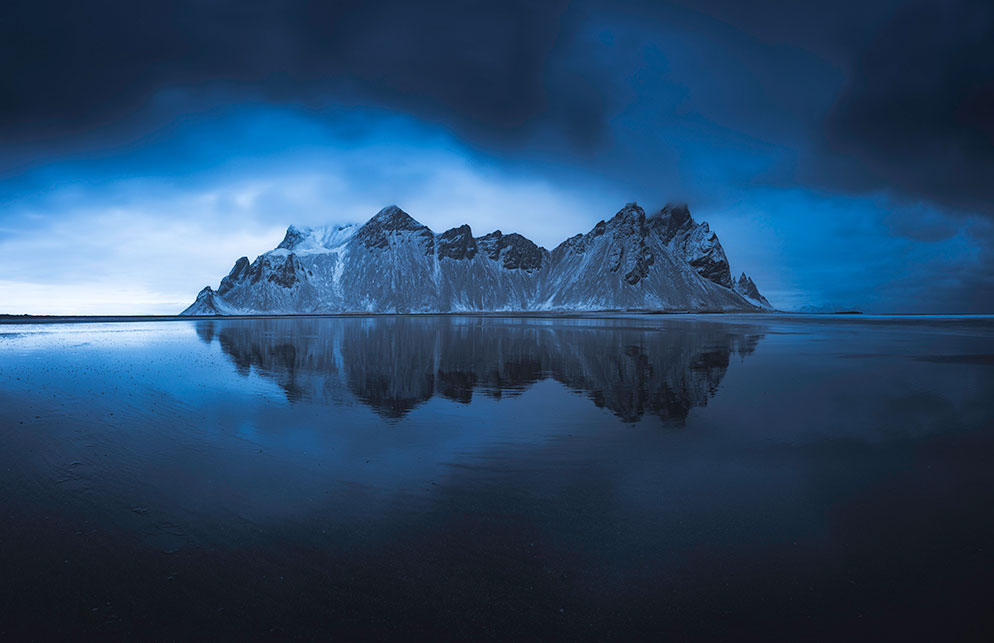
Time lapse of snow blowing on the beach with the Vestarhorn mountains in the background, in Iceland, using the intervalometer to shoot still images to be later stitched together to create a time lapse video using third-party software.
What exactly is a time lapse?
First, let’s understand what it is we are trying to create. A time lapse consists of hundreds to thousands of individual photographs taken in succession and then compiled into a video. By taking multiple photos in succession with a brief interval between, you’ll be able to create a video that represents a sped-up passage of time.
Now of course, you can achieve similar effects by simply recording long durations of video and then speeding them up but shooting still images with the intentions of creating a time lapse video has its benefits. When using an intervalometer—a timing device that's used to trigger the camera's shutter at pre-determined intervals—also known as an interval timer to create your time lapse, you have the ability to take a single frame from your stills and maintain RAW editing capabilities for that single frame. You have a bit more freedom with single images, especially with the resolution of a Z 9, to crop in and still maintain 8K and 4K resolution. And finally, you can utilize long exposures while shooting stills to capture scenes like the Milky Way rising into the night sky, something that isn’t achievable by shooting video. And, with a camera that’s capable of shooting 8K, you’re giving yourself the flexibility of a large file so you can be creative in post-production, to crop, zoom into or pan around the scene.

Z 9, NIKKOR Z 100-400mm f/4.5-5.6 VR S lens at 400mm focal length, 1/500 sec, f/5.6, ISO 500, manual exposure.
Creating a Time Lapse on the Z 9
The Nikon Z 9 makes unleashing your time lapse creativity extremely simple while allowing the user the ability to take advantage of the full versatility of the camera. There are two main ways to create a time lapse on the Nikon Z 9, “Interval Timer Shooting” and “Time-lapse Video.” Both options in the end will allow you to walk away with a time lapse to be proud of, but there are some significant advantages to choosing one over the other depending on your needs. (Editor’s note: many other Nikon digital cameras also offer both the Interval Timer Shooting and Time-Lapse Video options. Check your camera’s user manual to see if your camera offers these options.)
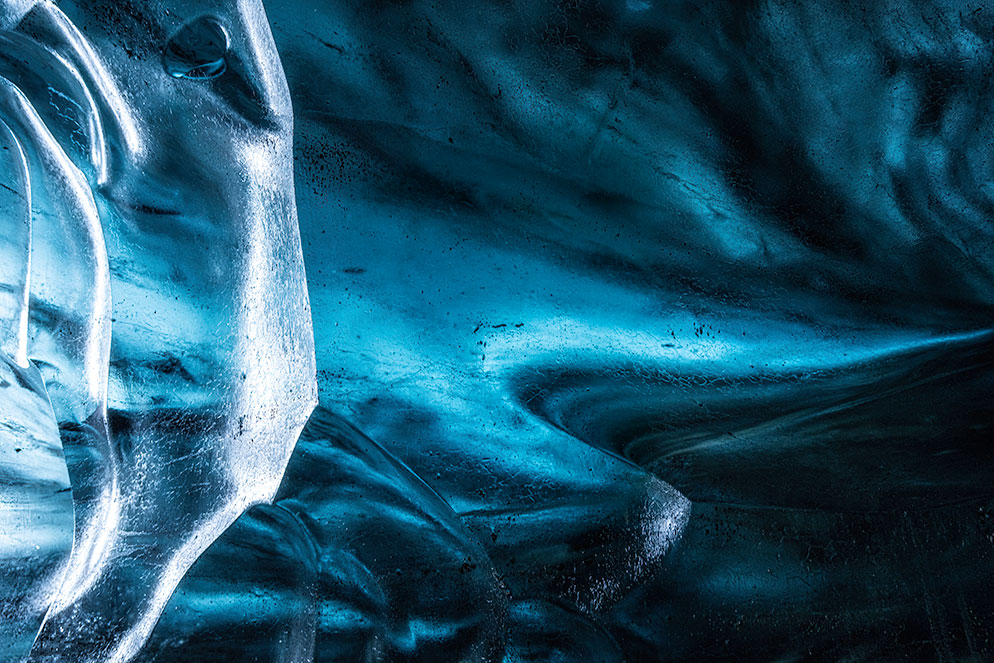
Time lapse captured in an ice cave in Iceland, using the intervalometer to shoot still images to be later stitched together to create a time lapse video using third-party software.
Interval Timer Shooting
With Interval Timer Shooting, the photographer can create a time lapse in the traditional manner, through a series of still photographs separated by an interval. This is my preferred method as it will allow me to have full RAW editing capabilities on each .NEF file before compiling the images in post-production into a final product. The great function with this option on the Nikon Z 9 is that you have the option of having the camera not only output each individual still frame as a .NEF, but also as a video as well. These videos can be output to resolutions as high as 8K/30p, either H.265 or H.264.
Other differences for this function versus Time-lapse Video include the ability to set a start day/time. This is a great when you want to set up your time lapse to shoot overnight while you sleep, or for remote projects. TIP: Shooting time lapse overnight and don’t want to have to hear each shutter snap? With cameras that offer Silent or Quiet shooting, you can turn off/down the sound.
You can also set up the Nikon Z 9 to do bracketed time lapses. For instance, if you wanted to create a time lapse that utilized HDR images, you could set the camera to capture bracketed exposures and then in post-production combine them to create HDR images that you then use to create your final time lapse video.
Z 9, NIKKOR Z 100-400mm f/4.5-5.6 VR S lens at 250mm focal length, 1/1600 sec, f/5, ISO 1600, manual exposure.

Z 9, NIKKOR Z 24-70mm f/4 S lens at 70mm, 1/640 sec, f/4, ISO 250, manual exposure.
Time-lapse Video
By utilizing this function of the camera, just like Interval Timer Shooting, you can set your camera’s interval and duration of shooting for your time lapse. The main difference though is that your final product output from the camera is a movie. There are no RAW files available for post-processing or to select a high resolution still from if you’d like a single image to print or utilize in another creative way. But, if you want to make your time lapse creation as easy as possible with minimal post-production work, this option is your choice. This function allows for the photographer to instantaneously have a time lapse available for use once shooting is complete. Your setup is a bit different here as well, as you set the desired shooting time and interval, and the Z 9 will display how long your final clip will be for reference.
Being a still and time lapse photographer, I always opt to shoot in Interval Timer Shooting, that way I can get the best of both worlds…a still image and time lapse.
For both options, you have the ability to choose where you’d like your project to store to help keep your time lapses organized on your XQD or CFexpress card. In Interval Timer Shooting, you can have the Z 9 create a source folder, while in Time-lapse Video mode, you can designate a specific card slot for storage. You can also enable or disable focusing before each image is taken. I opt for disabling this as I shoot fully in manual focus.
Z 9, NIKKOR Z 100-400mm f/4.5-5.6 VR S lens at 400mm focal length, 1/400 sec, f/5.6, ISO 1000, manual exposure.
Time lapses take your audience out of a still image, and into a world of storytelling motion.
Z 9, NIKKOR Z 24-70mm f/4 S lens at 27mm, 1/6 sec, f/5, ISO 250, manual exposure.
Z 9, NIKKOR Z 100-400mm f/4.5-5.6 VR S lens at 100mm focal length, 1/640 sec, f/5.6, ISO 320, manual exposure.
Key Settings
Once you’ve chosen which time lapse functionality will work best for you, you will then need to start directing the camera on how you want the Z 9 to create your final product. Let’s look at some of the key settings that you will need to set in order to create the best final product possible.
Intervals
First, you’ll need to decide on the speed you want to convey through your time lapse. Do you want your scene to speed through the moment? Or would you like something a bit smoother and more cinematic? The speed of your subject is what will most likely determine your interval settings. The faster the subject, the shorter the interval. If your subject is slow moving, a longer interval can be utilized. An example of a fast-moving subject would be vehicles driving down a highway, this may warrant a 1-2 second interval. A slow-moving example would be the Milky Way moving through the sky. Here, a 5-10 second interval may get the job done. Note: When you set your interval, you want to make sure that your interval time is longer than the shutter speed itself. For example, if my shutter speed is 2 seconds, and I want a one second interval, my interval should be set to 3 seconds.
For Interval Timer Shooting, you’ll need to set your interval time as well as the Intervals x shots/interval. This is where you will tell the camera how many images you want the time lapse to consist of. The Z 9 can shoot up to 9,999 images.
Number of Shots
The number of shots will control the duration of your final time lapse, so before setting them, you’ll need to do a bit of math. You will need to decide if you will want your time lapse to be 24fps or 30fps. 24fps will give your video a smoother, more cinematic look while 30fps will give your video a slightly crisper and cleaner look. Shooting 60fps is another option.
I prefer to shoot most of my nature lapses in 24fps. So, if I want a 10 second final time lapse scene at 24fps, I will need 240 shots to achieve that. If math isn’t your favorite subject, there are several time lapse calculator apps available online to help you set the correct settings. The Z 9 actually has a built in calculator to help you figure out the correct time lapse settings. While in Iceland, I wanted to aim for 30 seconds long final clips, usually at 2 second intervals, so my total shoot time was ideally around 30 minutes and 900 shots.
Exposure Smoothing
If you’ve decided to shoot your time lapse by utilizing either Aperture Priority or Shutter Priority modes, you’ll want to turn on “Exposure Smoothing.” This will only work though if you have “Auto ISO” turned on as well. By turning on this function, the Z 9 will attempt to adjust exposures between frames as consistently as possible to reduce flickering within the time lapse.
Interval Priority
If you have chosen to shoot your time lapse by utilizing either Aperture Priority or Program Mode, you will want to turn on Interval Priority. With this function enabled, the camera will make sure that the interval takes priority over the exposure time, helping keep a consistent look.

Z 9, NIKKOR Z 100-400mm f/4.5-5.6 VR S lens at 310mm focal length, 1/400 sec, f/6.3, ISO 100, manual exposure.
Lens Choices, Compositions & Scene Choice
For your compositions and lens choices, it’s key to take a quick look at your subject and study the parts that are going to convey the biggest sense of motion. While documenting the landscapes of Iceland, I shot various scenes on lenses ranging from the NIKKOR Z 14-24mm f/2.8 S, NIKKOR Z 24-70mm f/2.8 S, NIKKOR Z 70-200mm f/2.8 VR S and the NIKKOR Z 100-400mm f/4.5-5.6 VR S.
All these lenses were chosen intentionally to help best convey the mood of a particular scene. For example, when I had extremely fast-moving clouds and blowing snow at the Vestrahorn Mountain, I opted to go with the 14-24mm to capture all of the movement. On a day where I spent observing fog rolling through the intricate ridges of a mountain, I chose the 100-400mm lens to bring my audience’s eye into a very particular area where the best motion was. When selecting the proper lens for a desired scene, be aware that you may need to crop in during post-production, and you may also want your end-result video to be in a 16x9 ratio. I tend to err on a bit wider focal length than I’d normally use, to give me this flexibility.
When setting up a composition, I try to position myself in a way that the motion through my scene adds to the overall aesthetics. For example, if you're time lapsing a scene that has a small creek running through it, try to make sure that the motion of the creek is working as a leading line, and not just randomly through the frame. That motion can be a bit disorientating. Look for converging lines in motion as well, like fast moving clouds moving either towards or away from you.
With a wide-angle lens, this motion will either converge or diverge in your scene, creating a powerful sense of motion. Remember, you may want a 16x9 aspect ratio at the end, so when composing your frame, keep that in mind and try to envision how much may need to be cropped at the top or the bottom. Time lapses are all about motion, so look for scenes where there is indeed, motion. Cloudless skies during the daytime and no motion in the foreground can yield rather bleak scenes. Choose your time and location to time lapse wisely and pre-plan for weather and light.
Z 9, NIKKOR Z 24-70mm f/4 S lens at 35mm, 0.4 sec, f/14, ISO 100, manual exposure.
Z 9, NIKKOR Z 100-400mm f/4.5-5.6 VR S lens at 400mm focal length, 1/800 sec, f/6.3, ISO 2000, manual exposure.
Filters for Time Lapses
To create a nice and smooth time lapse, you will want to keep your shutter speed rather low to create a bit of motion blur within each frame. I try my best to aim for shutter speeds that are double the frames per second of my final product. For example, if I’m aiming for a 24fps video, I’ll aim for a 1/50 second shutter speed. For 30fps, 1/60 second. It’s okay to drop even slower on your shutter speed for effect, but these are my limitations.
Now these shutter speeds can be quite challenging to achieve at times when your ambient light is quite bright, for example the middle of the day, so utilizing neutral density filters can be quite beneficial. A three, six or even ten-stop neutral density filter can help you reach these lower shutter speeds during brighter shooting times. Now I know what you are thinking, “Why not raise your aperture as high as possible and lower your ISO?” And that’s a valid point, but there are two reasons this may not be the best idea. First off, even with an aperture of f/22 and setting ISO as low as possible, there still may be times that the light may be too bright. Secondly, if there is any dust or debris on your camera’s sensor, it will become more apparent at a higher aperture, therefore creating a possible post-processing headache. I almost always utilize an ND filter in order to keep my shutter speed and aperture low.
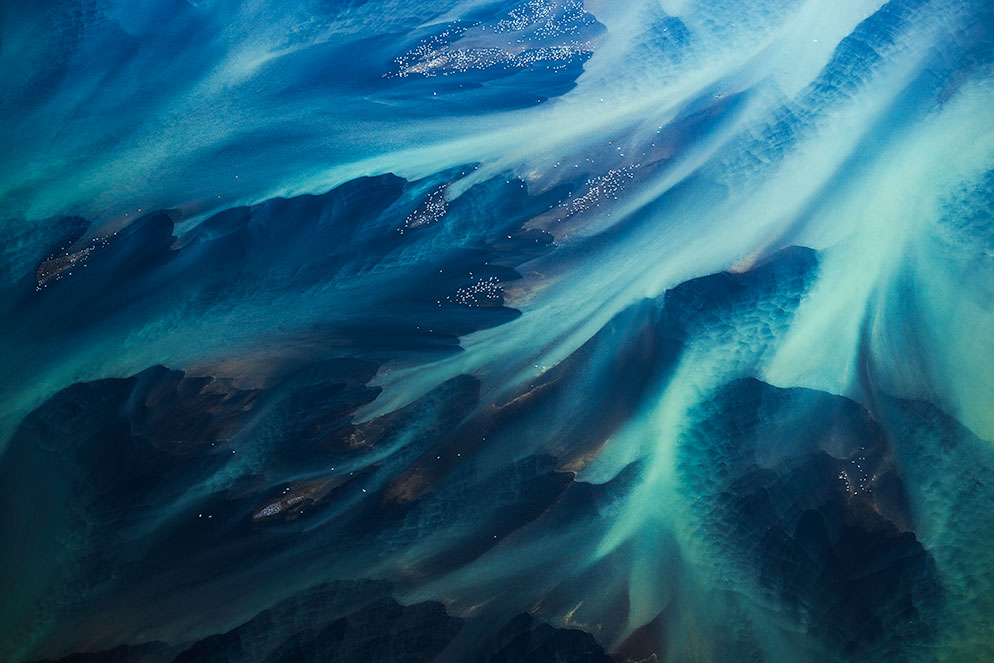
Time lapse of Glacier Lagoon in Iceland, using the intervalometer to shoot still images to be later stitched together to create a time lapse video using third-party software.
Time lapse of Glacier Lagoon in Iceland, using the intervalometer to shoot still images to be later stitched together to create a time lapse video using third-party software.
5 Mistakes to Avoid:
There’s a lot that goes into creating a time lapse, so the last thing you want after coming across the perfect scene is to have a simple mistake completely ruin your work. Here are five mistakes to be aware of making while out in the field:
-
Make sure that you go through your set up checklist one final time before starting your time lapse. This includes making sure that your camera is in manual focus, you’ve leveled your frame, switched your white balance over to a constant white balance, and everything discussed above. Even though I have been time lapsing for a few years now, I still go through my “checklist” on my phone prior to starting my sequence, just to make sure.
-
Double check that battery and make sure its fully charged! There’s nothing worse than getting halfway through an epic time lapse, only to have your battery die! The Z 9 battery lifespan is incredible, but that doesn’t mean I might accidentally start with an almost dead battery.
-
Ensure that your tripod legs are fully locked, and your legs are on a sturdy surface. I’ve had a few time lapses get ruined due to the tripod leg slowly sliding down during the shoot, or even having the wind knock the leg off a rock the tripod was standing on. Speaking of tripods, when using a lens that has built in VR on a camera that's on a tripod it is recommended to turn the VR (Vibration Reduction image stabilization) off.
-
Check your camera’s sensor prior to starting the time lapse. The Nikon Z 9 comes with a shutter shield that does an incredible job at keeping the camera’s sensor free from dust and debris, but eventually you may still end up with something on your sensor, especially if you change lenses frequently. In time lapses, it can be quite challenging to remove any small sensor spots, so I make sure to give my sensor a good cleaning prior with both a blower, and the Z 9’s “Clean Sensor” function.
-
Finally, and this may seem like the simplest concept, but you can easily forget to do it! Don’t forget to press “Start” to start your time lapse! At the beginning of my time lapse journey, I kept finding myself pressing the shutter button to start the time lapse. Obviously, this didn’t work, and I ended up empty handed during a few shoots. Click that “Start” button and watch the camera for a minute to make sure that it is indeed shooting.
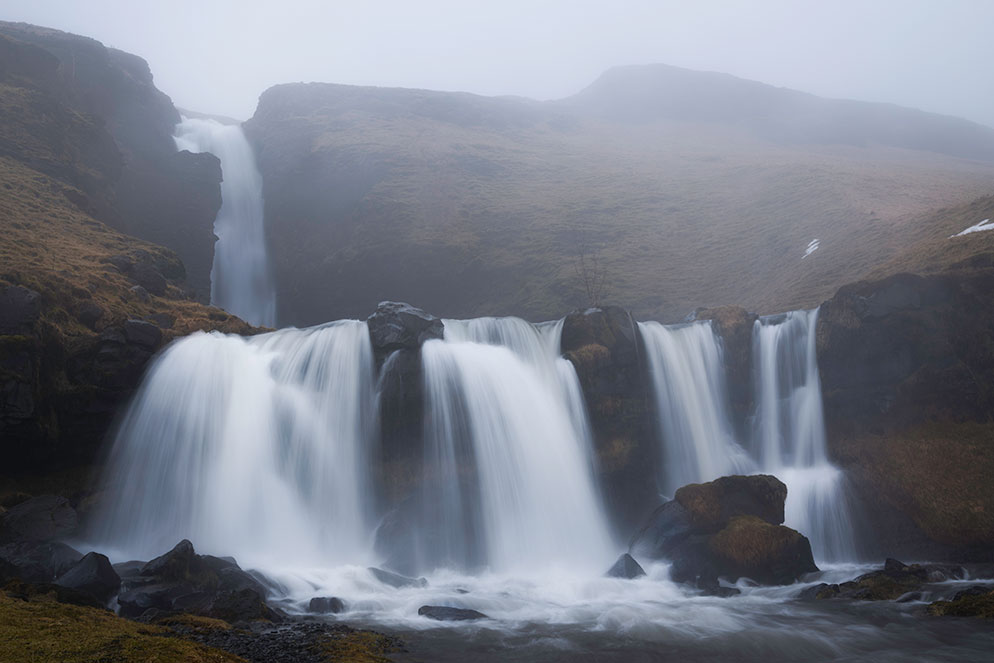
Time lapse video of moving water in Iceland, created using the in-camera time lapse video feature of the Z 9. This feature creates the finished time lapse video and saves it to the media card. No need for additional software to combine hundreds or thousands of individual image files.
Conclusion
Creating a time lapse is just one of the many ways to unleash your creativity and have fun with photography. It can indeed take some thought process before you have your end-product, but with the Nikon Z 9’s Interval Timer Shooting and Time-lapse Video options, the camera simply asks you to tell it what you want it to do, and then it does all the hard work for you. If you’re looking to dip your toes into this fun realm, just like anything else, practice makes perfect. Try time lapsing various subjects, times of day, and with various intervals. You’ll be amazed at what you and your camera are able to create!

Mike Mezeul II is a photographer and photojournalist addicted to storytelling and adventure. He's photographed landscapes, professional sports, natural disasters, concerts, air-to-air aerial photography and more.
More articles by this contributor


