Want to Take Better Bird Photos? First Step: Customize Your Mirrorless Camera
Into bird photography? Then you know the odds are against you. You show up, they take off. That’s the first problem to solve: getting to the right spots without spooking your subjects. With patience, determination and what you’ve learned from trial-and-error experience, that can be accomplished. The rest pretty much depends on how you take advantage of your camera’s incredible built-in technology. We think that part comes down to customizing your camera to get the pictures you want—the pictures you previsualize as well as the pictures that happen instantly and unexpectedly, right in front of your eyes. Simply, your camera has to be as ready as you are.
Which is why we talked with Lindsay Silverman, who brought a recent passion for bird photography and a lifetime of photographic experience and expertise to the conversation. Customizing his cameras for the desired result is exactly what he does. It’s also what he teaches in his online presentations and workshop sessions with enthusiasts, pro photographers and NPS (Nikon Professional Services) members.
Ready to cut those odds even more?
First Things First
Think of the following list as a quick-start intro to Lindsay’s settings and shooting choices for his Z6III, Z8 and Z9 mirrorless cameras—his elements of customization. This is what works for him, and it’s what he suggests.
• Choose Bird Detection AF mode. If that choice is not an option in your Z camera, set Animal Recognition.
• Set your frame advance at 20 frames per second.
• Set AF-C for continuous autofocus operation.
• Set Auto ISO.
• Always shoot RAW files.
• Always have the histogram display on.
• When available, have in-camera VR and lens Sport VR active.
• Set Picture Controls to neutral.
Lindsay’s Area AF choices, which are critical to success, will always be determined by the situation. Likewise for exposure compensation settings.
How and why do these settings work for him? And what about those situational choices for Area AF and exposure comp? As you might expect, Lindsay, and his pictures, will tell those stories.
“You Lookin’ at Me?”
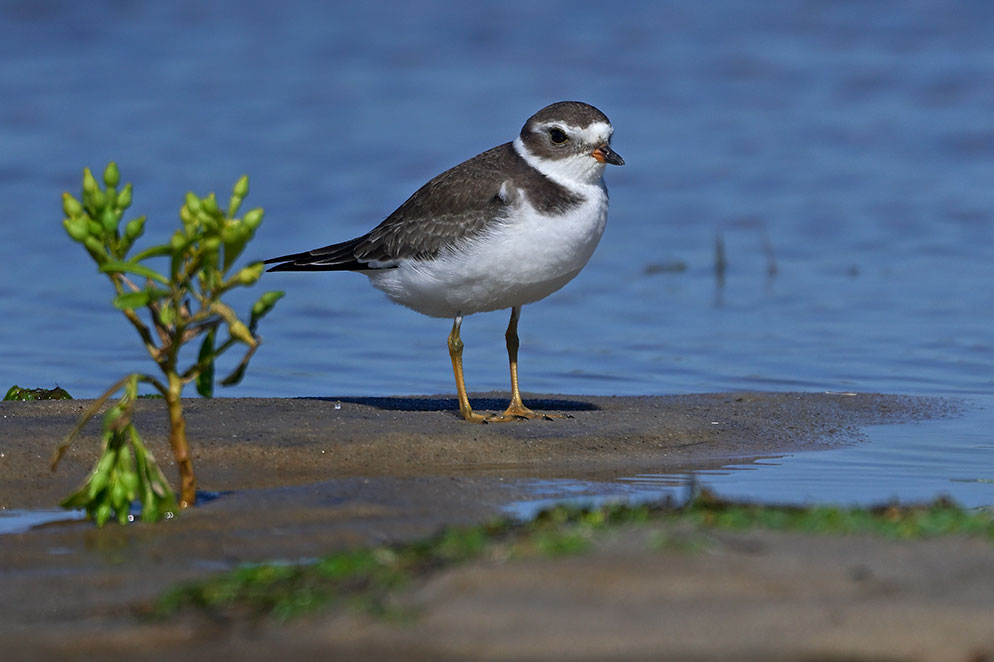
Z8, AF-S NIKKOR 500mm f/5.6E PF ED VR, Mount Adapter FTZ, AF-S Teleconverter TC-14E III, 1/2000 second, f/8, ISO 400, manual exposure.
What you’re seeing is a semipalmated plover, which Lindsay describes as a “beautiful, small shorebird that likes to bop around. Seriously, it doesn’t walk—it bops, and at an incredibly fast speed.” And if that isn’t enough to make it a challenge to photograph, “It also zig-zags.”
To get this image, Lindsay got down low, on the sand, at eye level to the bird. “Being at the same level as the bird always makes for a better composition.”His lens for this image was the AF-S NIKKOR 500mm f/5.6E PF ED VR—a DSLR lens known for its small size and light weight, which makes it ideal for bird photography. Lindsay used the Mount Adapter FTZ to fit it to his Z8, and the AF-S Teleconverter TC-14E III to extend its 500mm reach to 700mm.
“The bird got used to my presence,” he says, “and for a moment it stopped bopping long enough for me to get a sequence.” In this frame, the bird’s tail feathers appear to frame the bud, which was a possibility Lindsay previsualized before shooting a 20-frames-per-second sequence. And just in case of resumed bopping, he also matched his choice of Wide-Area AF Large with his continuous-autofocus default setting of AF-C. Which brings his AF choices into the conversation.
“There’s a feature on my Z cameras that allows me to choose an Auto AF area from six different options,” Lindsay explains. “There’s Wide Area Small; Wide Area Large; Wide Area Custom 1—you can customize the [AF] box’s shape and location; Wide Area Custom 2—another setup of shape and location; 3D Tracking; and Auto Area.” His frequent custom choices are Wide Area Small; Wide Area Large; Custom 1 (“for a little bit larger than the large”) and Custom 2 (“for a little bit larger than custom 1”). These settings enable him to place the AF box—small, large, larger or largest—over his subject based on its physical size, his proximity to it, the focal length of the lens he’s using and his framing choice for the image.
For this photo he used Wide Area Large because he knew that even though the bird was perched, it was going to fly, and eventually it did.
AF-C is an obvious choice because birds are always moving. “Even when they’re perched, they’re moving their heads to check on predators, so I keep the camera in AF-C because I want it to be continually focusing for that moment when I press the shutter release and shoot my 20-frames-per-second sequences.”
There’s one more key autofocus-based setting available on the Z6 III, Z8 and Z9, and it’s called Cycle AF Area Mode. “It means I can assign a button on those cameras, and with a press of that button I can cycle through the AF area modes I’ve chosen and get to them really quickly.”
Auto Advantage and Exposure Comp
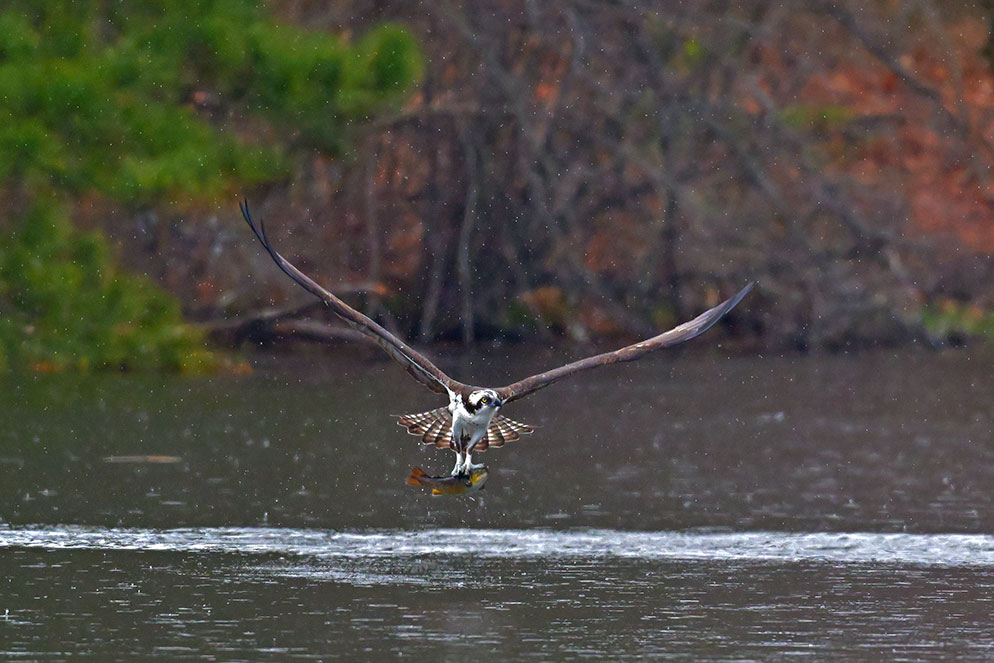
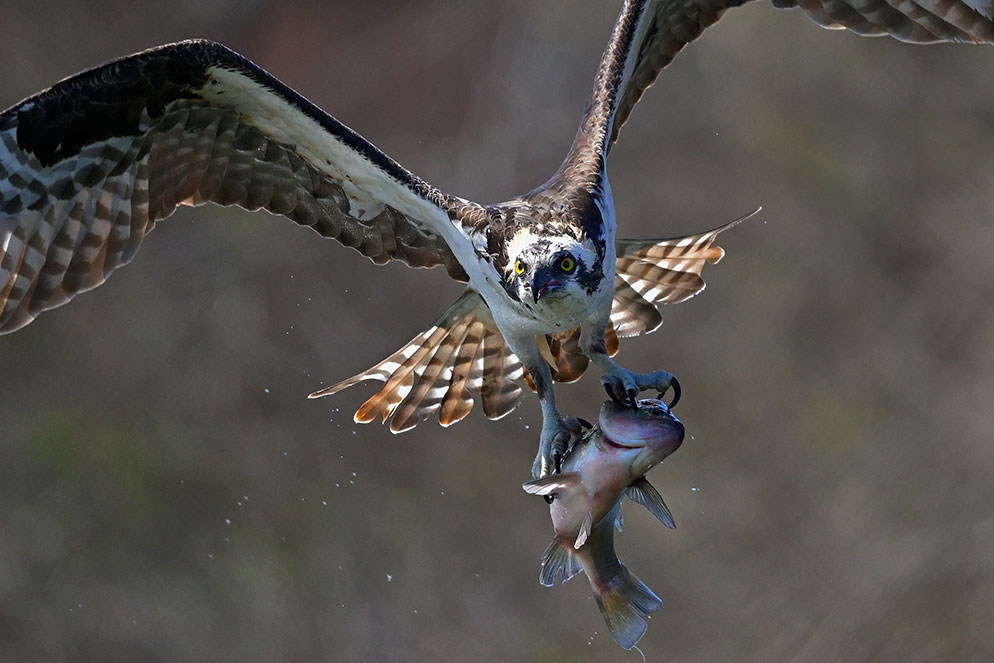
Z9, NIKKOR Z 600mm f/6.3 VR S, Z Teleconverter TC-1.4x, 1/2500 second, f/9, ISO 8000, manual exposure.
Lindsay got this photo because he knew it would happen. It was springtime, and migrating osprey were at a nearby pond that was abundant with rainbow trout. “It was drizzling—the dots you see are raindrops,” Lindsay says, “so the light was not ideal, and osprey dive at over 60 miles an hour to catch their fish, so I went to 1/2500 second for the shutter speed.”
He’d set his Z9 for Auto Area AF, which meant he didn’t have to select any AF box at all. “The camera is going to look at the entire scene and use any of its 493 autofocus points to find the bird and the bird’s eye.”
The success of this photo was also due to Lindsay’s default use of Auto ISO for all his bird photography. “What Auto ISO does is automatically select the appropriate ISO based on the shutter speed and aperture I’m using, as well as the light that’s available. Here, 1/2500 second pushed Auto ISO to 8000.” Which was not a problem because he knew the Z9’s image processor would keep noise to a minimum.
“But because ‘auto’ is involved,” he says, “the camera can sometimes be fooled by the range or contrast of light in the scene, and by the subject I’m photographing. Here, the osprey, the fish, the water and the background were all fairly dark, so I set a plus 2/3 stop of exposure compensation. The beauty of Auto ISO is that I can press my exposure comp button very quickly and dial in an intentional over- or underexposure to correct the scene, and then let Auto ISO do the rest.”There is, however, a limit to “the rest” because his cameras allow him to set a ceiling on the ISO boost. “I’m always playing the image-quality game,” Lindsay explains, “and shooting with the Z8 and Z9 I tend to put that ceiling at ISO 6400. With the software I use—Nikon’s NX Studio or other software—I get really lovely images, and shooting RAW files means I still have total control over the images in post processing.”
The ceiling for the Z6III is another story entirely. “It’s 12,800 ISO, because at 24 megapixels, the Z6III is half the resolution of the Z8 and Z9, and half the resolution means each individual pixel on the Z6III is much larger than a pixel on the other two cameras, so the Z6III gathers more light. That’s why I use it when I know I’m going to be in very low light. I’ll get less noise and I can shoot at extremely high ISOs—I have no fear of going to 12,800 with the Z6III.”
Walk Softly and Carry a Long Lens
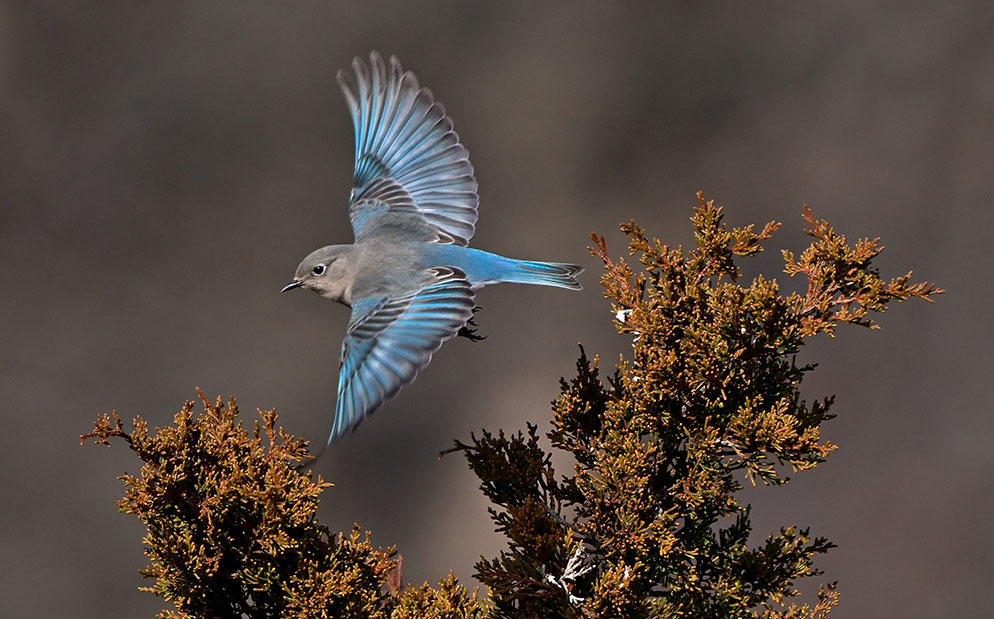
Z9, NIKKOR Z 180-600mm f/5.6-6.3 VR, Z Teleconverter TC-1.4x, 1/2000 second, f/9, ISO 800, manual exposure.
I keep the camera in AF-C because I want it to be continually focusing for that moment when I press the shutter.
“I was frustrated when I started my bird photography,” Lindsay says. “I would see the bird and walk quickly to get to it, and it would fly off. Or it would be in a tree perch and by the time I’d get into position for the picture I wanted, it was gone, and I didn’t know where it went. So, after awhile, I made it my business to understand their behaviors, and to change some of mine.”
He learned to approach slowly and sidestep branches and dried leaves. He kept his movements and gestures slow and small to avoid any that a bird would mistake for a predator coming its way. “I moved slowly, in a zig-zag pattern, and I watched the bird from the corner of my eye.”
Lindsay photographed this Eastern bluebird—“a rather small, very fast-moving bird”—with his Z9 and 180-600mm NIKKOR Z lens. “I have that lens for its tremendous reach, incredible sharpness and light weight. But even as close as I can get with a long tele like that one, many times it’s not close enough. I often know I’m going to have to crop to get the image I want to tell my story, so I need the highest image quality I can get, and with the 45.7 megapixels of my Z9, I can crop in, as I did here, and still get a beautiful file.”He used a Z Teleconverter TC-1.4x on the 180-600mm tele lens, for an effective focal length of 840mm. The result is an image of “a rather small” bird that doesn’t look small. “I wanted people to see the details—I wanted to tell more of the story.”
Telling that story links directly to technology in Lindsay’s choice of frame rate for his bird photography. “At 20 frames per second, some would argue that I’m overshooting the scene—shoot for three seconds, it’s 60 pictures; five seconds, a hundred pictures. But I’m from the Henri Cartier-Bresson school of photography, and shooting at that frame rate allows me to choose my decisive moments. Those are the frames I usually post or print and tell stories about. I could probably get a shot of a bird in a single frame and call it a good shot, but I’m looking for nuance—and that could be the direction of the bird’s face, or wing, or both. It could be the way the light is hitting the bird. The nuance moment is very often the specific reason for why this image.”
Expectations and Priorities
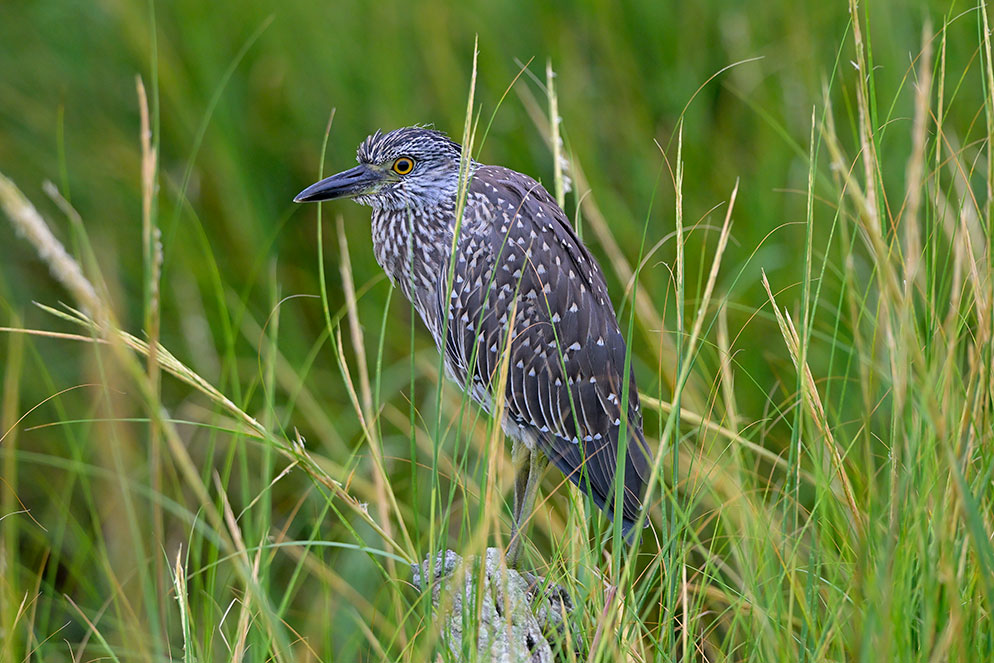
Most of the time Lindsay chooses manual exposure because he wants to individually control both shutter speed and aperture, but in this situation he chose shutter-priority in order to be able to pan with the juvenile night heron when it took off, which is what he expected it to do at any moment.
“I first set 1/4000 second for a series of images and shutter-priority for a quick switch to 1/30, 1/60 or 1/90 second for panning if I sensed the bird was about to fly.” As it turned out, Lindsay was satisfied with his bird-at-rest images, but it was good to know shutter-priority had him covered if he wanted in-flight panning pictures as well.
Because the Z6III currently doesn’t have Bird Detection mode, he chose Animal Recognition from the Subject Identification menu. “What’s really remarkable about this image is the accuracy of the Z6III’s subject ID,” he says. “The wind was blowing fairly briskly, and I was trying to time my shutter release to how the grass was moving—I didn’t want it over the bird’s eye. At 20 frames per second I got a lot of that motion, but this shot caught the perfect positioning of the grass and the bird itself that I wanted.”
Catch of the Day
Z8, NIKKOR Z 600mm f/6.3 VR S, 1/4000 second, f/6.3, ISO 1600, manual exposure.
Lindsay was at the pond, ready to photograph night herons, when a passing shadow got his attention. “It went over me, and when I looked up there were three osprey, circling. They had to be hunting, and sure enough, they started to dive. This one caught the fish, and as it came out of the water it banked a right turn and flew toward me. I actually ducked—but not before getting this super close-up view. It’s one frame of a 160-picture sequence—eight seconds of the bird landing in the water, coming up with the fish and then coming straight at me.”
Lindsay’s camera customization always includes having in-camera VR active and Sport VR set for lenses that offer it. The fast and often unpredictable movements of birds, and unexpected opportunities like diving ospreys, is the reason for that. Both stabilization settings work well with his camera supports. “I seldom hand-hold my cameras,” he says. “I’m typically shooting with a monopod, but if I know a bird is going to be in a particular spot, I’ll take my tripod, with a gimbal head, so I can pan and tilt, silky smooth, and not get arm weary being out for hours.”
Because of the bright sunlight, Lindsay had set his Z8 for a 2/3-stop underexposure in anticipation of photographing the night herons, and like everything else that day, that setting worked perfectly for the osprey catch.
Over/Under Exposure Choices
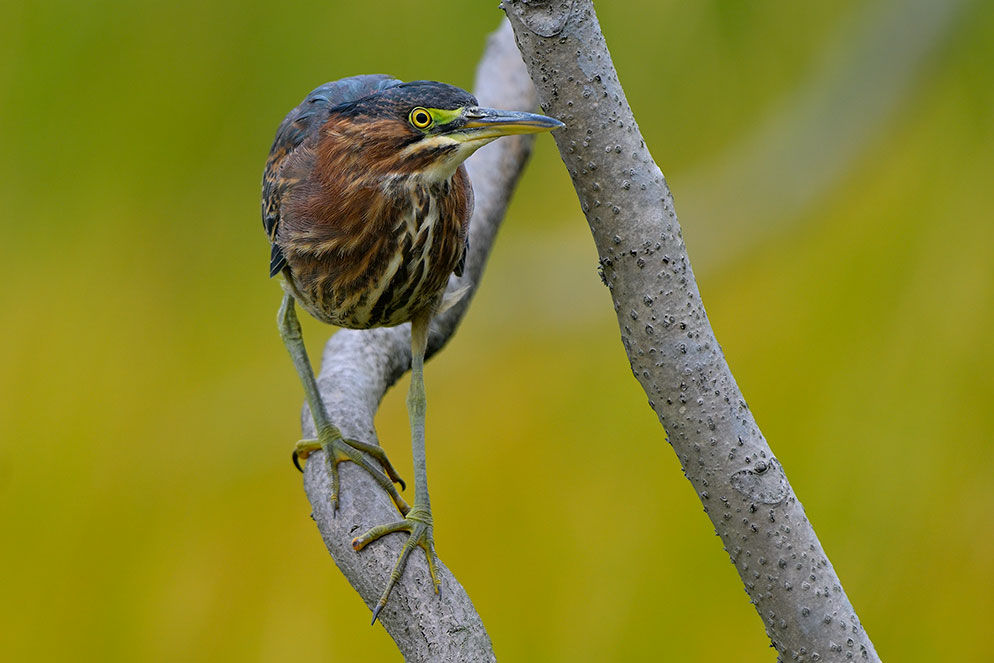
Z6III, NIKKOR Z 180-600mm f/5.6-6.3 VR, 1/640 second, f/6.3, ISO 720, shutter-priority exposure.
“Green herons are especially photogenic birds—a lot of tones and colors, blues and shades of purple—so I especially wanted high image quality for this one. That meant getting my ISO under 1000, and for that I chose shutter-priority and slowed the shutter speed. Which would have blurred the photo if the bird took off, so I made the decision to go only for images of it on the branch.”
But the really crucial decision for this image was the exposure.
“The background and the branches were light, but the bird was relatively dark,” Lindsay says. “With subject identification, the camera has an idea of what I’m photographing, but even with Auto ISO, Matrix metering and all my best intentions, the camera might underexpose.” Here, he overexposed by 1/3 stop, and he knew to do it because of two things: “I looked at the image in real time in the viewfinder, and I always have my histogram active so I can see the actual, active exposure. Both of those—real time views and the histogram’s analysis—give me the guidelines to get the photos I want.”
Another factor in getting the photos he wants has to do with his cameras’ Picture Controls menus. There are 31 Picture Controls available to him in his Z6III, Z8 and Z9, but because he wants the most natural images for his nature and wildlife photography, he sets his cameras’ Picture Control to Neutral. “That way I have control of highlight and shadow details, and if I want to make other adjustments I can do post processing of the RAW file.”
Lessons Learned
Early on, when he knew practically nothing about bird species, their habits, habitats or behaviors, it was impossible for Lindsay to get images he liked. “I was getting correctly exposed, sharp pictures, but they never really satisfied me,” he says. He knew he wasn’t making the best of his opportunities; more important, he knew he needed to create better opportunities.
“One day I said to myself, ‘These birds are not going to outsmart me again. I’m going to learn the craft of photographing birds.’” That step involved trial-and-error experience and not being afraid to make mistakes as long as he learned from them. It also meant previsualization of photos—in essence, deciding what he wanted to see. You might say that previsualization tells you how to set your camera.
Six years after getting into bird photography, every day is still an adventure for Lindsay. “When I go out to shoot, I go with the intention of doing something new or different, of making a picture I’ve never gotten before. I may have an idea of what I’m going for, but I’m ready for the unexpected, so I’m never locked into intentions or expectations. What I’m really locked into is learning something.”
A Customizer’s Game Changer
By Lindsay Silverman
Here’s how, and why, Lindsay set up his Z6 III, Z8 and Z9 for Cycle Area AF Mode.
Cycle Area Setup
When Cycle Area AF Mode came out, I thought it was a game changer for wildlife, sports and nature photographers because it made AF mode switching a quick-change reality.
One day I’m out shooting, and there’s a spotted sandpiper, a little bird in pretty much constant motion. I get down to eye level. The bird’s moving around. I press the Z9’s Video Record button, which I customized for Cycle Area control, and I’m able to cycle through 3D tracking, Auto Area AF and Wide Area Large, and use any one of them depending on how close or far the bird is and how quickly it’s darting. I see the result in real time and instantly find the mode that works best for the situation. Amazing technology!
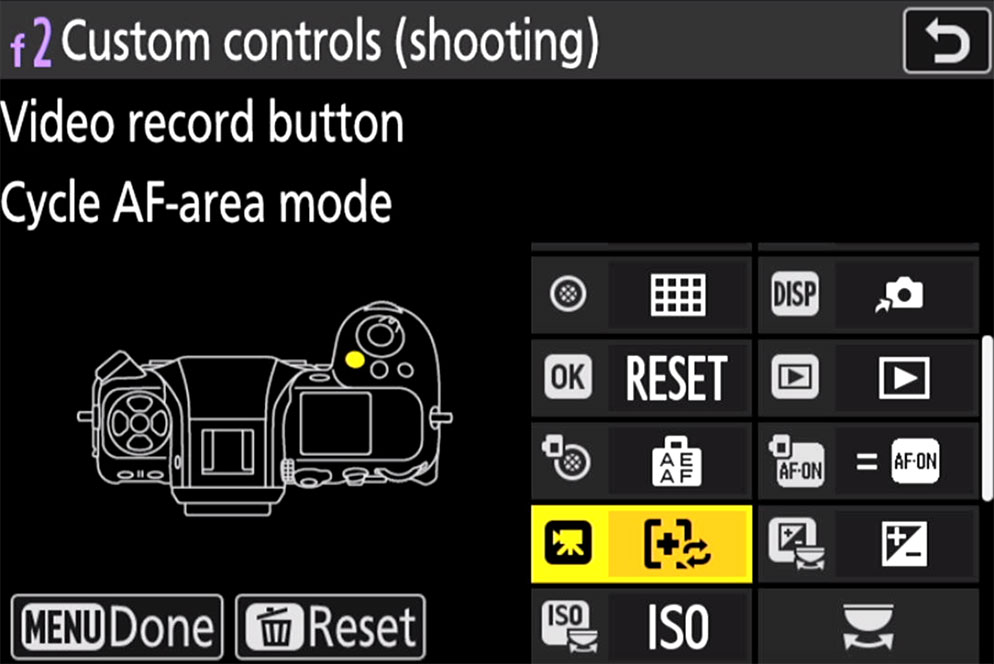
Lindsay chose Video Record to be his cycle control button.
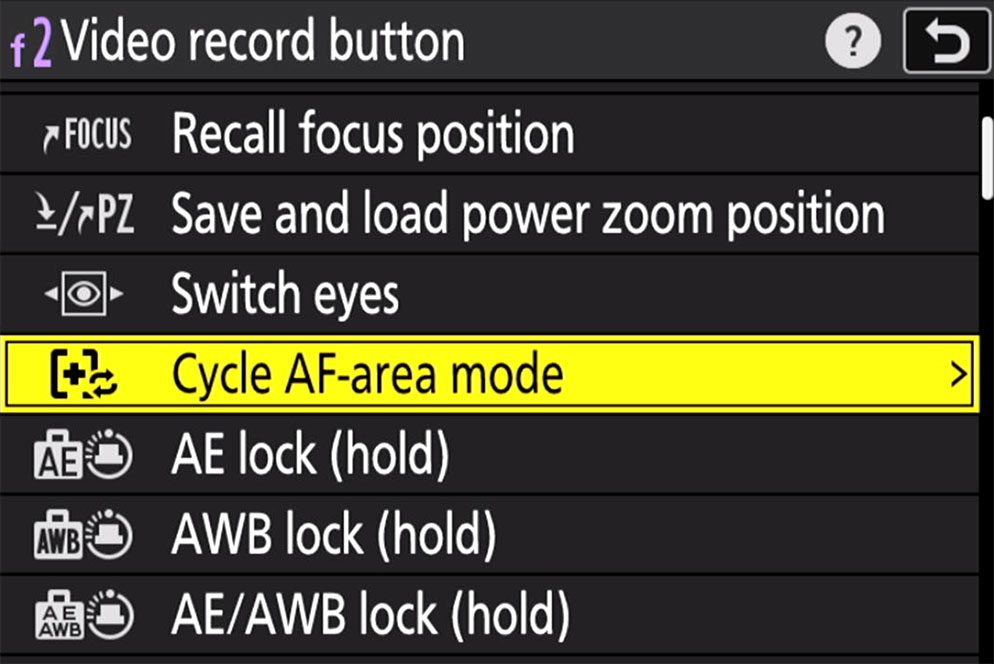
The option he chose for that button: Cycle Area AF Mode.
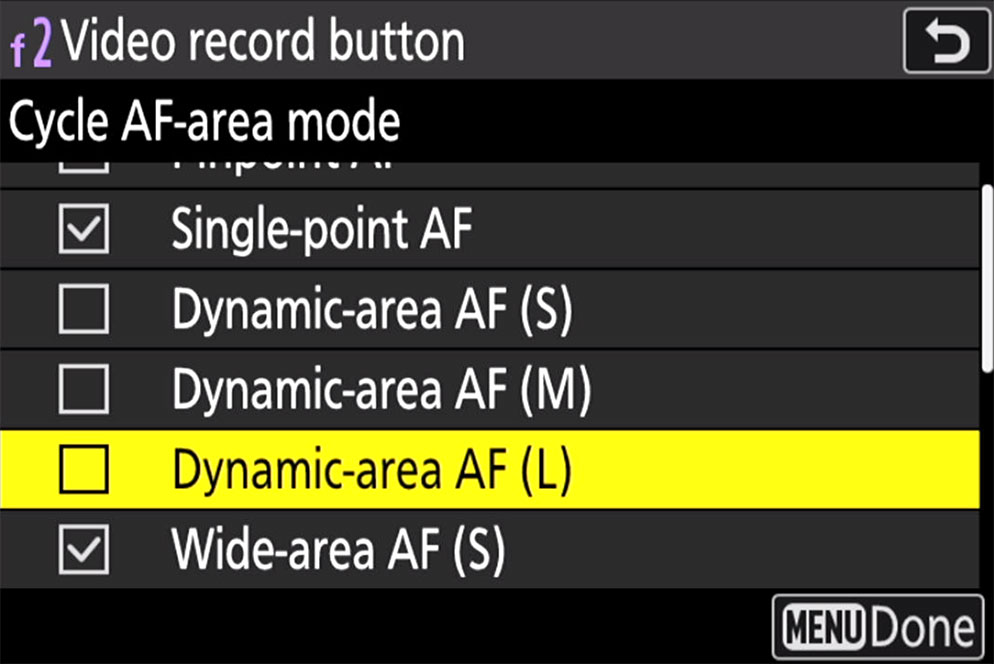
Lindsay checked only the boxes for features he wanted the Video Record button to control.
Lindsay Silverman retired several years ago after a 30+-year career at Nikon in a variety of capacities, included general manager of Nikon House, senior product manager, senior technical manager, company spokesperson and Nikon rep on special assignments with many of the world’s greatest professional photographers. When he’s not out photographing, he teaches online courses on the Z8 and Z9 for the Creative Photo Academy at Paul’s Photo in Los Angeles and for the online Santa Fe Workshops. He’s also currently putting together an online birding photography class. For more about Lindsay and his photography, check out his Facebook page, his Santa Fe Workshops listing and his Instagram page.
More articles by this contributor


