Birding Photography Tips with Nikon COOLPIX Super-Zoom Digital Cameras
Updated 2/4/25
Birding which was already a popular hobby exploded during COVID 19 due to the lockdowns. With lots of free time folks were looking for activities close to home. Viewing wildlife in your backyard, and even setting up bird feeders to draw songbirds in is simple. And, a little birdseed will go a long way towards bringing new visitors to you, ready to model in front of your camera!
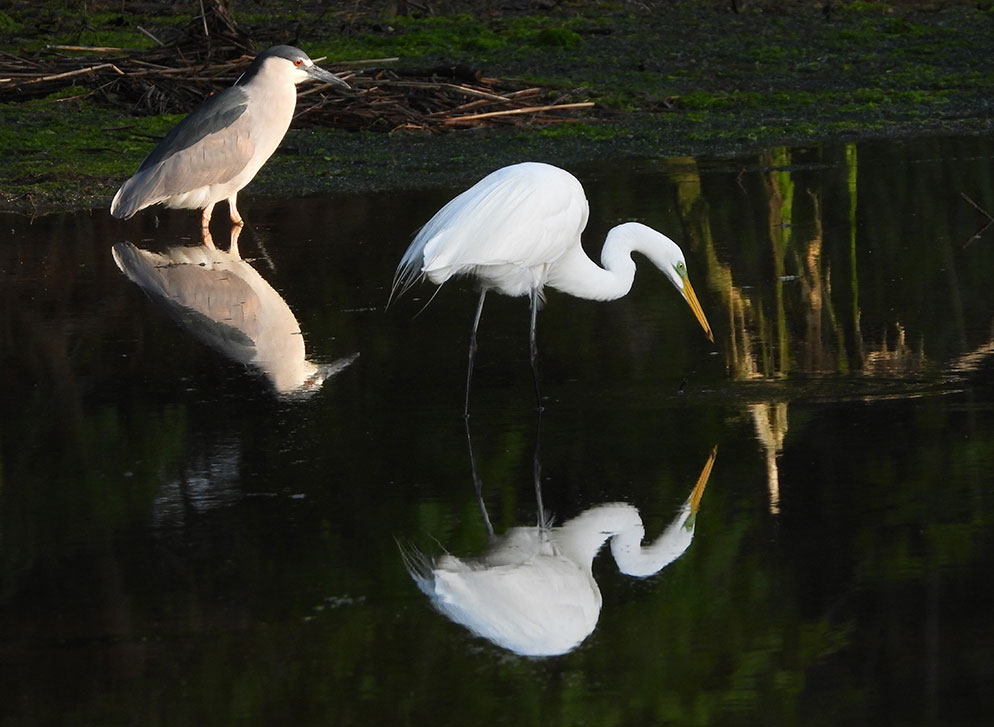
(left to right) Black-crowned Night Heron and Great Egret in late afternoon, searching for food. Both birds will very slowly and deliberately shuffle their feet to stir up prey. When you know what a bird’s feeding behaviors look like, you can anticipate the types of images you may be able to make.
Birding is a wonderful hobby that has gained a lot of new enthusiasts over the past year(s) due to COVID 19. When there’s nothing much you can do, viewing your backyard for wildlife, and even setting up birdfeeders to draw songbirds in is simple. And, a little birdseed will go a long way towards bringing new visitors to you, ready to model in front of your camera!
Hardcore bird photographers may spend upwards of tens of thousands of dollars on their gear—long telephoto lenses and cameras with high continuous shooting rates. But there is also an affordable option for the beginning bird enthusiast or the birder who wants to move from binoculars or a fieldscope to a digital camera: Nikon’s superzoom series of COOLPIX cameras, also known as bridge zoom cameras.
The superzoom camera is an all-in-one, somewhat “compact” camera in that it is a point & shoot camera, and there are no interchangeable lenses, but the zoom power is huge.
Full automatic control is built into these cameras for the newbie who doesn’t want to do much thinking and is looking to just point and shoot. You’re ready to capture your local fine feathered friends as quickly unboxing the camera, charging the battery, attaching the camera’s neck strap and inserting a media card.
But, these cameras also offer manual shooting and exposure modes which allow you to grow as your photographic abilities take you to the next level.
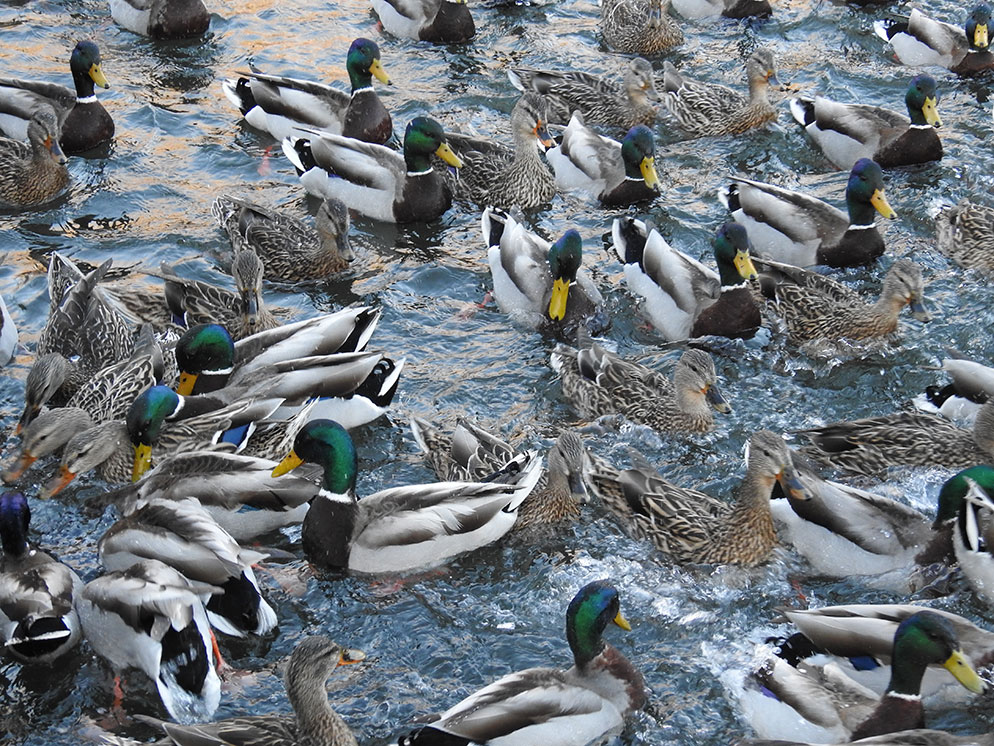
This image was taken on a cold winter day. Someone had just thrown cracked corn—which is nutritious and relatively cheap for a large bag—to the ducks—male and female Mallards—so there was a bit of a feeding frenzy, which made for an action packed image.
The biggest feature of a bridge camera (for the purposes of this article) is its super-zoom or super-telephoto lens. The Nikon COOLPIX cameras that fit in this category include: current P series models (P900, P950, P1000) and B series models (B500, B600). And, all of these cameras feature a Bird Watching Scene Mode.
The P900 and P950 each feature an 83x optical zoom/166x Dynamic Fine Zoom lens while the P1000 features a 125x optical zoom/250x Dynamic Fine Zoom. The B500 has a 40x optical zoom/80x Dynamic Fine Zoom and the B600 has a 60x optical zoom/120x Dynamic Fine Zoom. Dynamic Fine Zoom is a feature on select Nikon COOLPIX digital cameras that extends the zoom range electronically 2x with minimal image degradation.

This Mute Swan and her Cygnets (babies) were swimming in a small pond. The colors weren’t doing much for the image, so the photographer decided to convert to B&W in post-production and add a vignette.
Want a super helpful tip for taking great photos of birds with your Nikon superzoom camera? Turn the dial to the Bird Watching Scene Mode!
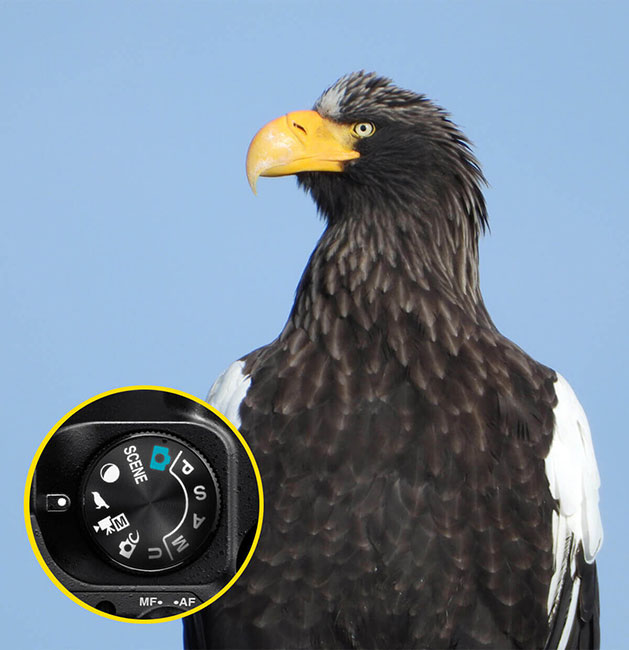
Simply rotate the mode dial to the Bird-watching mode and the camera will adjust settings to make it easy for you to take great photos.
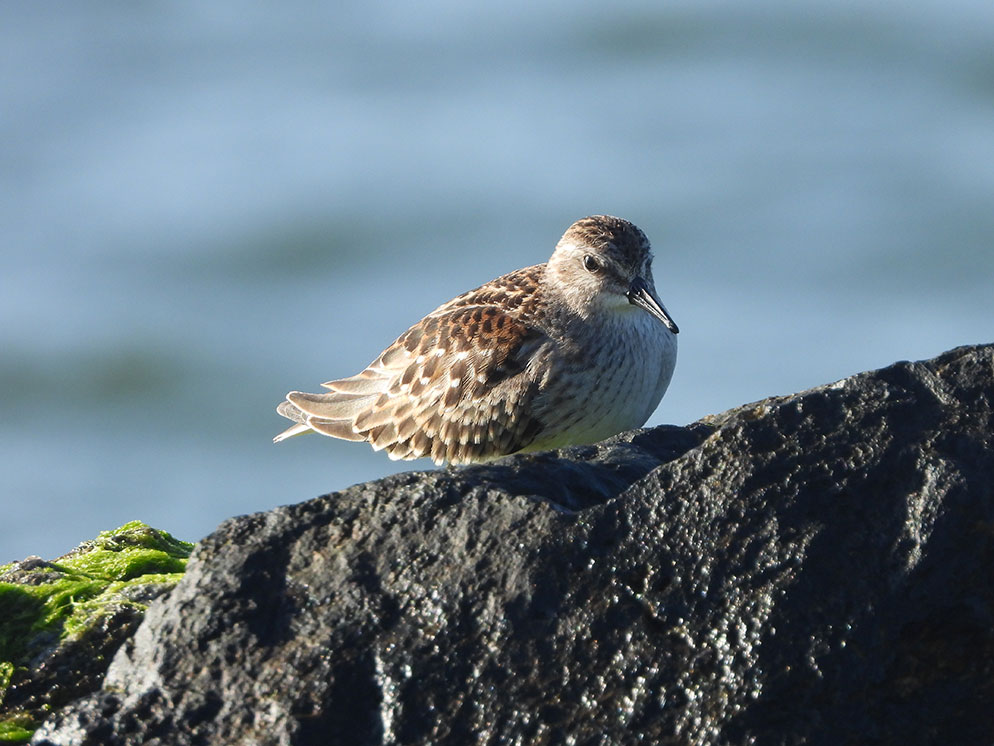
Semipalmated Sandpiper resting on an ocean jetty off Long Island, photographed on a late summer afternoon. The ocean has been turned into a soft, silky blue background due to the shallow depth of field.
Want a super helpful tip for taking great photos of birds with your Nikon superzoom camera? Turn the dial to the Bird Watching Scene Mode! This will tell the camera you’re taking photos of birds, so exposure and focus modes will be adjusted to best capture these types of images. You can find the Bird Watching Scene Mode on the Mode dial, the icon looks like a bird.
Scene modes are a great way for beginners and those folks who want the camera to do the thinking for them. Select the Scene Mode for the type of image you are shooting and it will adjust things like shutter speed, aperture, ISO, and more to assist you in making great photographs.
Looking to challenge yourself and manually set the camera’s exposure? You’ll want the fastest shutter speed for the lighting condition you’re in/ISO setting you’ve selected. The fast shutter speed will likely mean you’re going to be using a wide aperture, which is ok because it will help separate the bird you’re photographing from its background.
Light is important to all photographs but the quality of the light you’re shooting in will make a difference in your images. Go out mid-day in the summertime and you’ll find bright sun with harsh shadows. Shoot in the early mornings or late afternoon and the color of the light will be warmer and the shadows more dramatic. Know that if you go out to take photos and it is overcast, that is called flat light, and there will be few shadows.
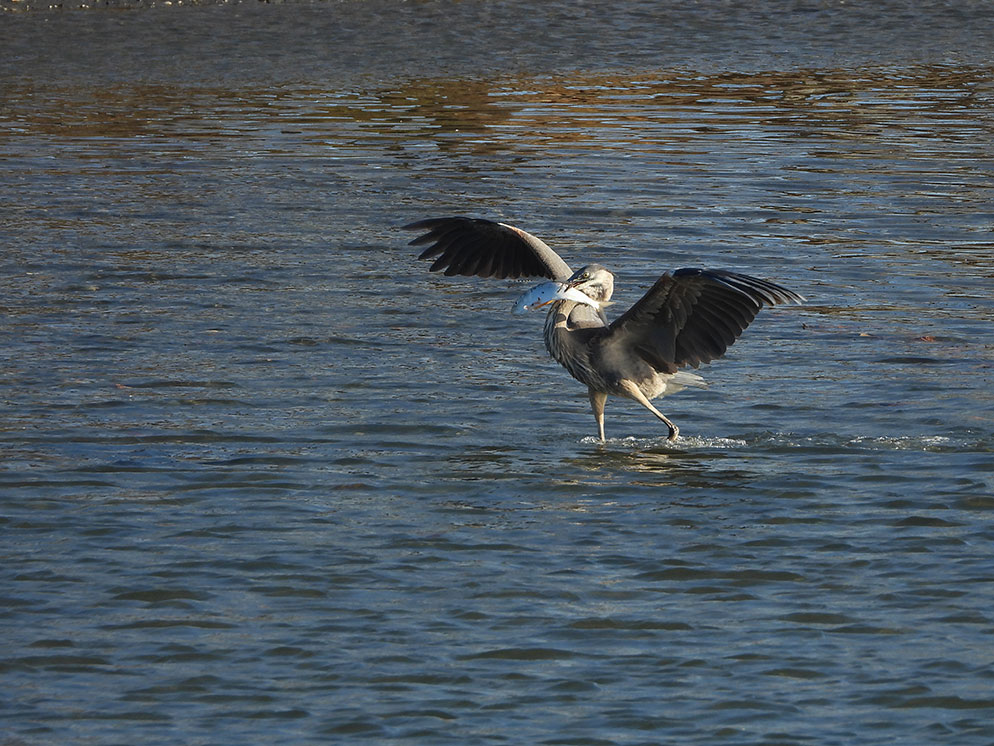
This Great Blue Heron was successful in finding plentiful fish to eat. These birds will skewer the fish with their beaks to catch them and then swallow the fish whole.
Stabilization is another consideration when shooting with a long telephoto zoom lens, especially on these super-zoom cameras. Make sure the Vibration Reduction (VR) is turned on.
You may also want to place the camera on a tripod or monopod, especially if the camera is much larger/heavier than what you have been used to using. A tripod isn’t necessary but it can be helpful when you’re zoomed out to the maximum telephoto end of the lens.
When hand-holding the camera, make sure to firmly plant your feet, bring your elbows into your body and hold the camera with your left hand under the lens barrel, and your right hand on the grip. This stance will help you from adding camera shake to your images. If you can lean against a tree or lean on a fence or railing, this will also help keeping you from adding camera movement.
This is all the more important when it comes to video. Use a tripod when available, or other means to stabilize the camera as much as you can while filming will ensure you video is smooth and doesn’t have jerky movements.
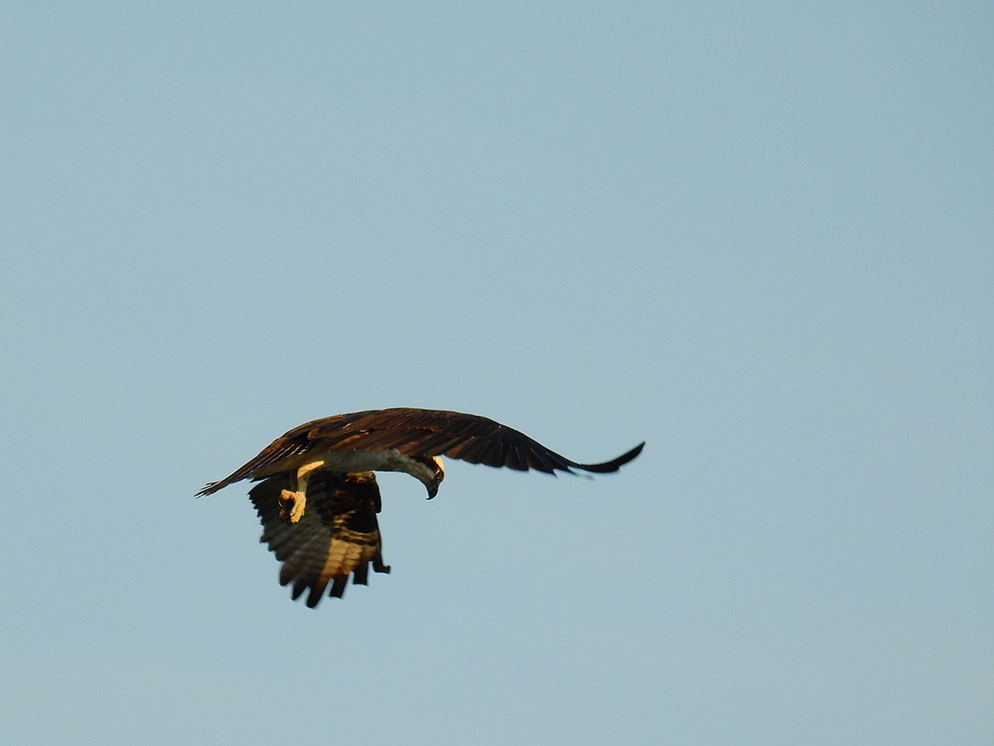
Capturing birds in flight like this Osprey can be challenging, but get easier with practice. This Osprey had just left its nest to look for a meal.
Where are the birds?
So you have your camera, now what? Depending upon where you live, you may be able to peer out the window into your backyard and see birds. Venture a little further from home and it’s likely that there are more birds calling your neighborhood parks home. Other areas to discover include local and not so local nature preserves, county and state parks. Make a trip to the zoo for really exotic birds.
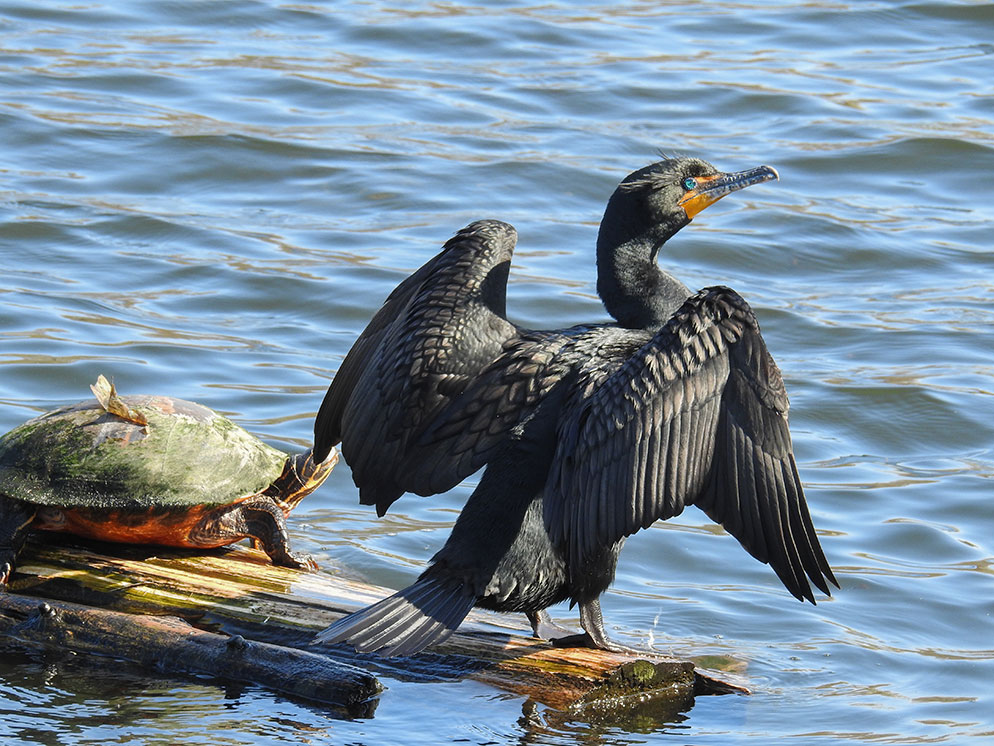
Double-crested Cormorant drying wings in sun. These birds have feathers that can get waterlogged, so they stand with their wings spread wide to dry their feathers in the sun after swimming.
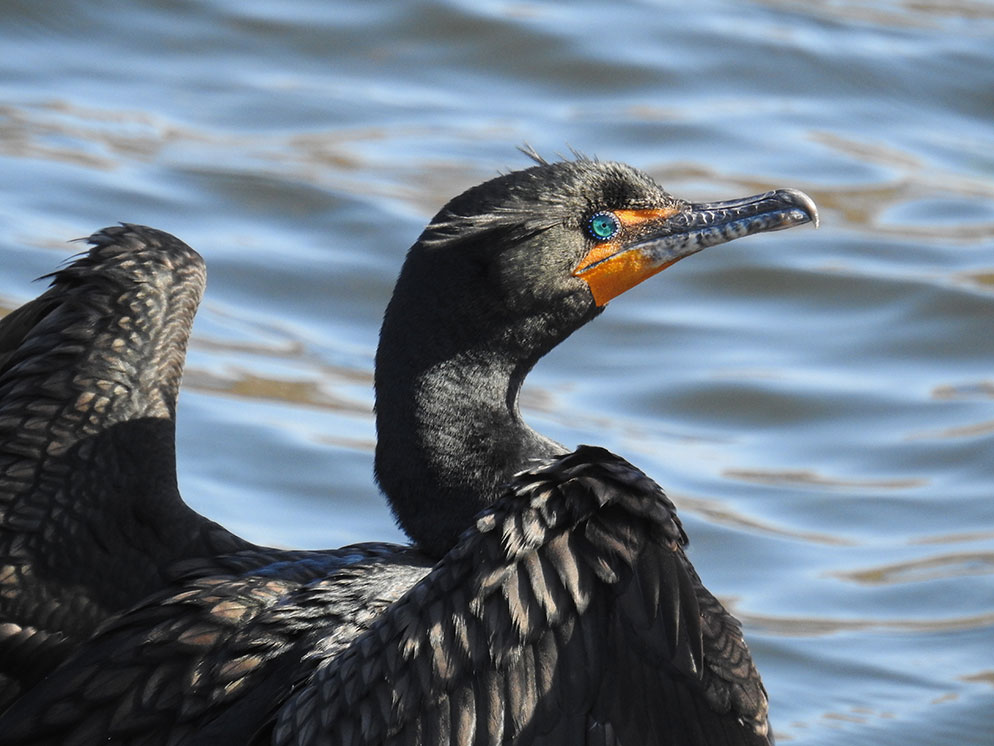
Double-crested Cormorant drying his feathers in the sun. This image is a close-up shot of the same bird. The Cormorants have beautiful eyes and look stunning when the sunlight hits them.
Camera Settings:
You want a fast shutter speed. If you’re using scene modes, the Bird Watching scene mode is an excellent choice because it was designed specifically for photographing birds. You could also try the Sports scene mode which helps you take great photos of action. If you’re setting the exposure yourself, use shutter priority which will let you set the camera for the fastest possible shutter speed.
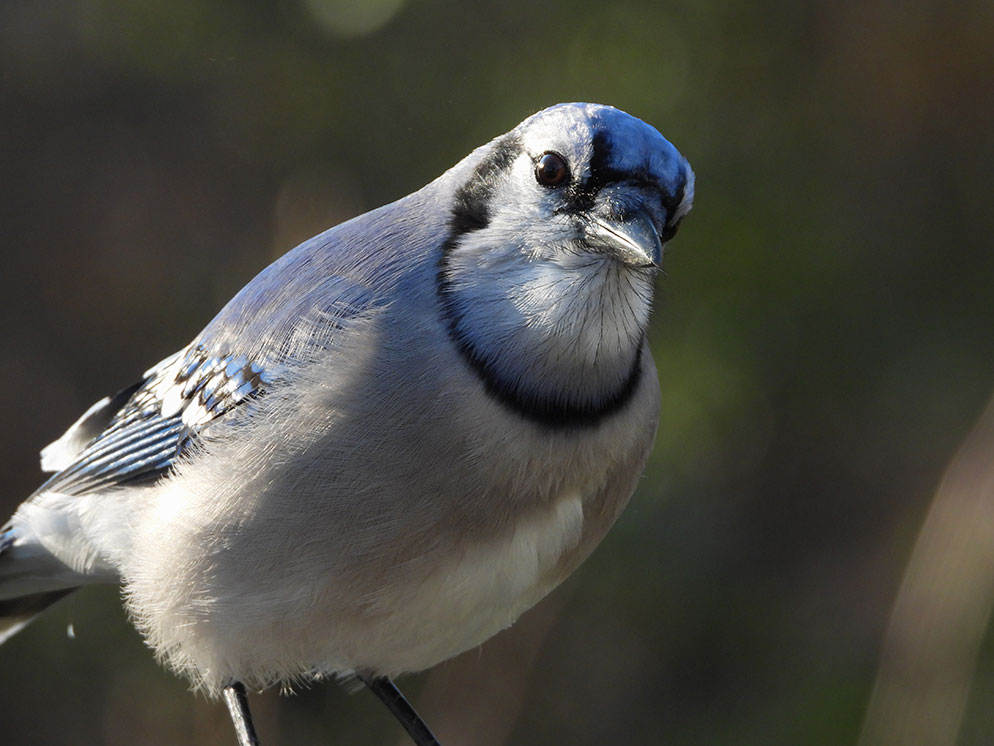
A Bluejay’s eyes, like many other birds, are on either side of its head and so they will commonly turn their heads for better depth perception.
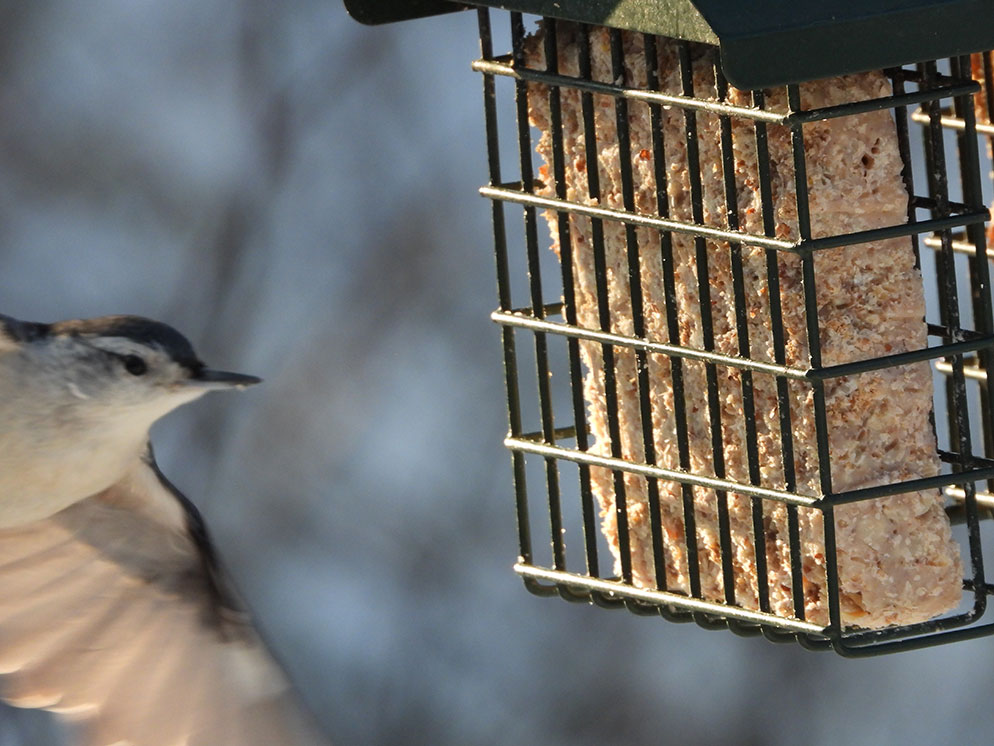
Blurred images can sometimes be a happy accident. This White-breasted Nuthatch was flying into the frame with the suet feeder when the shutter was pressed, capturing the bird in motion, entering the frame. Oftentimes when photographing birds, they’ll fly out of the frame as you’re pressing the shutter, leaving you with nothing but a blur of feathers.
Composition:
-
Use the rule of thirds for more interesting compositions. Imagine a tic-tac-toe board in the camera’s viewfinder or on the LCD and place the subject where those lines intersect.
-
Always place more “negative space” in the direction a bird is looking if you’re photographing it in profile. Doing this makes a more pleasing composition.
-
Look at your backgrounds. You may be able to move around and still photograph the bird the way you want, but with a more pleasing background.
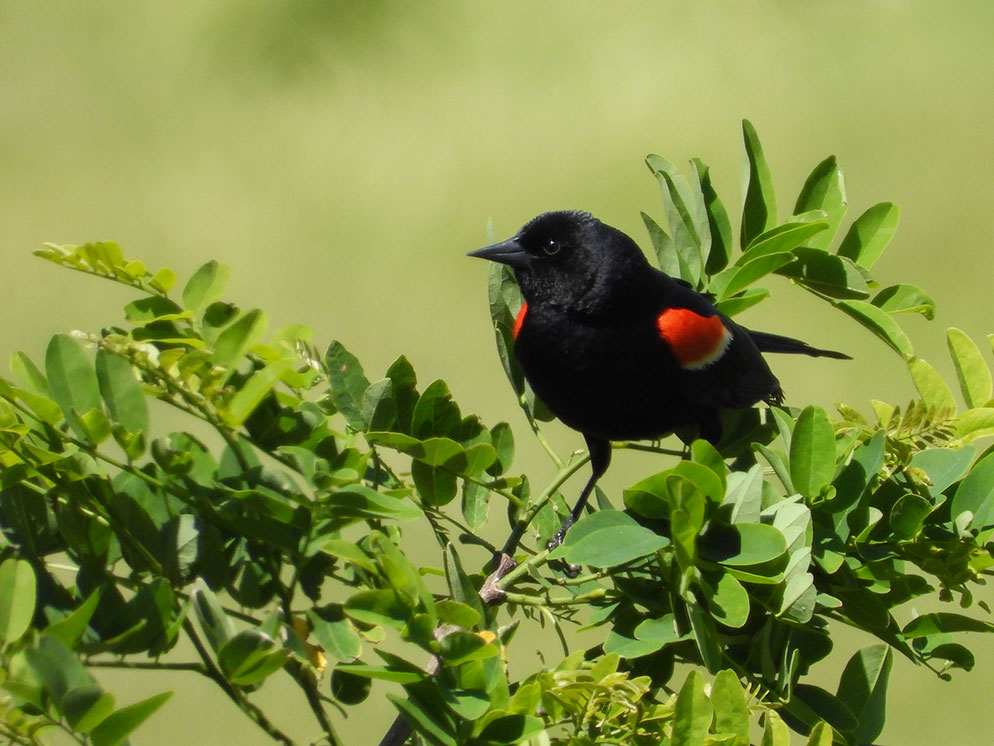
Red-winged Blackbird in a bush. These are birds that you’ll usually find near bodies of water and after being around them, you’ll soon come to recognize their call. As with humans or any animals really, having the eyes sharp with a catchlight is ideal. The catchlight is the glint of light in the eye.
Types of photographs to capture
-
Birds searching for food, or eating at a birdfeeder.
-
Birds preening themselves.
-
Birds in flight.
-
Birds on a perch.
-
Birds in silhouette. When the sun or other light source is not in the right spot in the sky to illuminate the bird, and you can’t logistically move around it, photograph the bird in silhouette. Do this by exposing for the background and the bird in the foreground will fall into the shadows. This can be a very dramatic image.
-
Details. Zoom in close for a super-tight composition that includes only a portion of a birds feathers. Detail photos like these are all about patterns and textures.
-
Birds and their babies. Be extra careful to give the parents and their chicks distance. When momma birds feel threatened they may attack. Swans are known to chase people away from their babies. Terns will fly at you in order to chase you away if you get too close—and in most locations in the US, you have to keep a certain distance from nests of certain birds like terns and plovers. These nesting areas are often roped off with signage that explains that they are protected species.
-
The ”identification” photo is a photograph of a bird that you might think of like a mugshot. It may not show personality, but to some birders (bird watchers and photographers) they like to capture these types of images of all of the birds they’ve seen, to keep a catalog.
-
Other folks look for the “action shot” of a bird hunting, feeding its chicks, flying or performing some other activity.
-
Birds in their environment. Sometimes you want to zoom all the way in and capture an image where the bird fills the entire frame; but sometimes you will want to include a portion of the environment. Including the environment in the image will give the viewer context as to where the bird is.
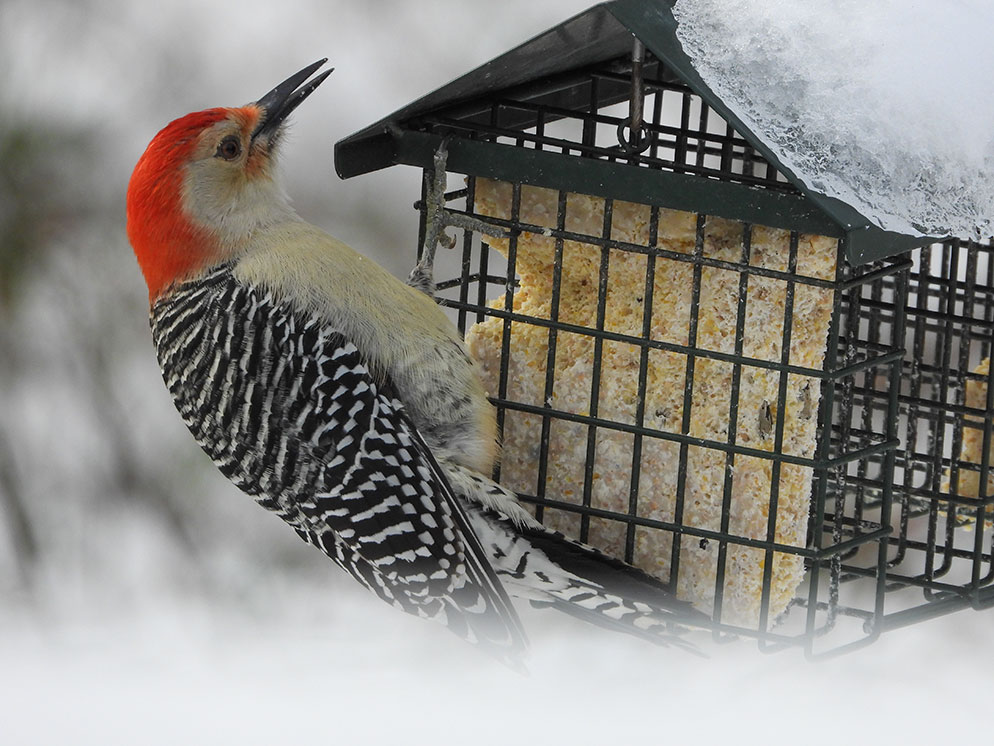
Red-bellied Woodpecker eating Suet from a feeder. The white at the bottom of the image is snow in the foreground, which added to the wintery feel of the photo so an overall white vignette was added to the entire frame.
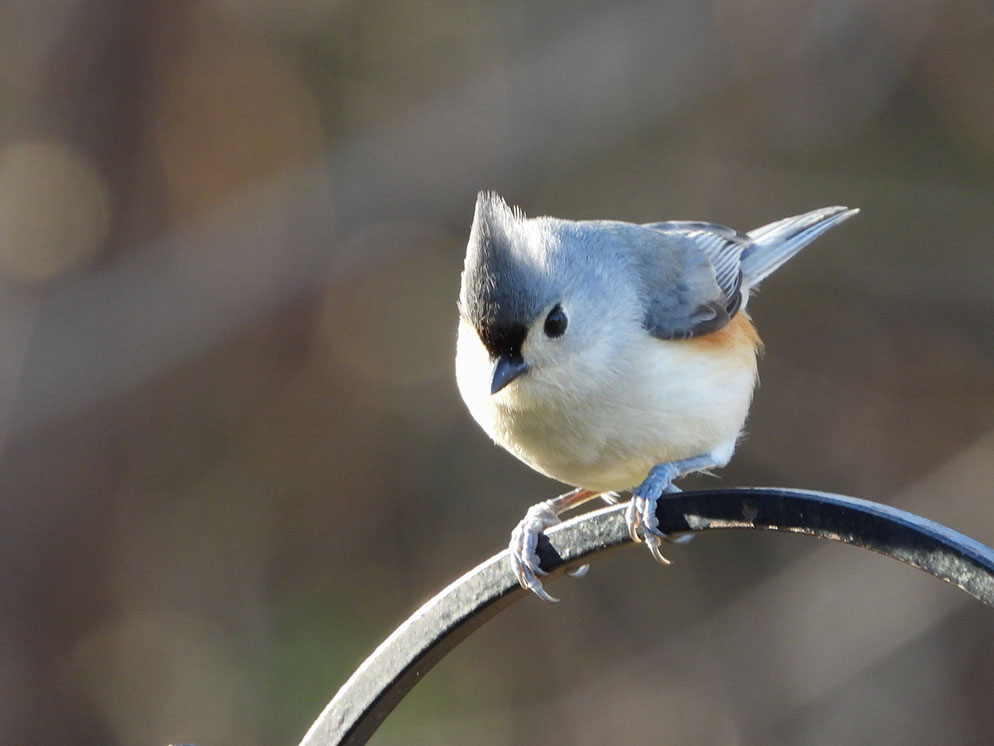
Tufted Titmouse, a common visitor to backyard birdfeeders, perched on the decorative metal arm of a birdfeeder. Here, less is more, no need to include the entire feeder in the image.
Backyard Birdwatching
Find out what the birds eat. You can find bird feeders and birdseed in many stores including pet stores, supermarkets, even hardware stores and general department stores.
If you’re going to be placing bird feeders in your backyard, think about where you’re placing them. Does that area get sunlight or is it always in shade? What does the background look like? Is it an area that is easy to see from your home or easy to quickly get to without disturbing the birds?
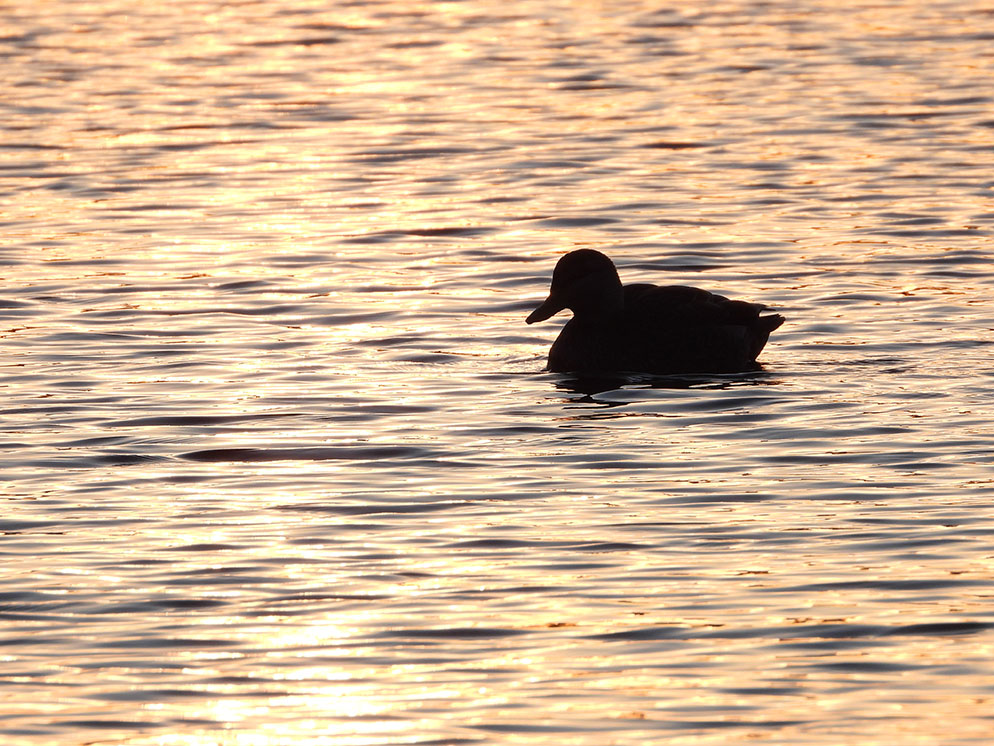
Silhouettes are dramatic. When you just aren’t in the right position for your avian subjects to be illuminated, expose for a silhouette but exposing for the background. This image was made in late afternoon. As you get to know more and more birds, you’ll be able to tell what species they are just by the silhouette.
Bird Photography Tips:
-
Do a little research.
-
There are great field guides as well as websites that will teach you everything you want to know about birds. In fact you may even find field guides on birds in your state or region of the country.
-
Apps are great for identifying birds while in the field.
- Always have your camera with you because you never know when a bird of prey like a Hawk or Eagle will fly overhead, or a Wild Turkey, Peacock or other unusual bird will cross your path.
-
Birds will often perform repetitive behaviors. Watch their daily routines. Do you see them sitting on the same perches or branches each time they visit?
- Follow local laws regarding bird nesting areas.
-
It’s likely that there will be birds that live around you year round while others are migratory and may only stay pass through.
Nikon USA’s corporate headquarters is located on Long Island, NY and we know that there are many songbirds, as well as larger birds and even birds of prey who live in our area. There are also many species of birds who live on Long Island part of the year. For instance, Ospreys fly north to Long Island in the Spring to breed and leave in early Autumn; whereas a number of varieties of ducks and other birds like Loons spend their summers in the arctic or other northern locales and fly to Long island for the winters.
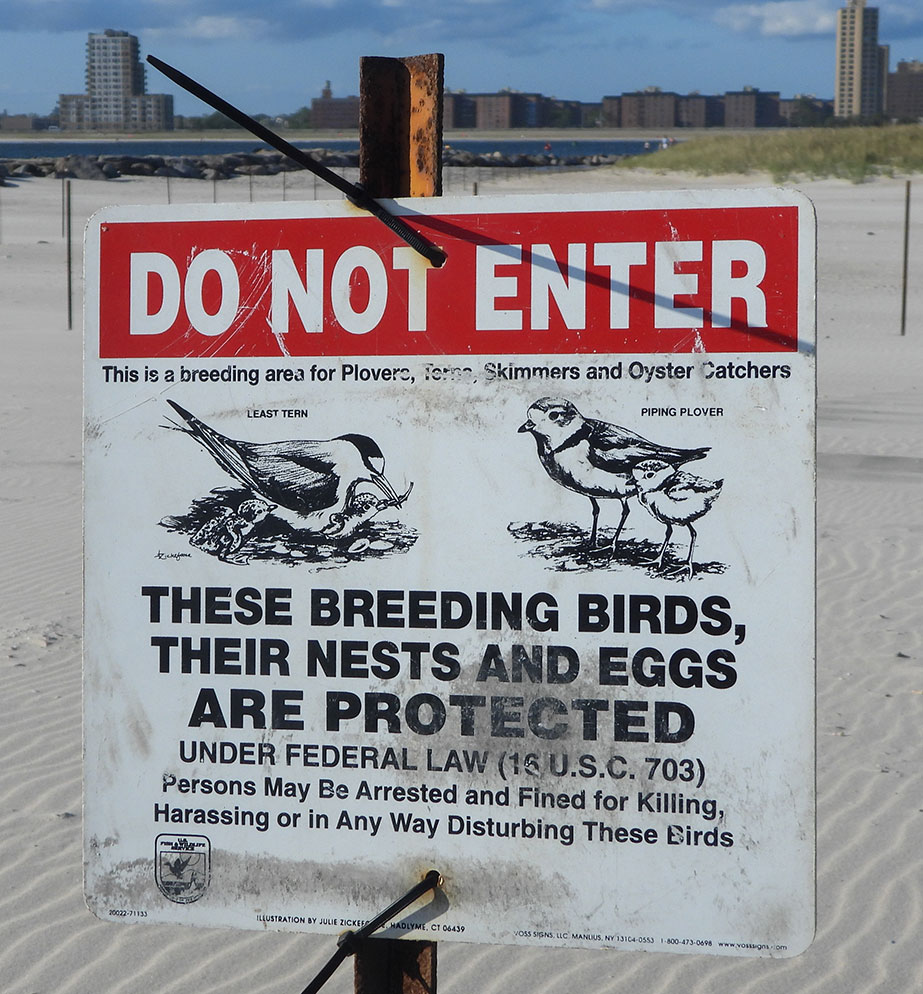
An example of the type of signage that you might come across on a beach showing the protected area for nesting birds.
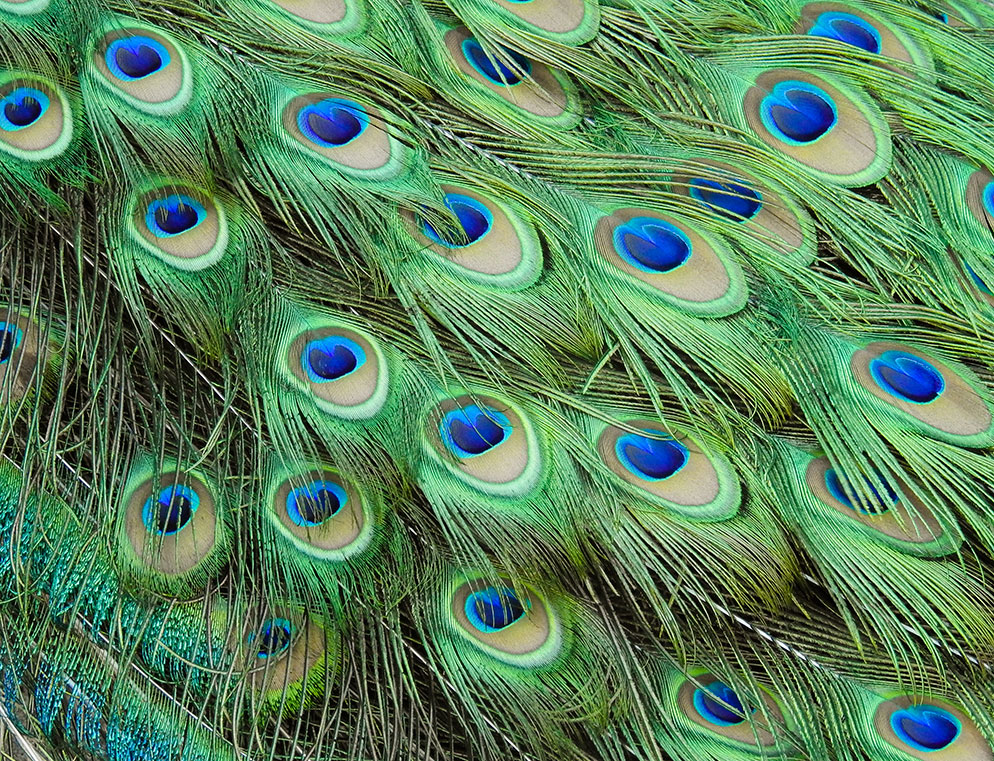
A male Peacock will strut his stuff for a Peahen, displaying his feathers. In this instance, he wasn’t doing that, so instead, the photographer chose to zoom in for a tight shot of just his colorful feathers. The best tip you can follow is to always be prepared and have your camera with you. The Peacock was wandering around the garden area of a local restaurant.


