The Basics of Flash Photography
When most folks purchase a DSLR or mirrorless camera, their first thought of an accessory to buy is normally a lens, but if you take photos of people at all, especially indoors, a flash can make the biggest improvement to your photography. The best part is that Nikon Speedlights are really easy to use, with a full automatic mode, called i-TTL, or Intelligent-Through-The-Lens metering. This means that the camera and flash will communicate with each other and figure out the best exposure that will balance both the subject and the ambient light.
When you first learn about flash photography, the number one thing to be aware of is the direction of light hitting your subject. Since most of Nikon’s accessory Speedlights have an ability to tilt and swivel, this lets you bounce light off of your surroundings, changing the direction and quality of light.
When I take a photo with a flash, my goal is to have the resulting photo look natural by mimicking how light normally falls; I don’t want my photos to scream, “I used a flash!”
If you simply point the Speedlight directly at your subject, you’re going to end up with very flat lighting that will most likely cause glare on your subject’s face and shadows behind her head. This is the type of lighting that many people are trying to get away from, which is why they’ve bought a DSLR or mirrorless camera in the first place.
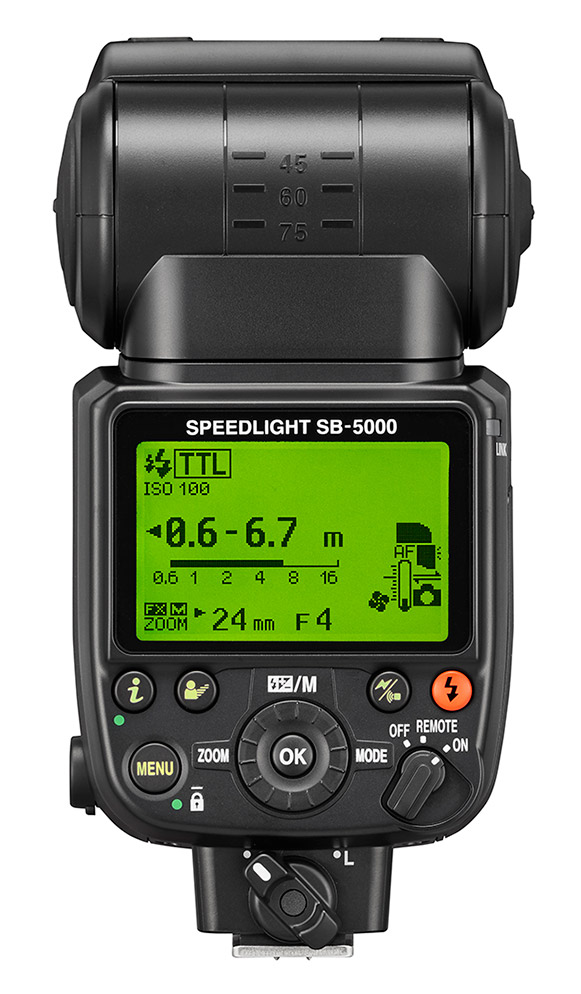
The SB-5000 Speedlight flash set to TTL mode, (the modes are shown at the top left corner of the display).

Pointing the flash directly at your subject results in flat lighting that has no dimension. It also increases the chance of glare on your subject’s face and red-eyes.
If you’re inside, the simplest way to get great results from a Nikon Speedlight is to: put it in i-TTL mode (meaning it’s in automatic mode), tilt the head so it’s bouncing straight up, and then take your shot. Instantly you’ll see the shadows have disappeared, there’s no glare on the forehead, and you’ll never get red-eyes. This is because you’ve changed the direction of light, so that instead of it hitting your subject straight-on, the light is coming down from above. By bouncing off the ceiling, not only does this soften the light, but the direction is similar to what we’re used to in our daily lives, so it looks much more natural.

Bouncing the light off of the ceiling results in much more natural looking light but it can lead to shadows under the eyes and chin.
When you’re inside and have walls and a ceiling around you, you actually have a lot of different options for where you want the light to come from. You can bounce off of the ceiling to get much more natural looking shots but you can also bounce off of walls as well. This gives you the ability to drastically change the direction of light merely by shooting off of one wall or the other.

Notice the warmer colour on the this photo, because the wall was a tan colour.

You get a lot of dimension to the photo by bouncing light off a wall but remember that your Speedlight will pick up the colour of that wall. For this photo, the wall was white.
The one thing to notice when bouncing off the ceiling is that your subject will sometimes get shadows under their eyes or neck, due to the light falling straight down. One way around this is to use both the walls and ceiling to your advantage: point the flash slightly behind you and not only will it bounce off the wall (giving you some fill light to get rid of those shadows), but it will still hit the ceiling (giving you that natural light we want). You do have to be careful with this technique. Make sure that your wall isn’t too far behind you or else the photo will be dark since the flash may not have enough power to travel to the wall and ceiling and back to your subject.

If you want natural looking light without the shadows under your subject’s eyes and chin, try bouncing your Speedlight at a 45° angle behind you. You may get some funny looks from people around you but the results will speak for themselves.
If you ever run into situations where the resulting flash power isn’t giving you the correct exposure you want but you don’t yet want to venture into changing the flash power manually—that’s where Flash Exposure Compensation comes in. Just like the camera’s exposure compensation which lets you easily brighten or darken the overall exposure in one-third increments, Flash Exposure Compensation lets you quickly tell the camera to increase or decrease the power of the flash depending on your situation.
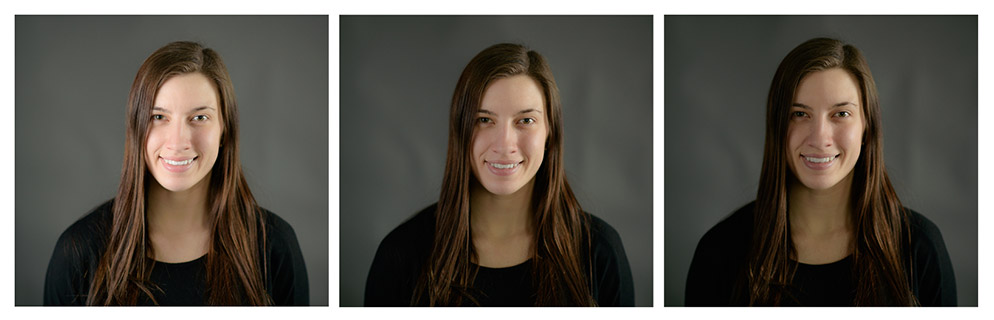
In this example, there is sunlight coming in from camera right, with a Speedlight used to balance the shadows on the left side of the subject’s face. From left to right you can see the difference using Flash Exposure Compensation: +1EV, 0EV, -1EV.
As a quick tip: whenever I’m bouncing a flash off the ceiling I almost always start at a +0.7EV or +1.0EV Flash Exposure Compensation values as I find that provides a good balance between lighting my subject well, and increasing the light falling on the background (which helps lighten the background so it isn’t completely dark).

This photo is technically well exposed for the subject’s face.

Even though the photo at left is technically well exposed for the subject’s face, I prefer the overall exposure for this photo which had a Flash Exposure Compensation value of +0.7EV. This slight overexposure brightens the subject, but more importantly adds a little bit more life to the background.
Flash photography isn’t only for professionals. Nikon’s i-TTL system makes it easy for anybody to get great shots by merely changing the tilt or swivel of the flash-head to create natural looking light, all while letting the camera figure out the correct exposure.