The Familiar Made Magical: How Stack Focus Reveals What the Eye Often Misses
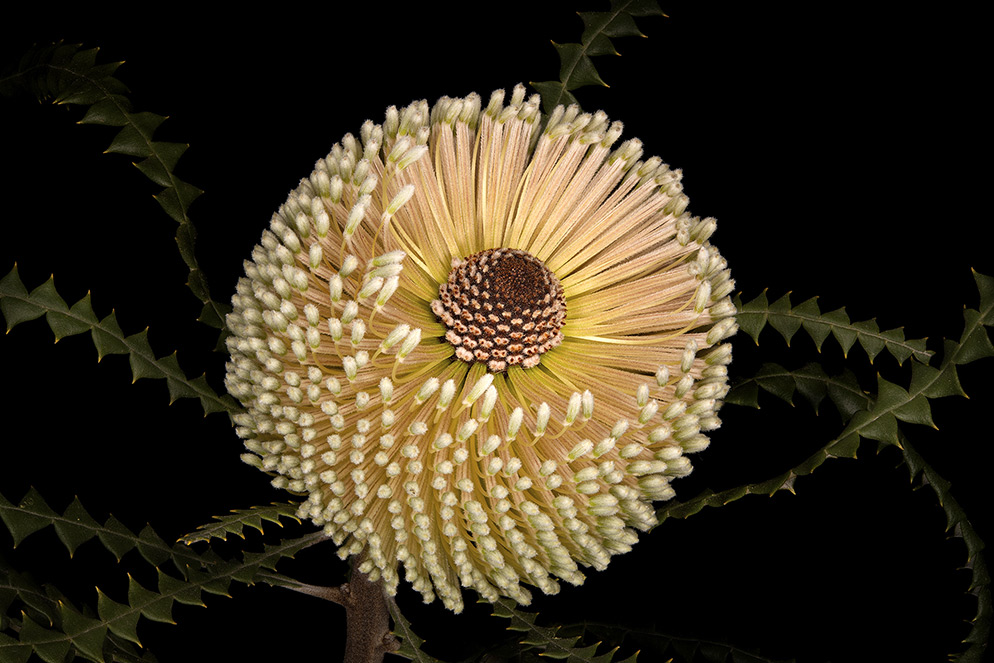
Banksia speciosa, commonly known as the showy banksia, is a species of large shrub or small tree. In Photoshop, David dodged the background to reduce the effect of the flash on them—"I wanted them to have dimension, but not brightness," he says.
There's focus, and then there's stack focus.
Stack focus, which is also often referred to as focus stacking, is a technique that produces close-up images of depth and detail beyond that seen in conventional close-ups.
What stack focus does is extend depth-of-field in macro photography, and if you're not familiar with the technique, you might wonder why you'd want to do that. You could set f/11, f/16 or f/22 and get a great deal of depth-of-field. Stack focus, though, is a totally different approach and a means to an end beyond familiar close-up images.
Stack focus results in the kind of striking photographs you see here. To create them, award-winning fine-art photographer David Leaser took multiple images of his floral subjects at different focus points. Then, using software, he layered the separate photographs to create a revealing, stunningly sharp, detailed composite image.
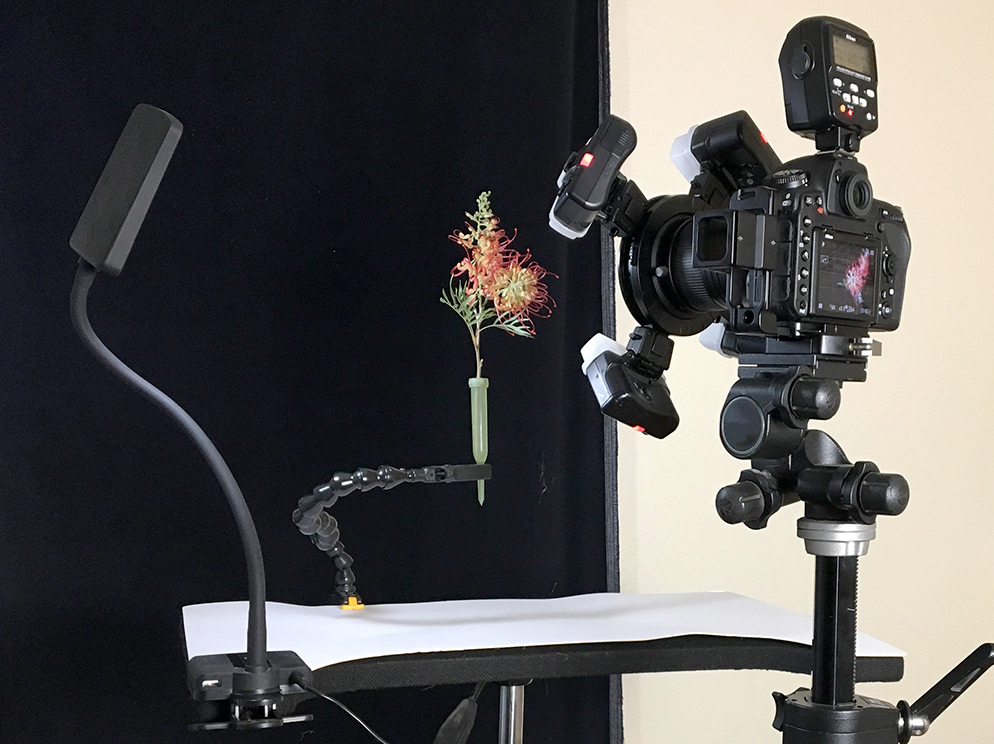
David Leaser's home studio setup with the D850 and 60mm Micro NIKKOR, SB-R200 Speedlights and the SU-800 Commander in place. Note the LED modeling light at left, clamped to an inexpensive tripod, which he uses during focusing, then shuts off before photography begins. He uses Wimberley PP-200 plant clamps "to keep the plants steady and position with precision," and floral water tubes for single stem cut flowers to keep them hydrated. All the photos with this article were taken with the D850 and the AF-S Micro NIKKOR 60mm f/2.8G ED lens at 1/60 second, f/8 and ISO 64.
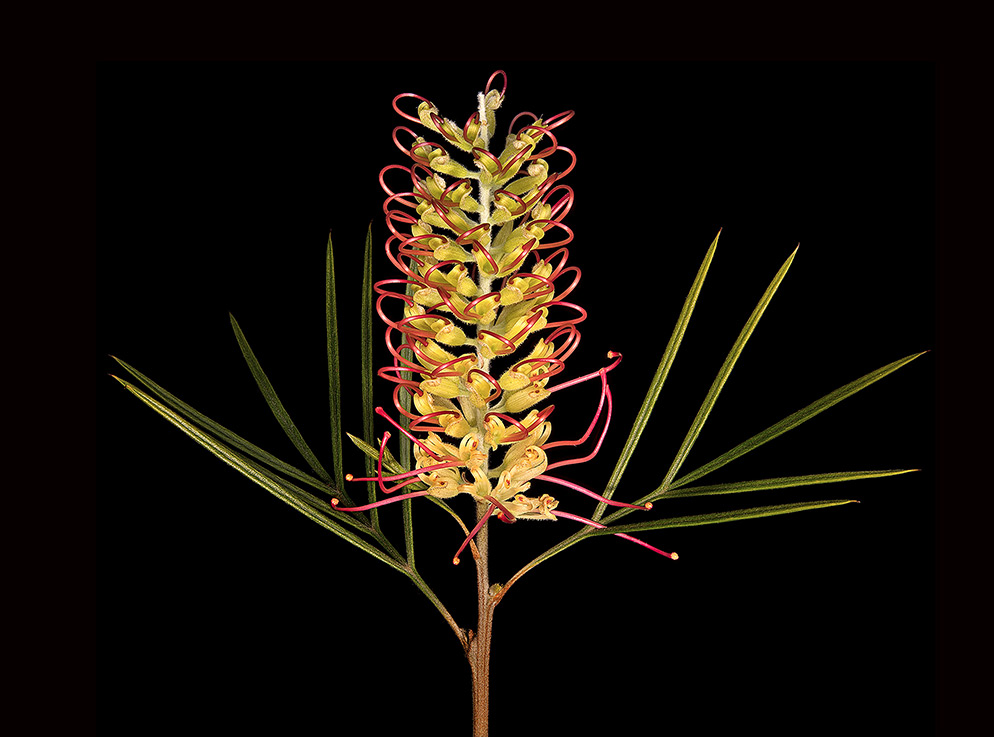
Grevillea is a diverse genus of evergreen flowering plants. "The red stamens started to open through the process," David says, "but fortunately there was no motion recorded in the images."
Back Story
About ten years ago, while shooting landscapes in the Amazon, David found himself captivated by "the tiniest of living things on the rainforest floor," including the smallest of flowers. Realizing that even the best close-up lenses couldn't get the depth-of-field he could see in these flowers, not to mention the details even the eye often misses, he started experimenting with stack focus photography. What he wanted to capture and share was "a bee's-eye view of nature," and focus stacking was the way to do it.
When he first used the technique, he'd mount his D3X and 60mm Micro NIKKOR lens on a motorized rail device that would move the camera and lens toward his subject at preset intervals. The system did the job: the rail moved the camera and lens, in precise increments, closer and closer to the subject, taking pictures at each interval, with each image capturing a different area of focus.
Today, David uses the D850 because whether you call it stack focus or focus stacking, the capability is built into the camera. (it's also in Nikon's full-frame mirrorless cameras. With the new Z 6 and Z 7 mirrorless cameras, focus shift shooting adds a new feature called “Peaking Stack Images”. This feature, when turned on, will employ focus peaking to create a black-and-white preview stack that can be used to check focus after shooting.) The D850's stack focus feature moves the elements in the lens; the camera itself does not move. The advantages over the rail system are fewer moving parts, fewer settings, less gear to carry when shooting on location and no need for power cords or batteries for the rail.
"The results I get with the D850, considering my concern for the art of the process and the ability to communicate what I see, are equal to the rail system results," David says. In fact, in one respect the results are better because turning lens elements rather than moving a camera reduces or often eliminates a parallax problem the stacking software had to contend with. (Parallax, in photography, is the difference between a subject seen through the lens and the way it’s captured by the sensor. The difference occurs most often as the lens moves closer to the subject.)
Using the D850 means the process of taking the individual pictures that will comprise the composite is pretty much automatic. But it's not push-button automatic—there's equipment to set up, menu selections to make and test shots to take. But in David's view, that's where the creative part of the process comes into play.
If you're interested in creating your own focus stacking photos, or if you've been doing it using the motorized rail system and would like to simplify the process, here's how David gets it done.
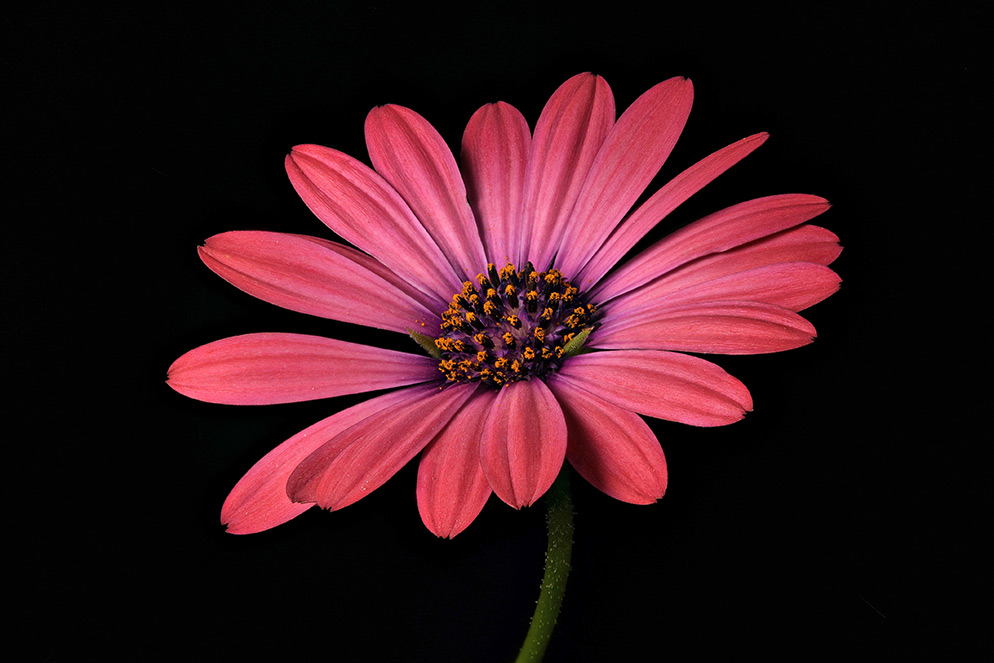
Osteospermum, known as the African daisy, is a genus of the sunflower/daisy family. "This image is one of the collection created at the Huntington the first time I photographed with the D850," David says.
The Setup
David's gear for stack focus photographs includes an AF-S Micro NIKKOR 60mm f/2.8G ED lens on his D850; a super-sturdy tripod (it's a Manfrotto 3251); a small, clip-on LED light; a background surface (he used black velvet for the photos here); and stacking software (his choice among available programs is Zerene Stacker).
And one more thing. If you've seen the pictures accompanying this article, you've probably realized that the most important factor in their creation is light. More precisely, the control of light.
We've got that covered with Nikon’s wireless close-up Speedlight system. It's available in two configurations—the R1, with two SB-R200 Speedlights, a Speedlight attachment ring and a selection of lens adapters to fit the ring onto; and the R1C1, which includes two SB-R200 Speedlights, the SU-800 Commander unit, the attachment ring and lens adapters. You can add additional SB-R200 Speedlights, which is what David did; his flash setup most often features five SB-R200s. "The number of Speedlights I use is dictated by the size and the closeness [to the lens] of the subject," he says. "I want light on all sides of the subject, and if it's really close to the lens, it's important to get light to the bottom of the subject."
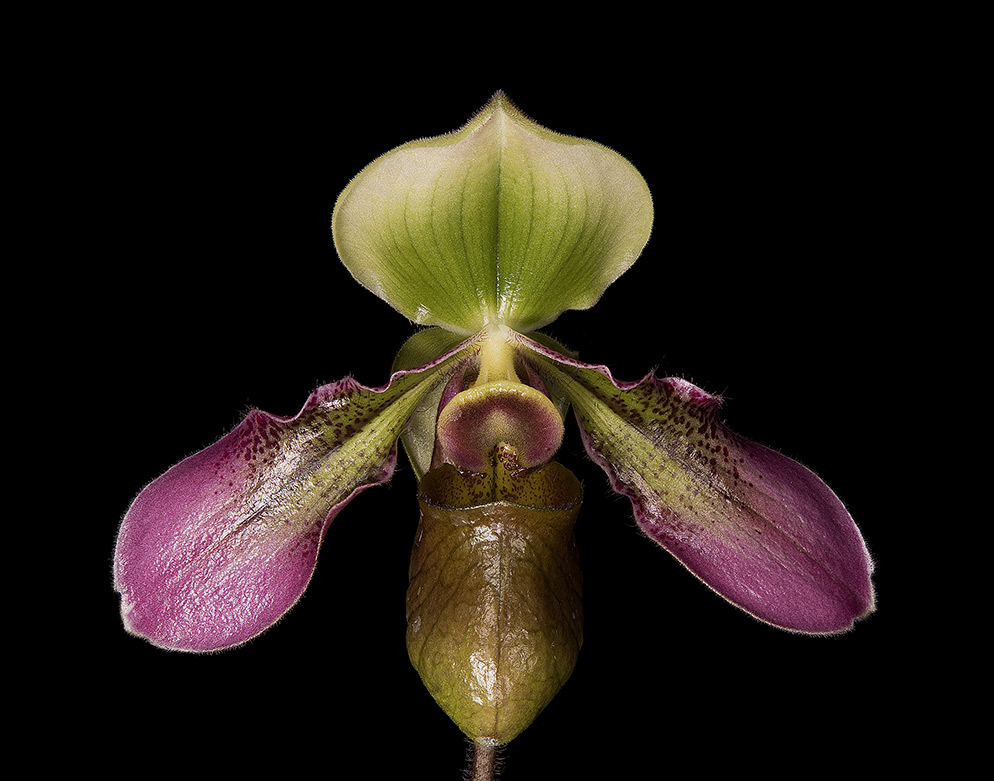
Paphiopedilum hookerae, commonly known as a slipper orchid, is a species endemic to Borneo. "I particularly wanted to see how the D850 would capture and display details, but since it was the first time using the camera, I didn't expect to produce images I would add to my portfolio. But I realized I'd been able to do both: show the detail the D850’s stack focus technology can achieve and capture images of nature which move me—and may move others."
The Menus
Everything is controlled from the camera, and getting the camera into stack focus mode is pretty straightforward, though you'll want to check the D850's manual, too.
First, access the camera's Focus Shift Shooting menu, which will offer settings for step width, the number of shots and the time interval between shots. Step width controls how far the lens elements will move to photographically get closer to the subject; David selects 3 from the scroll menu. Next, you'll select the number of shots the camera will take for your composite; David typically chooses from 50 to 125 depending on the size and depth of his subject. Selecting the time interval will determine how much time will elapse between shots. "That's important because the flash units recycle very quickly, but you do have to allow for that," David says. He sets that menu to 00, which is the default for five-frames-per-second.
Your choices might be different depending on your subjects, their size and the Micro NIKKOR lens you're using. Nikon's NPS site offers a wealth of helpful tips for your decision making. You can start here, then check out the charts for number-of-shots suggestions here. You can also read more about focus stacking with the D850 here.

A Goldfinger pincushion protea flower, a genus of South African flowering plants, sometimes also called sugar bushes. David didn't use the entire stack of images here because the green leaves behind them looked so distracting he deleted the last images in the stack—the sharp frames—leaving the early blurry ones to soften the leaves' overall effect in the photo.
Tips and Hints
Here are some of the things David's learned along the way:
-
Camera battery at full charge so you're sure to capture 120 or more shots.
-
VR off because the camera's on a tripod.
-
David's standard settings for his stack focus photography are 1/60 second, f/8, ISO 64.
-
In the Focus Shift Shooting menu, be sure the Silent Photography option is off. If it's on, it will disable flash photography.
-
David suggests turning on Exposure Smoothing—the setting's available in the Focus Shift Shooting menu. "Smoothing results in smoother, more consistent exposures," he says.
-
Focus is critical. Focus shift mode on the D850 automatically sets the camera for autofocus, but before David selects that mode he manually establishes the all-important starting focus point. He's modified his D850 with a Nikon DK-17M Magnifying Eyepiece, which makes it easy for him to see details through the viewfinder. "I also use the LCD screen preview and zoom in to ensure sharp focus," he says. And he sometimes uses a Hoodman H32MB HoodLoupe Glare Free Viewing Loupe Optical Viewfinder for DSLR 3.2-inch LCD displays to magnify the display. It's worth the extra effort; as we said, "Focus is critical."
-
So is distance. Just how close to his subject is the front element of the lens in his setups? "It can be very close—within inches, depending on the size of the flower, but not so close that it's hard to illuminate with the flash."
-
Which means a test shot is vital. "I take single test shots to determine the distance between the lens and the subject for the best illumination. The lighting is the most important thing to test. I know the focus is going to work—lighting is the big issue."
-
Movement. You don't want any. Not when flowers or plants are your subjects. Heat coming up in the room, the air conditioning kicking on, air seeping through drafty window frames—the delicate parts of the flowers and plants will move. "A typical session takes about 15 minutes," David says, "and I'm always thinking about air movement, my movement and camera shake. And a flower is a living thing, and living things move on their own. A flower starts to wilt as soon as you pick it, and I do these photographs in a dark room because if a flower sees light it will move toward it." In addition, he brings his subjects into the dark room for anywhere from a half to a full day before photography to acclimate them to the dark. How much time before depends on the flower and how perishable it is. A little research and experience with your subject will go a long way to determine acclimation time.
-
The Trouble with Tulips. "They will respond to the flash," David says, "and will move toward the lights. Tulips are the most difficult flower to do."
-
The stacking software can help movement problems by making minor corrections for slight motion. "But that's why I take up to 150 pictures, sometimes more—so I can pull out the bad images and the composite will still work."
-
Location. A quiet, darkened room, like the one made available to David at the Huntington Library, Art Collections, and Botanical Gardens in San Marino, California, where he made the photos you see here. "The Huntington holds more than a dozen of my works in their permanent collection and displays many of them," David says. Because of the quality of his work, he has established a long-standing relationship with the Huntington, and they supply the subjects of his photos. "Photographers skilled at this technique can make their own inroads," he says. "Botanical gardens can be good clients. You can buy flowers at the supermarket, work at home to get evidence of the quality of your work and then approach a botanical garden. Many gardens need people to photograph their collections—I think there's a real opportunity there."
-
Finally, focus stacking isn't limited to flowers and plants or the great indoors. Subjects include insects, butterflies, coins, stones, tree bark, jewelry, seashells, rock formations and pretty much any found objects with complex structures and textures. The familiar made magical awaits.


